

In my last column, which delved into a couple of useful sharpening techniques, I promised additional techniques this time around, and I’ll make good on that promise. But first we should turn to one of the important questions about sharpening: When in the image-editing process should you sharpen?
The Traditional View
Conventional wisdom has it that you should make sharpening the last operation before converting to your output color space, but there’s a problem with this approach. Sharpening works by increasing local contrast along edges. Typically, after sharpening some pixels that were almost white become pure white, and some pixels that were almost black become pure black. The black ones aren’t too much of a problem, but the white ones can be: Depending on your output device and how you’ve sharpened, sharpening can make light pixels appear whiter than they should, so that edges or diffuse highlights look artificial.
The problem is that almost all our printing devices have a minimum amount of color that they can lay down, and depending on the process we’re printing to, that minimum amount may be quite different from pure paper white. An extreme case would be newsprint, where the minimum printable dot is typically in the 8-to-10-percent range. The “transition zone” — the zone between the smallest printable dot and paper white — is huge.
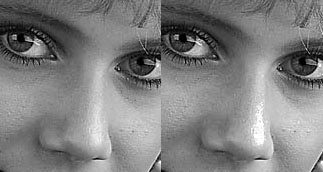
When we print images, we want to use the smallest printable dot for our diffuse highlights — highlights that still contain actual detail — and reserve paper white for small specular highlights such as the glints on metal or glass, which lack detail. If instead we drive our diffuse highlights into the transition zone, as in Figure 1, we typically produce an ugly result. Note the severe case of “highlight psoriasis” in Figure 1 on the model’s nose in the image at the right. In the image on the left, we’ve maintained a dot in the detailed highlights, reserving paper white for the small specular highlights on the necklace.
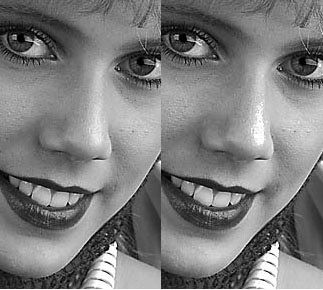
Figure 1: In the image on the right, diffuse highlights are too white, leading to an artificial look.
Controlling highlight behavior in the transition zone is critical to producing good images, and is a topic deserving attention in its own right. But it’s also one of the things we need to keep in mind when we sharpen images.
Injudicious sharpening may not produce results quite as ghastly as shown in Figure 1, but it can result in random white speckles along high-contrast edges when you do it as the last operation before converting to output space. Hence my recommendation is that you sharpen before setting your highlight and shadow dots, which should probably be the last thing you do before converting to output space.
Of course, both shadow/highlight dot setting and sharpening for output are dependent on the specific output process — the paper, the inks, and the mechanism used to apply one to the other. If you’re the type who prints the same image to many different kinds of output (even if the difference is only between matte and glossy papers on an inkjet printer), you may find sharpening from scratch each time you make a print a fairly tedious process. The sharpening technique I present below can help reduce the drudgery, partly by splitting the sharpening process into two distinct passes.
Two-Pass Sharpening
Several years ago, I started playing with the notion of doing two separate sharpening passes. The first, pre-sharpening pass aims simply to restore the sharpness lost when turning the image into pixels, whether by scanning or direct digital capture. The second pass is then tailored to the particular printing process that will be used.
Separating the two passes lets you address two very different issues separately — the sharpness the image itself needs, and the sharpening the printing process requires — and when done carefully this approach works very well indeed. Like most things in digital imaging, however, when done carelessly, two-pass sharpening can make a pig’s ear of your image.
First Pass
As your first pass, if you simply apply a gentle sharpening to the entire image with the Unsharp Mask filter, your image will look great — but only until you try to sharpen it again for output. At that point, you’ll quickly find that textured areas start to look crunchy, and that noise pixels pop out like stars behind the new moon.
A much better approach is to create an edge mask — a mask that selects only the high-contrast edges, leaving the rest of the image protected — and to apply modest pre-sharpening through the mask. In extreme cases, when the image is very noisy, you can even invert the edge mask and apply some kind of gentle blurring or smoothing, which lets you not only avoid sharpening the noise in the image but also actually suppress some of it; I usually use the Dust and Scratches filter with as low a radius and as high a threshold setting as possible, but Median and Gaussian Blur also work for this. In most cases, though, a slight boost to the contrast along edges is all that’s required.
Making an Edge Mask
Adobe Photoshop offers many tools for making masks. Here’s one technique I’ve found useful and reliable. Figure 2 shows the image before pre-sharpening.

Figure 2: Before pre-sharpening
I start by duplicating the image (as a matter of convenience when working with an 8-bit-per-channel image and as a matter of necessity with high-bit images, because most of the tools used in this technique aren’t available when editing high-bit images). Then I convert to grayscale, using whichever conversion method provides the best contrast along the edges that need sharpening. Which method works best for you will depend on the image you’re working with, and this topic alone could fill an entire article. Often, though, simply duplicating one of the individual color channels using the Channels palette works well. In other cases, I may use the Channel Mixer or Calculations to blend two or more color channels into a grayscale version. If you’re starting with a high-bit image, you also need to downsample the duplicate to 8 bits per channel by choosing 8 Bits/channel from the Mode submenu on the Image menu. In this case, I simply duplicated the Green channel into a new document, shown in Figure 3.
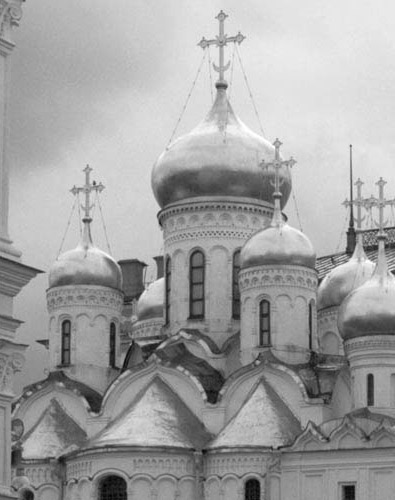
Figure 3: Image converted to grayscale, in this case by duplicating the green channel into a new document.
The next task is to isolate the edges. The easiest way to do so is to run the appropriately named Find Edges filter, which you can find on the Stylize submenu in the Filter menu. This produces the result shown in Figure 4.

Figure 4: Here we isolated the images using the Find Edges filters.
This does a reasonable job of finding the high-contrast edges in the image, but it also picks up some noise (in this case, the noise is film grain from ISO 400 color negative, but in other images it may pick up scanner noise, or a noisy blue channel in a digital capture). So I need to tweak the mask some before I can apply it to the image.
Blurring the Lines
The next step is to apply a Gaussian Blur to the mask. This will accomplish two goals.
- It will soften the edges around the edge mask, preventing sharp, unnatural-looking transitions between sharpened and unsharpened areas.
- It will get rid of some of the noise that Find Edges picked up.
The radius setting depends primarily on the resolution of the image and secondarily on its content. High-resolution images typically require a higher-radius blur than low-resolution ones, and close subjects with soft detail, such as head shots, typically need a higher radius than high-frequency images with lots of fine detail. In this case, a Radius of around 2.8 pixels blurs out the noise while preserving the main edges, albeit in softened form, as shown in Figure 5.
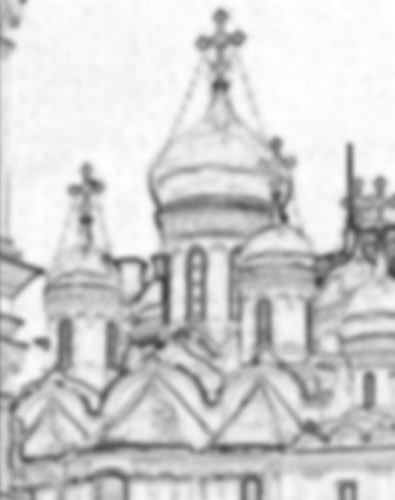
Figure 5: Applying a blur prevents unnatural transitions and eliminates noise.
Next I’ll invert the mask. This step is optional: I simply find it easier to see what’s happening when I make the areas I want the mask to protect black and those I want it to affect white. Inverting the mask also means that you don’t have to invert the selection after the mask is loaded. Choosing Invert from the Adjust submenu on the Image menu produces the result shown in Figure 6.
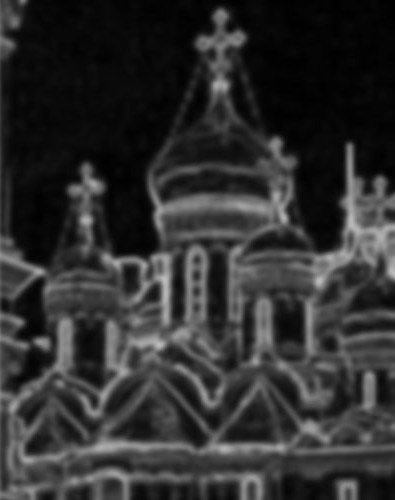
Figure 6: Applying a blur prevents unnatural transitions and eliminates noise.
The final step in creating the mask is to exaggerate the contrast of the mask, so that the edges we want to sharpen are really white and the noise we want to protect is really black. The Levels control offers an easy method for doing this. The trick here is to adjust the black and white input sliders in Levels so that the edges you want sharpened are pure white and the areas you want protected are solid black. You also want to leave a little gray in between, so that the transitions between sharpened and unsharpened areas are soft rather than sudden. The actual numbers will depend on the image, but typically you’ll want to move the sliders quite a way in, so that a lot of pixels are forced to black and a good many are forced to white.
Figure 7 shows the Levels adjustment for our example, and its effect on the mask.
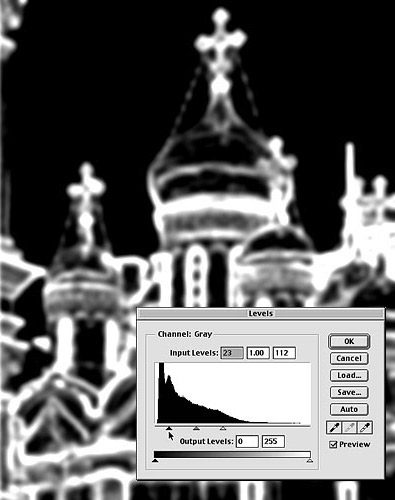
Figure 7: We used the Level adjustment to exaggerate contrast, to ensure the edges we want to sharpen are white and that noise is black.
Note that the mask still contains a fair number of gray pixels: Those areas will receive slight sharpening, and will prevent sharp transitions between the sharpened and unsharpened areas.
Applying the Edge Mask
Now that the mask is completed, I load it into the image using Load Selection from the Select menu. (Note that this works with both 8-bit-per-channel and 16-bit-per-channel images, which means you can use all of Photoshop’s tools to make selections in high-bit images. All too many people think that if you’re working on a high-bit image, your selection options are limited to the marquee and the lasso. If that were the case, I wouldn’t use high-bit images nearly as often as I do.)
With the selection loaded — I always hide the “marching ants” by pressing Command-H (Mac) or Control-H (Windows) so that I can really see what’s happening in the image — I choose Unsharp Mask from the Sharpen submenu on the Filter menu. Since the filter is constrained by the mask, it’s somewhat more forgiving in terms of the settings than it is when applied globally, but I always err on the side of caution: Remember, the goal is only to restore sharpness that was lost in the digitization process. In this case, I used a Radius of 0.4 pixels, an Amount of 140%, and Threshold set to zero to produce the result shown in Figure 8b. The original image is seen in Figure 8a, and a globally-sharpened version using the same settings is seen in Figure 8c.
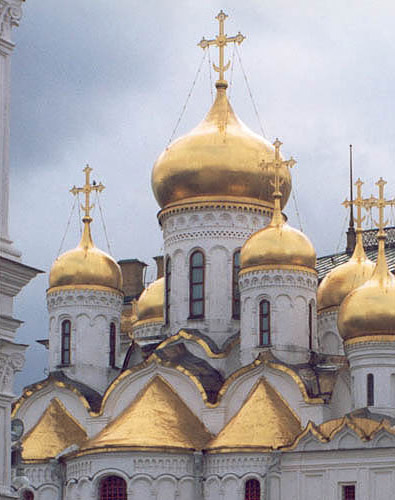
Figure 8a: Unsharpened

Figure 8b: Sharpened as described above, using an edge mask and Unsharp Mask

Figure 8c: Original image after global sharpening, using the same Unsharp Mask settings used for Figure 8b.
The differences between the globally-sharpened version and the selectively-sharpened version are quite subtle at this point: If you look in the deep shadow areas, you can see slightly more noise in the globally-sharpened version. The real payoff comes when you sharpen the image for output.
Second Pass
After you’ve applied your selective sharpening, sharpen the entire image to get the best results with your given output device. For guidance on how you might best manage this, refer to my previous Out of Gamut column, “(Almost) Everything You Wanted to Know about Sharpening in Photoshop but Were Afraid to Ask.”
The figures below show the image sharpened for output to an inkjet printer. Figure 9a shows the selectively-sharpened version after output sharpening: It appears slightly over sharpened on screen, but it’s free of objectionable noise and grain and will make a good print. Figure 9b shows the globally-sharpened version after sharpening for output. Clouds of film grain seem to have exploded into existence, notably in the dark cloud at upper left, but also in the walls of the building. Most inkjet printers will use black ink to render the noisy parts, making them even more obvious, so this version will not yield a satisfying print.

Figure 9a: The optimum result, achieved by sharpening edge masking and then sharpening for output.
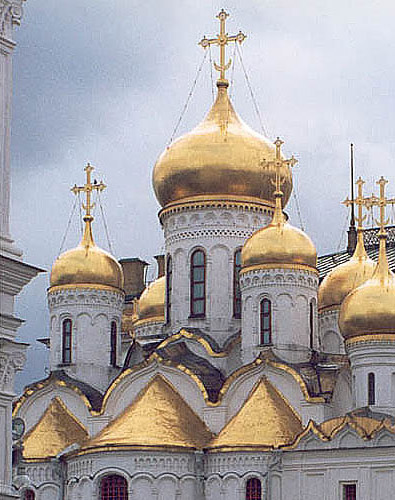
Figure 9b: A more typical (and less satisfying) results, achieved by using global sharpening and then sharpening for output.
It’s true that this pre-sharpening technique involves a fair bit of work. But most of it can be automated: The only steps that require user intervention are making the grayscale rendition to get the best contrast, blurring the edge mask with Gaussian Blur, and making the Levels adjustment to the mask. If you’re making multiple versions of an image for different outputs, a pre-sharpened master file is a good place to start: It lets you optimize your sharpening for the particular print process without worrying about image-content issues, because you’ve already addressed these. I process a lot of images, and I find that careful pre-sharpening saves time in the long run.
Reader Query
I’ll conclude by answering a reader query on my previous column about sharpening. On Friday, January 26, 2001, Don Cooper wrote: “Would Bruce or anyone else please tell me why fractional radius values are used, since there is no smaller unit than the pixel, and we are told to work at output resolution?”
Filters such as Unsharp Mask, High Pass, and Guassian Blur use a mathematical method called a convolution kernel. This is typically a 3-by-3 or 5-by-5 matrix of numbers that represent a group of pixels. The pixel on which the filter is currently operating is always at the center of the matrix, so a 3-by-3 kernel works on the surrounding eight pixels, while a 5-by-5 kernel works on the surrounding 24 pixels.
The kernel changes the current pixel’s value based on the values of all the pixels in the matrix. The Radius setting in filters like Unsharp Mask and Guassian Blur adjusts the relative weight given to the surrounding pixels: A smaller radius gives more weight to the current pixel, while larger radii give progressively more weight to the surrounding pixels. Photoshop doesn’t carry out any operations on 0.4 of a pixel—the pixel is indeed the fundamental particle in digital imaging—it just uses the sub-pixel values to decide how much weight to give to the surrounding pixels.
This article was last modified on July 18, 2023
This article was first published on March 13, 2001
Commenting is easier and faster when you're logged in!

Recommended for you
Four Under-the-Radar Lightroom CC Features Worth Knowing About
Adobe’s new Lightroom CC application is a streamlined sibling to Lightroom Class...
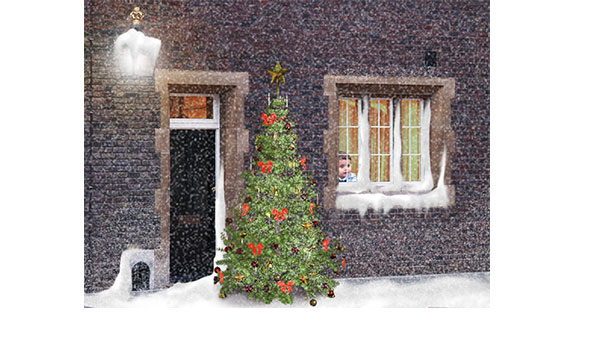
How to Create a Snow Scene in Photoshop
Too late to get your Christmas cards printed? You can still make an email card a...

Scanning Around With Gene: Getting Your Kinks at Home
Originally published December 29, 2010 One of my favorite magazines, at least fr...