Out of Gamut: (Almost) Everything You Wanted to Know about Sharpening in Photoshop but Were Afraid to Ask
It's a sad but undeniable fact of life: Whether you scan, shoot, or capture, the process of digitizing images introduces softness, and to get great-looking results, you'll need to sharpen the great majority of digital images. This column is usually about color management, but for every screed that's been written on tone and color correction or color management, there's precious little about sharpening. This time around, I'll outline some of my favorite sharpening techniques for Photoshop 5, 5.5, and 6.
The softness introduced during digitizing results from the very nature of the digitizing process. To represent images digitally, we must transform them from continuous gradations of tone and color to points on a regular sampling grid. Detail that's finer than the sampling frequency gets "averaged" into the pixels, softening the overall appearance. For some types of output, particularly press halftones and inkjet or color laser dither patterns, further softness is introduced when the image pixels are converted to dots of ink or toner. As a result, just about every digital image requires sharpening, no matter what its source, to counteract the softness introduced both in the capture and output processes.
The good news is that the digital approach also provides a nice range of remedies for its slightly fuzzy thinking. My Photoshop favorites fall into three broad categories:
- Using the Unsharp Mask filter globally
- Sharpening on an adjustment layer
- Using the Unsharp Mask filter on a selection
Unsharp Mask
The oft-maligned Unsharp Mask filter is capable of producing excellent results, but to get them, you need to understand how it works, and a great many people don't. The Unsharp Mask filter works by evaluating the contrast between adjacent pixels, and increasing that contrast when it's relatively high. The idea is that a large contrast difference between adjacent pixels usually represents an edge. But the filter doesn't really recognize edges, just pixel differences, so successful sharpening requires finding the settings that accentuate the edges in the image in a natural-looking way.
One important implication of this is that optimal settings for Unsharp Mask depend primarily on the image content, and secondarily on the resolution and the output process at which the image is aimed. Close subjects with soft detail need a very different treatment from distant subjects with lots of fine detail. Perceived sharpness is a function of local contrast.
Another key point is that judging sharpening from an image's on-screen appearance is quite tricky. Here are some general guidelines that should help:
- Always evaluate sharpness by looking at the Actual Pixels (100%) view (known in older versions of Photoshop as 1:1). You can sometimes draw reasonable conclusions about sharpness from the 50% view, but all of Photoshop's other zoomed-out views are heavily antialiased, so they don't offer a particularly accurate impression of sharpness.
- For images destined for on-screen use, or for printing to true continuous-tone printers (dye-sublimation, LightJet 5000, Durst Lambda, film recorders), sharpen the image until it looks good on screen. For images destined for halftone (press) or dithered (inkjet) output, sharpen until the image looks slightly oversharpened on screen.
- Always sharpen the image at the final output resolution. If you resample the image (up or down) after sharpening, you'll probably sample the sharpening halos out of existence, and you'll need to sharpen the image again.
The key parameter in obtaining good results from Unsharp Mask is the Radius setting. The Radius needs to match the image content. It controls the width of the sharpening halo in a somewhat indirect way: Entering a Radius of 1 doesn't produce a one-pixel halo; it just tells Photoshop to "look" one pixel outward as it evaluates each pixel for sharpening. That said, a large Radius setting produces a larger halo than a small Radius setting.
Next, set the Amount. Amount is the "volume control" for unsharp mask. It dictates the strength of the sharpening. A small Radius setting will need a higher Amount than a large Radius to produce the same degree of visual sharpness.
Last, set the Threshold. The Threshold control is basically a noise-reduction setting. It tells Photoshop to ignore a certain amount of difference between pixels when sharpening, and allows you to avoid oversharpening lightly textured areas such as skin tones.
How can you best balance the three settings? The procedure I recommend is to start with an Amount setting in the 200-to-300-percent range and a Threshold of zero, and work the Radius setting until it matches the image content. Then adjust the Amount setting until the desired degree of sharpening is obtained. Finally, if necessary, increase the Threshold to smooth out oversharpened areas of texture.
For Example
The best way to get a feel for the sharpening is to consider some examples.
Figure 1a shows an unsharpened image, Figure 1b shows reasonable sharpening settings, and Figure 1c shows the resulting sharpened image. In this case, the subject is close, with soft detail. We want to avoid oversharpening the skin texture, so a fairly low Amount and large Radius are called for, with some thresholding to smooth out the skin tones.

Figure 1a: Unsharpened

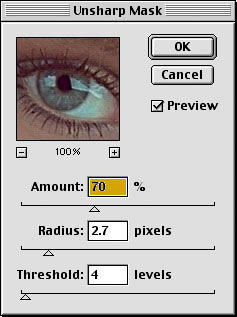
Figure 1b: Reasonable sharpening settings for the image in Figure 1a

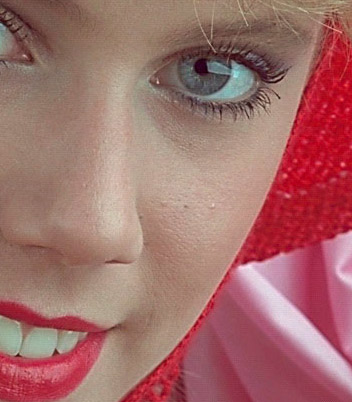
Figure 1c: Sharpened
Compare this with the image shown in Figure 2a. Unlike Figure 1, it's a "high-frequency" image with lots of fine detail, and it requires quite different sharpening. Figure 2b shows a reasonable set of sharpening settings that produce the result shown in Figure 2c. It requires a much smaller Radius, and hence a higher Amount. No thresholding was needed.

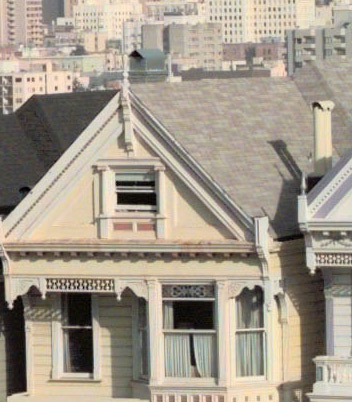
Figure 2a: Unsharpened

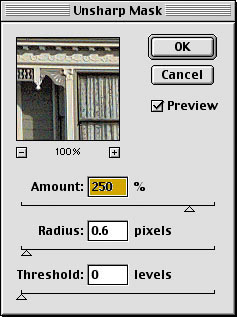
Figure 2b: Workable sharpening settings

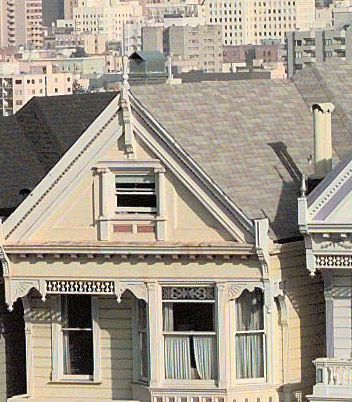
Figure 2c: Sharpened
Figure 3 shows the "wrong" sharpening applied to each image. The head shot has crunchy skin tones, and the cityscape looks out of focus. The culprit in both cases is the radius setting, which is now smaller than it should be in the case of the Figure 3a, and larger than optimal in Figure 3b.

Figure 3a: Inappropriately sharpened, resulting in harsh skin tones

Figure 3b: An overly large Radius setting causes this detailed image to look out of focus.
Sharpening in Lab
A good many users like to convert the image to Lab (CIELAB), then sharpen only the Lightness channel. The idea here is to avoid unwanted color shifts. Frankly, I don't often run into color shifts caused by the Unsharp Mask filter, but in those rare cases when I do, I prefer a simpler, faster, and less-destructive method than converting to Lab: Run the Unsharp Mask filter, then immediately go to Fade Unsharp Mask on the Edit menu and set the blending mode to Luminosity. This produces a result that's visually identical to the convert to Lab, sharpen Lightness method, and it's less destructive to 8-bit-per-channel images, because it avoids the quantization error you always get when you convert 8-bit channels to Lab.
Layer-Based Sharpening
The Unsharp Mask filter is a powerful tool, but it has two inherent disadvantages. First, Unsharp Mask sharpens everything, including noise. The filter works by evaluating pixel differences, and it doesn't really know whether a pixel transition represents an edge that needs sharpening, a piece of dust, a scratch, a noise pixel, film grain, or any one of a number of other elements that one typically wouldn't care to sharpen.
The other drawback: Unsharp Mask is a destructive edit, meaning that the edits are burned directly into the image data. You can use the History feature to go back and start over, but you can't modify the sharpening once it's been applied.
Layer-based sharpening addresses both issues. The sharpening is applied by an editable layer, without affecting the base image. Here's a simple but very powerful technique for applying sharpening through a layer.
Start by duplicating the background layer, and set the blending mode for the duplicated layer to Soft Light (for a gentle sharpening) or Hard Light (for a stronger sharpening). Figure 4 shows the base image, and the image with a duplicate layer set to Soft Light.

Figure 4a: Unsharpened

Figure 4b: Set the blending mode for the duplicated layer.

Figure 4c: The duplicate layer with a Soft Light blending mode chosen
At this point, all I've done is increase the contrast by adding the Soft Light layer. Where am I going? Well, sharpness is a local contrast function; Unsharp Mask actually works by increasing the contrast along edges. We achieve essentially the same goal with our sharpening layer by running the High Pass filter on our duplicated layer (it's on the Other submenu in the Filter menu).
Figure 5 shows the High Pass filter, and the resulting image. It's a little crunchy in the skin tones (I'll fix this next) but it's a much sharper image now, and I haven't touched the pixels in the background layer. I can vary the strength of the sharpening globally, by adjusting the opacity of the duplicate layer, but a much more powerful technique is to add a Layer Mask to the layer, then edit the layer mask.

Figure 5a: The Photoshop High Pass filter

Figure 5b: Sharpened
It's largely a matter of preference whether you choose to add a Layer Mask using Reveal All or Hide All. Use Reveal All if you'd rather paint in smoothing, and use Hide All if you'd rather paint in sharpening. In Figure 6, I used a Hide All layer mask, then used a soft-edged brush to paint in sharpening on the eyes, lips, hair, hat and scarf, while leaving the skin texture soft. Bear in mind that you can vary the opacity of the paint for further fine control over the sharpening.

Figure 6: Sharpened by using a High All layer mask and painting in sharpening with a soft-edged brush
As with Unsharp Mask, the critical parameter in this technique is the Radius setting, this time with the High Pass filter. Again, low-frequency images -- those with close subjects and soft detail -- generally require a higher Radius setting than high-frequency images with lots of fine detail. Figure 7 shows an unsharpened high-frequency image, the High Pass filter settings, and the resulting sharpened image.

Figure 7a: Unsharpened

Figure 7b: High Pass filter settings

Figure 7c: Sharpened
You can stack multiple sharpening layers to address different parts of an image. The sharpening applied in Figure 7 looks quite good, but the distant buildings are still a little soft. Adding a second duplicate layer, filtered using a higher Radius in High Pass, makes the background a little sharper, but doesn't do much for the foreground. Adding a Layer Mask set to Hide All lets me paint the additional sharpening into the background without making the foreground crunchy, as shown in Figure 8.

Figure 8a: To sharpen the background, we increased the Radius in the High Pass filter and created a Layer Mask, so we could paint additional sharpening into the background.

Figure 8b: Sharpened
You can, of course, combine the use of Unsharp Mask with sharpening layers, applying modest unsharp masking, then using layers to pump up the sharpness in critical areas. The third alternative, which we'll examine next time, is to create a mask, load it as a selection, then apply the Unsharp Mask filter to the selection. It's really the only way to sharpen high-bit images ideally, but it can also be useful for 8-bit creations.
The bottom line is that sharpening is a very subtle business. No single technique is likely to do justice to every image. The more sharpening techniques you have at your disposal, the better your images will be where it counts, on final output, whether it's to screen, to a desktop printer, or to a press.
Read more by Bruce Fraser.


Comments
eeh
Tue, 01/13/2004 - 07:07
Permalink
sharpening on just the lightness channel
ronenine88
Sat, 03/08/2003 - 19:45
Permalink
Very good
mkolodny
Wed, 01/24/2001 - 10:21
Permalink
Good article but...
Mitt Jones
Wed, 01/24/2001 - 13:09
Permalink
Re: Good article but...
stevengoldblatt
Wed, 01/24/2001 - 19:26
Permalink
Excellent
brozz
Wed, 01/24/2001 - 21:51
Permalink
nicely done
Don Cooper
Fri, 01/26/2001 - 10:01
Permalink
Why a Radius Value Below One?
BSS
Wed, 01/31/2001 - 03:56
Permalink
Solid explanations of fairly complicated subject.
alex23
Wed, 01/31/2001 - 09:12
Permalink
Excellent article
gumery
Wed, 01/31/2001 - 16:40
Permalink
hot stuff
subsen
Thu, 02/01/2001 - 05:17
Permalink
Outstanding feature - useful and clear
Brian James
Sat, 02/03/2001 - 20:35
Permalink
Sharpening
bmankin
Wed, 03/07/2001 - 12:19
Permalink
A very useful treatment of sharpening techniques
kellytom
Tue, 09/25/2001 - 00:09
Permalink
Concise and very easy to follow and understand.
SloaneE
Fri, 10/12/2001 - 14:09
Permalink
Great article on the uses of sharpening
wasleys
Sun, 06/23/2002 - 06:53
Permalink
Concise, useful, understandable
jtouboul
Sun, 01/12/2003 - 12:40
Permalink
Out of Gamut: (Almost) Everything You Wanted to Know about Sharp
Guest (not verified)
Tue, 10/13/2009 - 17:20
Permalink
Unfortunately, most digital
Guest (not verified)
Thu, 12/10/2009 - 22:31
Permalink
Playing the advocate
Guest (not verified)
Thu, 01/28/2010 - 20:18
Permalink
Re
Guest (not verified)
Mon, 02/15/2010 - 23:14
Permalink
Unsharp Mask Filter Technique
Mike Wreggitt
Mon, 02/15/2010 - 23:25
Permalink
Detail sharpening in Photoshop
Guest (not verified)
Fri, 04/02/2010 - 08:40
Permalink
Thanks for your advice. I
Guest (not verified)
Fri, 04/16/2010 - 22:35
Permalink
Guest
Guest (not verified)
Tue, 06/15/2010 - 07:56
Permalink
Sharpening in Photoshop
Guest (not verified)
Sat, 09/11/2010 - 22:26
Permalink
broken link to the 3rd method :(
Terri Stone
Sun, 09/12/2010 - 21:00
Permalink
link to 3rd method working
Guest (not verified)
Fri, 09/17/2010 - 11:47
Permalink
Thank you, Terri :)
Guest (not verified)
Mon, 08/22/2011 - 22:30
Permalink
cheap pandora pendants
Guest (not verified)
Wed, 03/20/2013 - 15:32
Permalink
awesome Photoshop Tutorial