


For my money, one of the most-underrated features in Adobe Photoshop CS is the Camera Raw plug-in, which reads raw images from just about every camera on the market that supports that format. (Version 2.2, which adds support for several new models thus bringing the total to more than 60 cameras, was released in late April.)
Camera Raw goes to work as soon as you point Photoshop’s File Browser at a folder full of raw files, building previews and thumbnails, and reading image metadata. It also kicks in when you open a raw image — the Camera Raw dialog box appears automatically.
Each camera vendor uses its own proprietary format for raw images, and supplies software for processing them, but in my experience, the vendor-supplied solutions leave a lot to be desired in terms of speed and stability. And of course, each vendor’s solution is limited to processing raw files from its own cameras. Camera Raw, on the other hand, is not only fast and well behaved, it’s also the nearest thing we have to a universal raw converter. Last but by no means least, it delivers images right where I need them, in Photoshop.
But one of the frequent knocks I hear about Camera Raw is its inability to make use of custom camera color profiles, thus ensuring more-consistent color results from the camera. It’s true: Camera Raw can’t use custom camera profiles. But having wrestled with many camera-profiling tools, I’m tempted to regard this as a feature rather than a limitation. If you shoot in the studio under tightly controlled lighting, and you spend four figures on camera-profiling software, you may be able to create a profile that accurately describes your camera’s color behavior, at least under that lighting condition, but all my efforts have met with limited success at best.
Many of the objections I hear to Camera Raw’s lack of support for custom camera profiles seem to be based on theory rather than practice — when I ask the objectors if they’ve tried dialing in Camera Raw’s color interpretation using its built-in Calibrate features, I’m usually met with a glassy stare, hence this column. But before delving into dialog boxes, it’s worth describing briefly how Camera Raw handles color.
Camera Raw and Color
Even though you see color when you look through the viewfinder, a digital raw image is a grayscale file! Most cameras use sensors with red, green, and blue filters placed over each element in the sensor in a Bayer pattern, with twice as many green filters as red and blue, because our eyes are most sensitive to the green wavelengths. The raw file contains grayscale pixels, each one of which represents only red, only blue, or only green. The principle task of a raw converter is to interpolate the missing color information for each pixel (a process known as demosaicing) to produce a color image.
Camera Raw does this, and much more, but one of the features (besides speed and stability) that distinguishes Camera Raw from other raw converters such as the camera manufacturers’ proprietary software is the way it defines color. For each supported camera, Camera Raw contains not one but two built-in profiles: one built under a tungsten light source, the other under a daylight light source. Camera Raw’s White Balance tools — the Temperature and Tint sliders — interpolate between (or even extrapolate beyond) these two built-in profiles.
Why two profiles? Simply, the vast majority of cameras respond very differently to tungsten light than they do to daylight. Digital cameras are inherently much more sensitive to red light than to blue, and the makeup of tungsten light, which contains a great deal more energy at red wavelengths than at blue ones, exaggerates this response. So a single profile may do a good job of representing the camera’s behavior under daylight or tungsten, but probably not (in my experience, never) both. Kudos to Thomas Knoll, Camera Raw’s creator, for producing an elegant solution to a tough problem.
But the profiles built into Camera Raw are generic profiles for the camera type. If your specific camera differs from the units that were used to build the profiles, the resulting color will be off. So Camera Raw includes controls for tweaking the behavior of the built-in profiles to better match the behavior of your personal camera.
The Calibration Process
I don’t claim that this procedure is the only way to use Camera Raw’s Calibrate controls, but it’s relatively simple, and has worked well on the dozen or so different camera models on which I’ve tested it.
The first thing you need is a reasonably well-exposed image of a known color target, which you then photograph with the camera whose response you want to tweak in Camera Raw. I prefer the ubiquitous 24-patch Macbeth Color Checker to other targets, both because it doesn’t have a huge number of patches to deal with and because the pigments used to create it don’t shift color appearance dramatically under different lighting, which isn’t true of many scanner targets printed on photographic paper.
The second thing you need is a color-accurate digital representation of that target, which you’ll use as a reference to which to compare your shot of the Color Checker. You can download a Lab color version of the Color Checker from www.colorremedies.com/realworldcolor/downloads.html.
If you want to proceed purely visually, you can use the Color Checker Lab image as is, but I find that it’s helpful to have RGB numbers as a guide, so I suggest converting the Lab file to your chosen RGB working space using relative colorimetric rendering to obtain an accurate RGB version. One more catch: When you’re working in Camera Raw, you can’t use Photoshop’s Info palette to get the RGB numbers from the target file. I just bit the bullet and spent a few minutes typing in the RGB values for each patch on Photoshop’s type layers. Figure 1 shows a ProPhoto RGB version of the Color Checker with the RGB numbers entered for each patch. We’ll call this the reference image, since it represents the accurate color for which you’re aiming.
 Figure 1: The Color Checker, downloaded from the Web site and converted from Lab to ProPhoto RGB, with RGB values added as type layers.
Setting Up for Calibration
With the converted RGB Color Checker reference image open in Photoshop, open your raw capture containing the Color Checker you shot, and arrange the windows on screen so that you can see the reference image while you work in Camera Raw, as shown in Figure 2.
 Figure 2: Arrange the windows containing the two Color Checkers so that you can see the reference image (top) as you work with the calibration image (bottom).
To make the Calibrate tab available, you first have to click Camera Raw’s Advanced button. This makes two new adjustment tabs, Lens and Calibrate, appear, as shown in Figure 3.
 Figure 3: Click the Advanced button to make the Calibrate tab appear.
Before working in the Calibrate tab, you’ll need to use the controls in the Adjust tab to make the overall contrast and saturation of your capture match the reference image. I do this using Camera Raw’s RGB Readout as a guide, making adjustments that try to match the tonal values of the gray patches in the bottom row of the Color Checker I photographed to those of the reference image.
Figure 4 shows the controls in the Adjust tab and the RGB Readout, which indicates the RGB values under the cursor, just like Photoshop’s Info palette. The controls fall into three groups: the Temperature and Tint sliders comprise the White Balance controls; the Exposure, Shadows, Brightness, and Contrast sliders are the tonal controls; the remaining slider, Saturation, controls the saturation.
 Figure 4: The Adjust tab and the RGB Readout.
The Tonal Controls
A quick explanation of Camera Raw’s tonal controls is probably helpful. Taken together, the Exposure, Shadows, Brightness, and Contrast sliders define a five-point curve, as follows:
- The Exposure slider sets the white clipping point.
- The Shadows slider sets the black clipping point.
- The Brightness slider is a midtone adjustment, like the gray input slider in Photoshop’s Levels — it adjusts the midtones without affecting the black and white points set by Shadows and Exposure.
- The Contrast slider applies an S-curve centered on the midpoint set by Brightness. At positive settings, it darkens values below the midpoint set by Brightness and lightens those above, without affecting the black and white clipping points. At negative settings, it lightens values below the midpoint set by Brightness, and darkens those above, again without affecting the black and white points.Setting the Contrast
Taken together, these controls let you shape the overall contrast quite precisely. A couple of handy shortcuts let you keep the cursor on the image to read the RGB values while you adjust the controls. The Tab key selects the next field. The up and down arrows increase and decrease the values in the selected field by 1, while adding Shift changes the increment to 10. Here’s my recommended step-by-step procedure:- Start by looking at the values in the white patch. Use the Exposure slider to match the values in your capture to those in the reference image.
- Next, look at the two mid-gray patches (Row 4 Column 3 and Row 4 Column 4, respectively), and use the Brightness slider to adjust the values in your capture to match those in the reference image. If the patches are very far from neutral, take the middle of the three values as the aim point.
- At this stage, the contrast should be in the ballpark, but the color balance may be wildly off. Set the white balance by clicking Camera Raw’s White Balance tool in the second-to-lightest gray patch. This may change the tonal values in the mid-gray patches, so go back and readjust the brightness slider if necessary. Figure 5 shows Camera Raw’s tool palette with the White Balance tool selected.

Figure 5: The White Balance tool in Camera Raw’s tool palette.
- Check the values in the second-lightest (Row 4 Column 2) and second-darkest (Row 4 Column 5) gray patches. If the light gray patch is too light and the dark gray patch is too dark compared to the reference image, increase the value of the Contrast slider.
- If necessary, fine-tune the values in the black patch (Row 4 Column 6) with the Shadows slider.By this point, you’ll probably have noticed that everything you do affects everything else. You may have to go through two or three iterations of these edits to get the best results. You probably won’t be able to get as much tonal separation between the white and light gray patches as in the reference image. Don’t worry — it’s OK if the white patch winds up being a little darker than in the reference. You should, however, be able to get within 5 levels or so on the remaining gray patches.Before proceeding to the Calibrate tab, you need to make one more edit in the Adjust tab. Look at the values in the red (Row 3 Column 3), green (Row 3 Column 2), and blue (Row 3 Column1) patches, and note the red value for the red patch, the green value for the green patch, and the blue value for the blue patch. If your camera is at all typical, you’ll find that the red value for the red patch is much higher than that of the reference image while the blue value for the blue patch is much lower. Don’t worry. Concentrate on the green patch, and use the Saturation slider to make the green value for the green patch match that of the reference image. The result should look something like Figure 6 in terms of overall contrast, but the hues may be different.

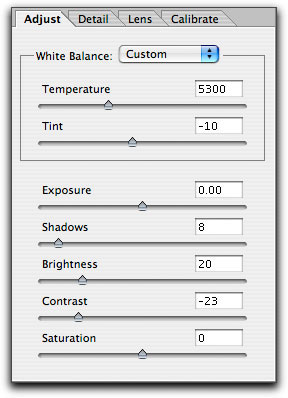
Figure 6: The Adjust tab edits completed (top) and the settings used (bottom).
Using the Calibrate Controls
Now you’re ready to tweak the calibrate controls to fine-tune the color, so select the Calibrate tab by clicking its label (or press Command-4 on Macs, Control-4 on Windows). Figure 7 shows the controls in the Calibrate tab.
Figure 7: Camera Raw’s Calibrate tab
The Shadow Tint slider controls the green-red balance in the shadows. Negative values add green, positive values add red. Check the darkest patch on the target in the raw image. If it’s significantly non-neutral, use the Shadow Tint control to get the R, G, and B values to match as closely as possible — normally, there shouldn’t be more than 1 level difference between them.
The final adjustments are to the Red, Green, and Blue Hue and Saturation controls while sampling the red, green, and blue patches on the target. This can be a little counter-intuitive at first. When you work on the red patch, you’ll find that the Red Hue and Red Saturation controls don’t change the red value for the red patch. Instead, they adjust blue and green relative to red. The Red Hue control adjusts blue and green relative to each other, changing the hue, while the Red Saturation control changes blue and green by equal amounts relative to red, increasing or decreasing the saturation — higher amounts of blue and green make a less-saturated red, lower amounts make a more-saturated one. That’s why you made that final saturation move in the Adjust tab.
Each edit you make inevitably has some impact on the other colors, so it’s important that you start with the green patch, then the blue, and finally the red. If you make the edits in this order, you’ll find that the low blue value for the blue patch gets increased, and the high red value for the red patch gets reduced.
Start with the Green Saturation, and get approximately the right proportion of red and blue to green for the green patch, then use the Green Hue control to get the right mix of red and blue relative to each other. Typically, you’ll bounce back and forth between the hue and saturation controls three or four times. Repeat the process for the blue patch next, and finish with the red. When you nail the relative hue and saturation of these three patches, the other color patches pretty much fall into place. Figure 8 shows the edited capture, and the Calibrate tab edits.
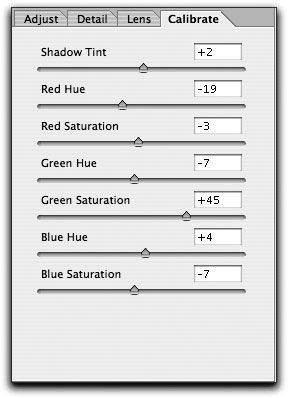
Figure 8: The edited capture (top), and the Calibrate settings that created it (bottom).
Saving your Settings
Once you’ve done the work, you’ll want to save the Calibrate settings so that you can apply them to images that are more interesting than captures of Color Checkers. To do so, choose Save Settings Subset from the Camera Raw menu, then, in the ensuing dialog box, choose Calibration Only — that way, you can apply the Calibration settings to other images without interfering with any other edits you made to them.
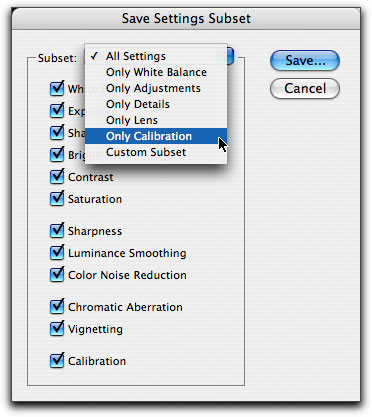
Figure 8: The Save Settings Subset (top) with the Calibration Only choice selected (bottom).
If you normally save settings to sidecar .xmp files, save the Calibration setting in Camera Raw’s Presets folder (Adobe Photoshop CS> Presets> Camera Raw) so that they’ll always be available. If you normally save the settings in the Camera Raw database, you don’t need to do anything special to make them available at all times.
You’ll probably have to make separate Calibrate settings for daylight/strobe and for tungsten, but the daylight settings will work for just about anything other than images shot under actual tungsten light. In particular, they don’t lock you in to the white balance and tonal adjustments you made to the target. They simply tweak the performance of the built-in profiles to better match your camera, so you’ll still enjoy the freedom Camera Raw offers in interpreting white balance and tonality. You’ll just get more accurate hue and saturation relationships in your images.
I’ve tested this procedure on about a dozen different cameras, and by investing about 10 minutes on each unit I’ve been able to dial in the color in Camera Raw so that each one produces near-identical results. So if you like the idea of Camera Raw, but you’ve been wrestling with skin tones that are too red, skies that are too green, or color that just isn’t quite right, maybe it’s time you too paid a visit to the Calibrate tab.
This article was last modified on January 18, 2023
This article was first published on May 18, 2004
Commenting is easier and faster when you're logged in!

Recommended for you

Heavy Metal Madness: The Family that Boats Together…
When I was four or five, my father decided to build a small speedboat in his gar...

Organizing Illustrator Files With Layers
We’ve all done it. We’ve all been so involved in the creative process that we do...
CreativePro Tip of the Week: Using the Oil Paint Filter in Photoshop
This CreativePro Tip of the Week on using the Oil Paint filter in Photoshop was...