


Curves, Levels, and Hue/Saturation are vital Photoshop tools I use on almost every image, and you probably do, too. But here are five cheap tricks (in fact, as long as you already own Photoshop 6, they won’t cost you a cent) that can make your image adjustment work go a whole lot faster.
Cheap Trick 1: Auto-place Curve Points
Curves is the tool I use for almost all adjustments to tone and color balance except for setting endpoints, which is better done in Levels. But if you’re still placing curve points by clicking in the curves window and then dragging the points with the mouse, you’re giving yourself extra work. This trick and the two that follow will help you speed up your curve adjustments.
By far the easiest way to place points on a curve is to Command-click (Mac) or Control-click (Windows) on the part of the image you want to adjust. When you do, Photoshop places a curve point that corresponds to the value of the image pixel you clicked on. If you want to make small, fine-tuning corrections to a small range of tone and color, it’s a good idea to first place a few anchor points, so that you don’t bend the whole curve. A very easy way to do so is to Command-click/Control-click on a few things that you don’t want to change, so that you lock down that part of the curve.
Even better, you can place a point on all three individual channel curves, without placing a point on the Composite RGB curve, by Command-Shift-clicking (Mac) or Control-Shift-clicking (Windows) on the image. This is particularly handy for the next cheap trick.
Cheap Trick 2: Gray-balance by the Numbers
This trick builds on the previous one, and offers a very fast method for killing color casts. The image must be in a gray-balanced RGB working space for this to work. All RGB spaces built into Photoshop are gray-balanced, but it probably won’t work in monitor, scanner, or digital camera RGB, because in those spaces equal numbers of R, G, and B often don’t produce a neutral.
- Find an element in the image that you know should be neutral or near-neutral. Clouds, white water, gray stone, shadows are all good candidates. In this example, we’ll use the gray sky. (See Figure 1).
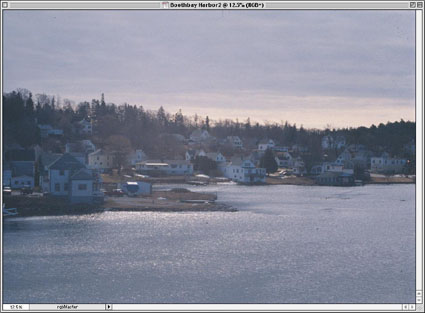
Figure 1: We begin correcting the color cast in this image by choosing a neutral tone, such as the gray sky. - Move the cursor to the area you’ve determined should be neutral, and read the RGB values from the Info palette. In this case, the sky pixels read R163, G160, B176. We need to make the values equal in all three channels. Taking the middle value as the aim point changes the tone the least, so in this case we’ll take the red value, 163, as the aim point, and we’ll increase the green and reduce the blue to that value.
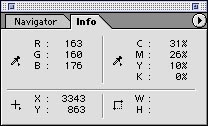
Figure 2: The Info palette identifies the value of the “gray” pixel we’ve chosen as R163, G160, B176. - Keep the mouse where it is, with the cursor on the sky pixels, and press Command-M (Mac) or Control-M (Windows) to open the Curves dialog box.
- Command-Shift-click/Control-Shift-click to place the point on all three individual channel curves, then press Command-2/Control-2 to target the Green channel in Curves.
- Press the Tab key until you’ve selected the output value, and type 163.
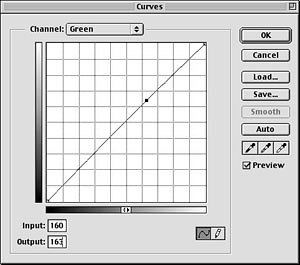
Figure 3: To begin evening the component values, we assign a Green value of 163. - Press Command-3/Control-3 to target the Blue channel in Curves.
- Enter 163 in the output value field.
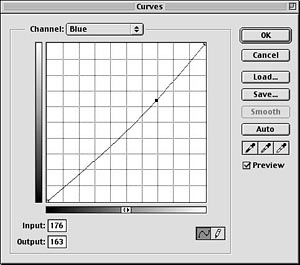
Figure 4: We enter the same value — 163 — for the Blue channel. - Click OK to apply the curve adjustment.
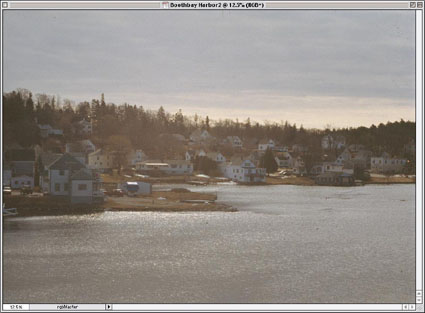
Figure 5: With the curve adjustment applied, the image appears more natural, without the blue cast of the original.
This is one of those tricks that takes longer to describe than it does to perform. With practice, you can do it faster than Photoshop’s screen redraw. (You may want to allow the image to redraw before carrying out step 8 to make sure that the results were within the range you expected.)
This article was last modified on July 18, 2023
This article was first published on July 11, 2001
Commenting is easier and faster when you're logged in!

Recommended for you

Scanning Around With Gene: Riding Mini-Bikes and Getting Stuff Welded
Being the boy in the family, it was my job to accompany Dad on the “manly...

Wondershare ToMoviee 2.0 AI Ranks Third on VBench Leaderboard, Showcasing Next-Generation Video Generation Capabilities
Wondershare, a global leader in creative software, announced that its ToMoviee 2...
Timeless Treasures in InDesign
Like friends and wine, some of the best InDesign features are the ones that have...