

Out of Gamut: Photoshop 6 Gets Smart With Color


I’ve spent the past few columns making the case that when it comes to Photoshop, there’s no perfect RGB working color space that works equally well in every situation. Now that Photoshop 6 is shipping, however, I’m happy to deliver the good news that you’re no longer stuck with only one RGB color space at a time. Now you can have your cake and eat it, at least as far as working spaces are concerned.
One of the biggest changes in Photoshop 6, and one that’s been largely ignored in most of the press coverage, is that Photoshop now supports “per-document” color. What’s that exactly? It simply means that each document can exist in its own profiled color space. At last, you can just open an image, and Photoshop will display it the way the image creator intended — without forcing you to make decisions about color spaces and conversions before you’ve even seen the image. Photoshop 6 has a whole slew of new color-management features I’ll address in forthcoming columns, but in this one I’ll concentrate on per-document color, and how to make it work rationally.
Let It Be
It’s possible to make Photoshop 6 behave like Photoshop 4 or 5 with regard to color management, but unless you have very specific workflow requirements, you’re almost certainly better off letting Photoshop 6 just be itself. The key to doing so is to take advantage of the all-new Color Settings dialog box, which replaces the RGB, CMYK, Grayscale, and Profile Setup dialog boxes in Photoshop 5. In the Color Settings dialog box you need to make the right settings for Color Management Policies and the Profile Mismatch and Missing Profile Warnings.
We won’t go into the details on the various working spaces, because when you configure Photoshop for per-document color, the choice of working space becomes much less critical (It’s a convenient fallback position rather than a rigorously imposed requirement). The best starting point is probably to pick the working spaces you’ve been using in Photoshop 5.x. But before we delve into the Color Management Policies, it’s important to point out an important change in Photoshop’s behavior, which is the way it handles Tagged images (those with color profiles embedded) and Untagged images (those without profiles).
Tagged! You’re It
Photoshop 5.x was a careless lover when it came to color. It only cared about profiles when you opened the image, and it gave you only two choices: Convert or Don’t Convert to the working space for that color mode. Once the image was open, it didn’t have a profile as such; it simply existed in the working space. If you changed the working space, you reinterpreted the color meaning of the numerical values in the file.
When you open a file in Photoshop 6, the program decides whether to treat it as Tagged or Untagged. Tagged images are color-managed according to their embedded profiles, unless you tell Photoshop to treat them as Untagged. On the other hand, Untagged images behave like those in previous versions of Photoshop — they get interpreted according to the current working space for that color mode. Change the working space and you reinterpret your Untagged images. Your Tagged images, however, don’t change: They stay in the space described by the embedded profile.
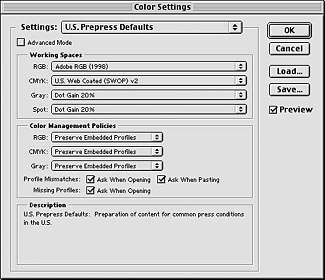
Figure 1 shows the Color Settings dialog box. The Settings menu contains a list of presets (you can customize the list by saving Custom settings in the Settings folder — Photoshop automatically points you to the right location). The RGB, CMYK, Grayscale, and Spot menus let you choose working space profiles for each color mode. The real magic, though, is in the Color Management Policies section.
Setting Policy
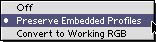
Figure 2 shows the Color Management Policies menu for RGB. (The menus for CMYK and Grayscale are identical except that Convert to Working RGB appears as Convert to Working CMYK and Convert to Working Grayscale, respectively.) Let’s look at the policies in turn.
As there’s no way to turn color management entirely “off” in Photoshop 6, the Off Policy is perhaps somewhat misleadingly named. Images are always displayed through your monitor profile, for example; there’s no equivalent to Photoshop 5.x’s “Display Using Monitor Compensation.” In version 6 it’s always on.
Similarly, if you ask Photoshop to convert an image to another color mode, it has to make some assumptions about the source color space. A better description would be “Behave like Photoshop 4”: The program discards embedded profiles in images, opens the images as Untagged, interprets the images according to the current working space, and generally tries to keep color management out of your face wherever possible.
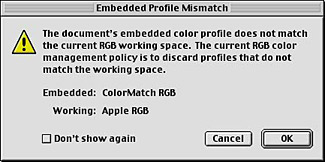
The sole exception to this rule is that if you open an image whose embedded profile matches the current working space, Photoshop treats it as a Tagged image and preserves the embedded working space profile, even if you subsequently change the working space. If you proceed to save this image, it will by default embed the original working space profile when you save (you can override the profile embedding in the Save As dialog box.). All other images are treated as Untagged, including new ones you create under this Policy, and profile embedding is turned off by default. When you open an image with an embedded profile that doesn’t match the current working space, you get an alert informing you that this image currently isn’t in the working space, and that the Policy is set to discard the embedded profile, as shown in Figure 3.
Under this Policy — color management set to Off — when you move pixels from one image to another (via copy/paste, drag and drop, etc.), the numeric pixel values are always pasted, which means that if the source and target images were in different spaces, the color appearance of the transferred pixels would change.
Off is the Policy you want if you’re a dyed-in-the-wool, by-the-numbers type who has been cursing at Photoshop for the past three years for stuffing color management down your throat. The downside of the Off Policy is that the only thing that will stay the same as you move images from your system to someone else’s — or even from Photoshop to another application on your own system — is the numbers themselves. The color may look very different, because the numbers acquire different interpretations as they move around.
If you operate in an all-CMYK, by-the-numbers workflow, you can set the Policy to Off for CMYK only, and still get the benefits of color management in the other spaces. If your work is mostly for the Web, and you need Photoshop’s RGB to behave the same as RGB in your non-color-managed applications, you can choose Monitor RGB as your RGB working space and set the Policy for RGB to Off. However, if you want to use color management, you’ll want to choose one of the other policies, and simply untag documents that need to be untagged on a case-by-case basis (see Tagging, Untagging, and Converting below).
Behave Like Photoshop 6
Preserve Embedded Profiles is the all-new behave-like-Photoshop-6 option. An image with an embedded profile gets opened in its own space, and when you save it, the correct profile is embedded by default. Untagged images have their Untagged status preserved, and profile embedding is turned off by default for Untagged images. No conversions take place unless you specifically request them.
When you move pixels between two RGB or two Grayscale images that are in different spaces, the color appearance is preserved (the numbers change as the moved pixels get converted to the destination space). When you move pixels between two CMYK images, the numerical values are preserved (the color appearance may change, since no conversion is taking place).
If you deal with images from several different sources, if you want to pick and choose working spaces to suit different needs, or if you’re simply a bit uncertain of how all this stuff works, Preserve Embedded Profiles is the best (and safest) Policy.
Behave Like Photoshop 5.x
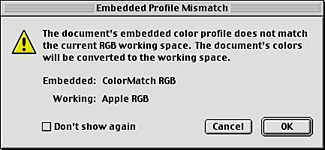
Convert to Working RGB/CMYK/Grayscale is the behave-like-Photoshop-5.x option. Images with embedded profiles are automatically converted to the current working space: You get an alert informing you that this image currently isn’t in the working space, and that the Policy is set to convert it to the working space, as shown in Figure 4. Untagged images preserve their untagged status, and are interpreted according to the current working space for that color mode.
Because this Policy generally makes sure that all images are in the working space, both numerical values and appearance are typically preserved when you move colors between documents. However, in those cases where you have a document that isn’t in the working space — let’s say you changed the Policy after you opened a document — the color appearance takes precedence over the numerical values. When you save images, profile embedding is turned on by default, overridable in the Save As dialog box.
If you have a reliable workflow that demands converting all your images into the same space, this is the Policy that will handle your needs automatically. It differs from Photoshop 5.x behavior in one important way: You can no longer set an assumed profile for Untagged images — those that lack embedded profiles. They simply open as Untagged images interpreted according to the current working space. If you need to be able to convert such images when you open them, consider using the Missing Profile warning, which we describe below.
Keep Me Posted
Photoshop 6 allows you to set warnings about missing or mismatched profiles. The warnings act independently of the Policy currently in force, but they replace the information-only alerts with dialogs that let you take some action. I strongly recommend turning them on all until you’ve arrived at some solid reason for nixing them.
When you open an image with an embedded profile that’s different from the working space, and if you’ve chosen Profile Mismatches: Ask When Opening, you’ll see the dialog box shown in Figure 5.
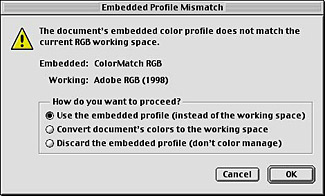
The dialog tells you which profile is embedded in the image and allows you to take one of three actions:
- “Use the embedded profile (instead of the working space)” tells Photoshop to open the image using its embedded profile to display it and convert it to other spaces on request. This option preserves the numerical values in the file, and also preserves the color appearance.
- “Convert document’s colors to the working space” tells Photoshop to convert the image from the embedded profile space to the working space. This changes the numerical values in the file, but preserves the color appearance.
- “Discard the embedded profile (don’t color manage)” tells Photoshop to treat the image as Untagged. It preserves the numerical values in the image, but the color appearance will change.
The warning Profile Mismatches: Ask When Pasting comes into play when you move pixels between images in the same color mode (RGB to RGB, CMYK to CMYK, etc.). When you paste between different color modes, color appearance always takes precedence, because you can’t paste RGB numbers into a CMYK document or vice versa. The warning is shown in Figure 6. It lets you choose between two possible outcomes:
- “Convert (Preserve color appearance)” converts the pixels being moved to the destination document’s space, preserving the color appearance and changing the numbers.
- “Don’t convert (preserve color numbers)” pastes the numerical values of the source into the destination document. Because the destination document is in a different space, the numerical values will represent different colors than they do in the source, so the color appearance will change.

When you turn off this warning, pasting behavior is dictated by the Policy set for that color mode.
When you select Missing Profiles: Ask When Opening, the dialog box shown in Figure 7 is invoked.
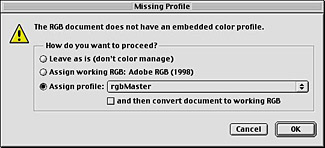
This dialog alerts you when a document contains no profile, and allows you to do one of four things:
- “Leave as is (don’t color manage)” tells Photoshop to treat it as an Untagged document. The numbers in the image remain unchanged, and are interpreted according to the current working space setting.
- “Assign Working RGB/CMYK/Grayscale” produces the same result as “Leave as is,” with one important exception: Instead of treating the image as Untagged, which means the interpretation of the numbers changes if you change the working space, the image is Tagged with the working space profile that was in force when you opened it. If you change the working space, the image will stay in the previous space.
- “Assign profile” lets you tag the image with any profile for that color mode.
- “Assign profile” together with “and then convert document to working RGB/CMYK/Grayscale” lets you choose a source profile for a conversion to the working space. This option is the replacement for the Assumed Profile mechanism in Photoshop 5.x. The settings in this dialog box are “sticky,” so while the Photoshop 6 method does require one more keystroke, I suspect that most people will find it much less confusing than the old Assumed Profile routine. Plus the new method has the advantage that you can change the source profile when you open the document instead of either cancelling the open and changing Profile Setup, or opening the document, then doing a conversion.
When you turn off the Missing Profiles: Ask When Opening warning, handling of images without embedded profiles is dictated by the Policy for that color mode.
Tagging, Untagging, and Converting
As in previous versions of Photoshop, you can convert from one color mode’s working space to another by choosing the desired mode from the Image > Mode menu. The Profile-to-Profile command in Photoshop 5.x gave you a lot of flexibility in doing other conversions, but also did nothing to prevent you from using the wrong profile(s), and it didn’t keep track of profiles after they’d been applied. Photoshop 6 replaces it with two safer and more effective commands.
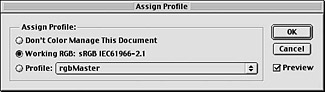
Assign Profile, on the Image > Mode menu, is shown in Figure 8. It lets you apply any profile to an image, or discard a profile that’s already been applied, making it an untagged image. Assign Profile doesn’t change the numbers in the file; it just applies an interpretation to those numbers. It also allows you to preview how an image will look in different spaces.
Convert to Profile, also on the Image > Mode menu, is shown in Figure 9. It’s similar to the old Profile-to-Profile, with two very important differences:
- It doesn’t allow you to choose a source profile. Instead, it always uses the document’s profile (or in the case of untagged images, the working space) as the source for the conversion. This prevents you from applying the wrong source profile.
- It keeps track of the destination profile, so the correct profile gets embedded when you save.
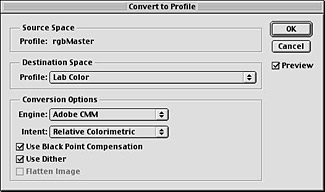
Like Profile-to-Profile, Convert to Profile lets you choose the engine and rendering intent, and apply black point compensation. I used to liken Profile-to-Profile to a chainsaw without a safety guard. Convert to Profile adds the safety guard.
Keeping Track
The new-found freedom to keep images in different spaces could quickly become bewildering. Fortunately, Photoshop not only keeps track of which image is in which space, it also offers you some important feedback. As shown in Figure 10, you can now display the document profile at the lower left of the image window.

Photoshop also offers a pair of more subtle clues: If you look at the title bar, you’ll see that the image mode is displayed as “RGB*.” The asterisk indicates that the document is in an RGB space that’s different from the current RGB working space. With untagged documents, a pound sign (#) appears instead of an asterisk.
This is by no means the whole story on Photoshop 6 color management, but it’s the part you need to master first. You can do much more with color management in Photoshop 6 than with any previous version, and at the same time the new architecture makes it less likely that you’ll do something wrong. We’ll continue to explore some of the other color management features in future columns.
“dyed-in-the-wool, by-the-numbers type who has been cursing at Photoshop for the past three years for stuffing color management down your throat.”
This is me. Why are we trying to color manage in our offices if we are not doing the offset printing here? I’ve been both sides of the desk, I was involved in profiling a commercial offset prepress department down to thumbprinting presses and can’t figure out why Adobe assumes that a designer can predict all the variables that affect color. I’m glad 6.0 gives me a way out of color management.