


Creativepro.com readers can subscribe to Element K Journals at a discount. Click here to learn more.
Calendars have become a hard thing to live without. They help us keep track of important dates such as birthdays, holidays, meetings and deadlines. Next time you need a calendar, you can scour the shopping mall for one that reflects your needs and tastes, or you can create one yourself.
Making your own calendar can come in handy if you want to keep track of business-related items, such as quarterly meetings or due dates that aren’t printed on store-bought calendars. You can also use “homemade” calendars as marketing tools by using your company’s logo or colors and adding special events. You can then hand them out to clients or prospective clients. Fortunately, PageMaker comes with a script called Calendar 1 that creates a basic calendar layout that you can then format to your taste, as shown in Figure A. In this article, we’ll show you how you can use this script to create your own calendar.

Figure A: Using PageMaker’s Calendar 1 script as a base layout, you can create professional-looking calendars for your personal or business needs.
Time Flies When You’re Having Fun
In order to create the calendar that’s shown in Figure A, we had to manipulate the script’s elements quite a bit, which may involve more time than you have. However, you can still produce an eye-catching calendar in a timely fashion with this script.
To demonstrate how to do this, we’ll first show you how to set up your document to accommodate the calendar layout. Then, we’ll show you how to access the script and apply it to your document. Finally, we’ll show you how you can format the script’s text and then add some color and graphics to create a great looking calendar.
Setting up the Document
To begin, launch PageMaker and choose File > New to display the Document Setup dialog box. Select the Wide option button in the Orientation area and deselect the Double-sided check box in the Options area. Doing so automatically deselects the Facing Pages option. Enter 12 in the Number Of Pages text box and change the Left margin to 0.75 inches, as shown in Figure B. Now click OK to create your document.
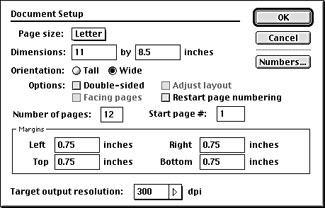
Figure B: Use these settings to set up your calendar document.
Running the Script
The Calendar 1 script is one of the many tem-plate scripts that come with PageMaker. To access it, make sure you’re on the first page of your document and then choose Window > Plug-in Palettes > Show Scripts to display the Scripts palette. Click on the Template arrow to expand the folder and scroll down to the Calendar 1 script, as shown in Figure C. Double-click on its name to display the Calendar dialog box, as shown in Figure D.
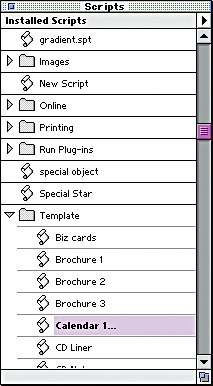
Figure C: Select the Calendar 1 script from the Template folder.

Figure D: The Calendar 1 script has many layout options from which to choose.
This dialog box allows flexibility when creating your calendar layout. You can choose any month as the first month of your calendar by selecting it from the list. This option is nice to have when you want to create a fiscal calendar that begins on a month other than January, such as July. You also have a choice of starting the weekdays with either Sunday or Monday depending on your needs. Finally, select the year from its list and click OK to add the calendar layout to the first page of your document, as shown in Figure E (this may take a few seconds). Repeat this process for the remaining pages in your document, being careful to select the correct month and year for each page.
Note: In Windows, the Calendar 1 script only goes to the year 2002. If you want to create a calendar that goes beyond that, you’ll have to edit the script. You can do this with the Edit Script command in the Scripts palette’s pop-up menu.
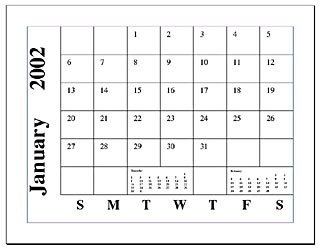
Figure E: This is the original layout of the Calendar 1 script.
This article was last modified on February 22, 2022
This article was first published on March 22, 2002
Commenting is easier and faster when you're logged in!

Recommended for you

Acrobat Tip: Make Last-Minute Corrections
An object you create in Acrobat, such as a link or a form field, can be selected...

When InDesign Ignores Your Leading Values
We’ve received two emails this week regarding leading — or, more spe...

A Script for Setting InDesign Preferences
This customizable script takes the chore out of setting InDesign's preferences t...