
Photography How-to: Learning to See in Black and White

Excerpted from Composition: From Snapshots to Great Shots by Laurie Excell with John Batdorff, David Brommer, Rick Rickman, and Steve Simon. Copyright © 2011. Used with permission of Pearson Education, Inc. and Peachpit Press.
In addition to the HTML version of the excerpt below, you can also download the excerpt as a PDF that retains the full design of the printed book.
In the digital age, black-and-white photography is as popular as ever, and the good news is that it’s never been easier to create stunning black-and-white images. Although the process of digital black-and-white photography is different from film, what makes a good image remains the same. We need to keep our eyes peeled for elements like tonal contrast, strong lines, patterns, shapes, and texture. We need to learn to see in grayscale. Here’s what I look for before I press the shutter button.
Poring Over the Picture
I was shoveling ice off my roof one winter night due to an unseasonably warm spell that hit the Midwest, causing all the snow to melt and creating tons of fog (and water that was leaking into my kitchen). As I was shoveling, I realized that I needed to get out there and see what the rest of the city looked like in this unusual situation. That’s when the image below caught my eye in a nearby park. The fog, lights, and snow created a compelling and mystical image. This was one of those moments when I said, “Stop what you’re doing and get your camera.” I’ve never regretted it. Notice how I used the streetlights and the fog to create a dramatic effect. The trees create a stark, dark contrast to the bright lights and snow.
Click the image below to see a much larger version with notes:

Poring Over the Picture
I’m drawn to images that make me feel like I’m really, literally there and that convey a sense of honesty. A good black and white should tell a story and stand the test of time.
Click the image below to see a much larger version with notes:

When to Go Black and White
I am asked this question a lot: “John, when do you decide to process an image as black-and-white?”
My family has been involved in the newspaper business for well over 100 years. I grew up reading a newspaper, and I’ve seen my share of black-and-white photos. My mind is constantly in grayscale mode. The question for me isn’t when do I decide to shoot in black and white, but when do I decide an image will be processed as color. There’s something timeless about a good black and white, and in my mind there’s less to get wrong. Don’t get me wrong — I shoot plenty of color images. But getting color right and not dating your work in the process can be difficult. For me, black and white just feels natural. Without a doubt, there are some shots that are better suited as black and whites. The following outlines a few of my thoughts on identifying and capturing those very images.
Learning to Live and See in a Black-and-White World
I rarely think about color. Instead, I’m stripping down the image in my head and categorizing it by its strengths. It takes a lot of practice to learn to see in black and white, but it can be done. I recommend practicing as often as possible, and you’ll see that you’ll get better with time.
The best part of this practice is that it will not only strengthen your black-and-white images, but your color images as well. Black-and-white photography gives us a chance to take away a very important element — color — and focus on the other elements that are harder to envision. The following are a few things to be on the lookout for when learning to see in black and white.
Tonal Contrast
Tonal contrast can be broken down into three categories: high, normal, and low. A high-tonal-contrast image consists primarily of white and black with very little gray. A normal-tonal-contrast image consists of a balance of all three. A low-tonal-contrast image can appear very flat since there’s little distinction between colors or tones within the image.
I tend to enjoy images where the blacks are most certainly black and the whites are very white. Many of my images are of the high-tonal-contrast variety so that the other elements of the image, which I’ll talk about next, come through even stronger (Figure 1).
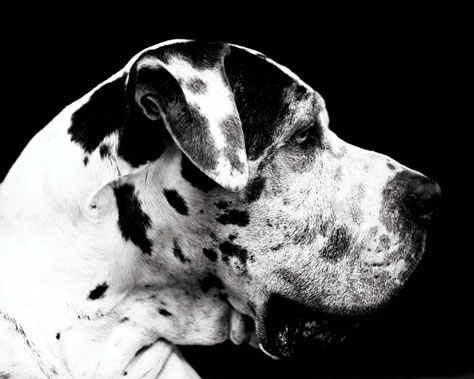
Figure 1: This image of Rodrigo is an example of very high tonal contrast. Check out how the whites and blacks are in strong contrast to one another, and how there’s very little gray in the image. ISO 320, 1/80 sec., f/3.2, 85mm lens.
The key to achieving this is to avoid colors with similar tonal ranges. For instance, if I’m shooting a dark red rose in front of dark green leaves, it’s just not going to work as a black and white. When stripped of their color and examined as shades of gray, their tonal range is too similar; there’s just not enough contrast there. If I were to shoot a white rose in front of dark green leaves, well, then I’d have the makings of a strong black-and-white image. Remember this when you are learning to see in black and white: Train your eye to look for variations in tone. Variations in color matter much less than variations in tone.
Texture
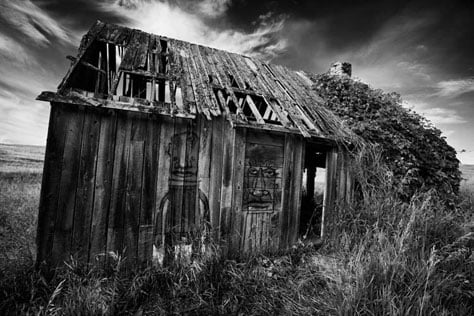
Figure 2: This image is almost three-dimensional. Here I tried to bring to life the textures in the barn, the clouds, and the grass so that it feels as though you’re standing there and could touch the barn yourself. ISO 160, 1/125 sec., f/8, 16mm lens.
What the heck is texture? I know texture is one of those words that the artsy fartsy sorts love to throw around, and the definition can seem vague at best. It’s real simple for me. If I see a barn and I can imagine running my hands over the aged, rough, splintered wood, that’s texture. If I’m looking out over a field of wheat and I can imagine what it would feel like to run my hand over the top of the wheat, that’s texture. It’s something you can feel. Texture adds another dimension to an image, making a black-and-white image come to life and giving it an almost three-dimensional feeling.
One of the best ways to show texture is with comparison. The smooth, puffy clouds in the sky countered by the old rough wood of a barn and the wispy grass provide the distinction among the textures that makes it visually appealing (Figure 2). If an image has too many similar textures, it gets too busy and becomes uninteresting. When playing with texture, work with contrasting textures within the same image to give it that extra something.
Light
The golden hours — those first or last few hours of light during the day when the angle of the sun is low and the light is soft — are the magical hours to photograph textures. This is when scouting a location can truly pay off. If I find a location that has a lot of texture — for instance, a field of wheat planted on rolling hills — I make a mental note and come back to shoot it during the golden hours. And, yes, I’ll even use my tripod (I’ll discuss the use of tripods a little later).
The same lighting works great for portraits. The softer light of early morning and late afternoon shows more contrast and texture in a person’s face. It can act to soften the skin or bring out the rough texture of sun-aged skin that has a real story to tell.
If your goal is to throw a lot of shadows or photograph something stark and barren, you’ll occasionally want to shoot in the bright, harsh light of mid-afternoon. There is no such thing as bad light; you just have to know what the different types of light will do to your image and be ready to show up when you have the best light for the image that you want (Figure 3).
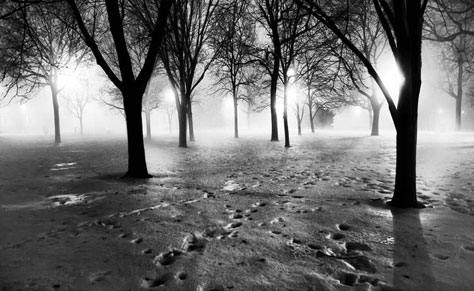
Figure 3: What really made this image work for me was the incredible light. The park lights were diffused by the fog, creating a soft glow that silhouetted the trees perfectly. ISO 1000, 1/25 sec., f/2.8, 27mm lens.
Shapes and Patterns
Shapes and patterns become even more evident in black-and-white photography. In fact, along with texture, they play the lead role. Keep your eyes peeled for repeating shapes, leading lines, and patterns. They make a big impact when you are viewing the landscape in black and white.
For example, in Figure 4, the pillars create a very nice line for your eyes to follow. This line adds depth to the image while at the same time maintaining a solid frame. The pillars also have a strong shape and are arranged in a repeating pattern. Also, notice the light: When shooting architecture, I like to look for strong lines and shapes that are complemented by shadows that pull the viewers’ eyes through a frame. If the pillars of the Agra Fort hadn’t had strong shadows on the backside, they wouldn’t have been nearly as effective at creating a strong leading line.
It’s key to keep your eye out for interesting light, such as strong shadows, when you’re shooting lines, shapes, and patterns. As you can see, color doesn’t matter in the image because the other elements are so strong. Preserving the color would only have taken something away from the final image.
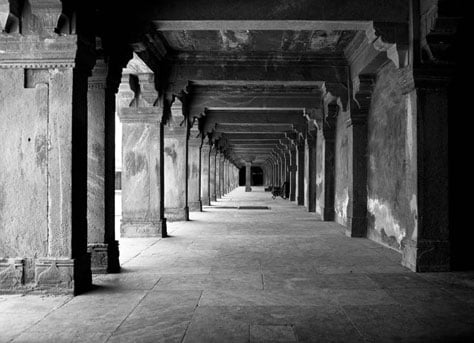
Figure 4: This image of the Agra Fort in India caught my eye because of the strong lines, the shapes of the pillars, and the repeating pattern. What made it really great is the perfect lighting that created the dramatic shadows. ISO 100, 1/100 sec., f/4, 28mm lens.
Portraits
I remember as a child looking at a black-and-white portrait my mother took of an oil-field worker. The image was extremely powerful. I couldn’t stop staring at his face; I studied every little feature and found myself wondering what it was like to be him. A black-and-white portrait can be very powerful — once you strip an image of its color and free the mind of distractions, you truly begin to see things for what they are. I like to think of it as redirecting the visual conversation.
The Indian man in Figure 5 is an excellent example. He is wearing a bright yellow turban, and the background is very colorful, which I found to be a distraction. To me, the story is in his face, not the colorful surroundings. With the color eliminated, the viewer is drawn into the man’s face and eyes.
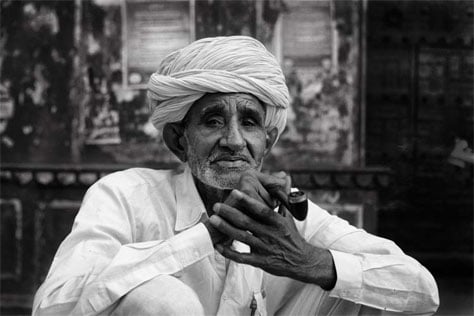
Figure 5: India is such a colorful country, but in this image the color was too distracting, so converting it to black and white just felt natural. ISO 200, 1/80 sec., f/4.5, 63mm lens.
The Peruvian woman in Figure 6 is wearing a bright traditional hat and clothing. When the image is converted to black and white, the focus falls off the clothing and is redirected to her eyes and the lines on her face. When you’re composing a black-and-white image, always remember to ask yourself what the real story is. If color isn’t the story, go ahead and leave it out. In doing so, you can make a good image really great.
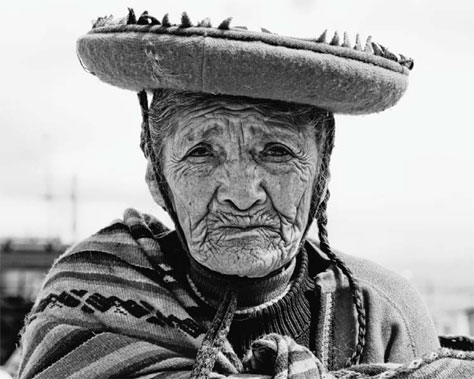
Figure 6: This woman was going about her day on the streets of Cusco, Peru. She was dressed in traditional colorful Peruvian clothing, but what compelled me to photograph her was her face. I knew that converting to black and white would allow me to tell the story as I felt it. ISO 200, 1/200 sec., f/9, 70mm lens.
Dramatic Landscapes
Learn to embrace nasty weather. I love bad weather. Yep, it’s official: I’m a storm chaser with a camera in tow. I’m a big fan of dramatic black-and-white landscapes, and nothing shouts “drama” louder than billowing dark clouds. I love it when the first word that comes to mind when I see clouds is “ominous.” It doesn’t get more dramatic than that.
Often when I’m out in the western United States shooting landscapes, I try to capitalize on the inclement weather. If the forecast calls for snow, rain, or better yet, severe thunderstorms, I’m ready to roll. Of course, you have to be careful not to put yourself in a precarious situation with lightning, but using some common sense can put you in a great spot when the amazing clouds come rolling in (Figure 7). Typically, I’ll shoot with my 16–35mm lens so that I can adjust the focal range on the fly. And if I want the clouds even darker, I’ll use my Lee Filters graduated neutral density filter.
A dramatic sky gives an extra “wow” factor to an already beautiful landscape. Remember to take the sky into consideration when shooting black and white. I’ll discuss “active” skies in more detail later, but just think about the extra contrast and texture that you are putting into your image when the clouds are telling a story all by themselves. Active weather almost always makes for an extraordinary black-and-white landscape.
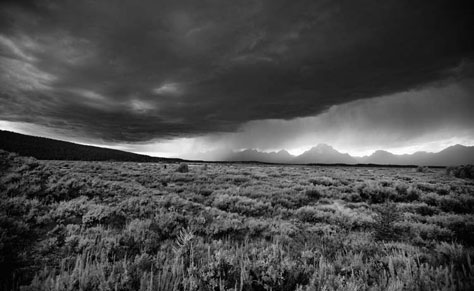
Figure 7: I was in the Tetons on my way to go backpacking when this storm rolled in. What drew me to this shot was the contrast between the dark clouds and the splinter of sunlight silhouetting the mountains. ISO 200, 1/80 sec., f/3.5, 16mm lens.
This article was last modified on January 10, 2022
This article was first published on January 4, 2012
Commenting is easier and faster when you're logged in!

Recommended for you

Make a Horizontal Lollipop Chart in PowerPoint
Turn a standard PowerPoint bar chart into an adorable lollipop chart with Stephy...

Insider Software Brings Automatic Preventive Font Maintenance to Leopard
Insider Software, the makers of FontAgent® Pro, announced today the immediate av...

Navigating and Customizing the Premiere Interface
Are you a Premiere beginner? Get started and customize your workspace with Myra...