
Photography How-to: Printing Black and White Images

The digital world is not kind to those of us who crave the graphic punch of black-and-white photos. Digital cameras are programmed to capture color data, and the vast majority of photo printers are also keen on color. So what’s a creative pro who prefers the world in shades of gray to do?
In the first part of this series, I explored several ways that Photoshop can convert a color image from a digital camera into a grayscale image. My conclusion: though I’m still nostalgic for the rituals of a wet darkroom, the flexibility of digital processing is superior. In this follow-up, I’ll show you how to print images after you’ve processed them.
Take Control
Before I printed my digital image converted in Photoshop, I wanted a control image to evaluate the output. I pulled out a 6 cm x 7 cm black and white negative. This image, shot in the late 1970s on Plus-X film, has high contrast (Figure 1).

Figure 1. This image, which began life as a black and white negative, is the control in my printing experiments. Click on the image for a larger view.
I scanned the negative on the excellent Epson 10000 XL flatbed scanner in both grayscale and RGB color spaces using LaserSoft’s SilverFast AI, which comes with the scanner.
I burned a CD of both the scanned negative and the image I captured with my digital camera (Figure 2).
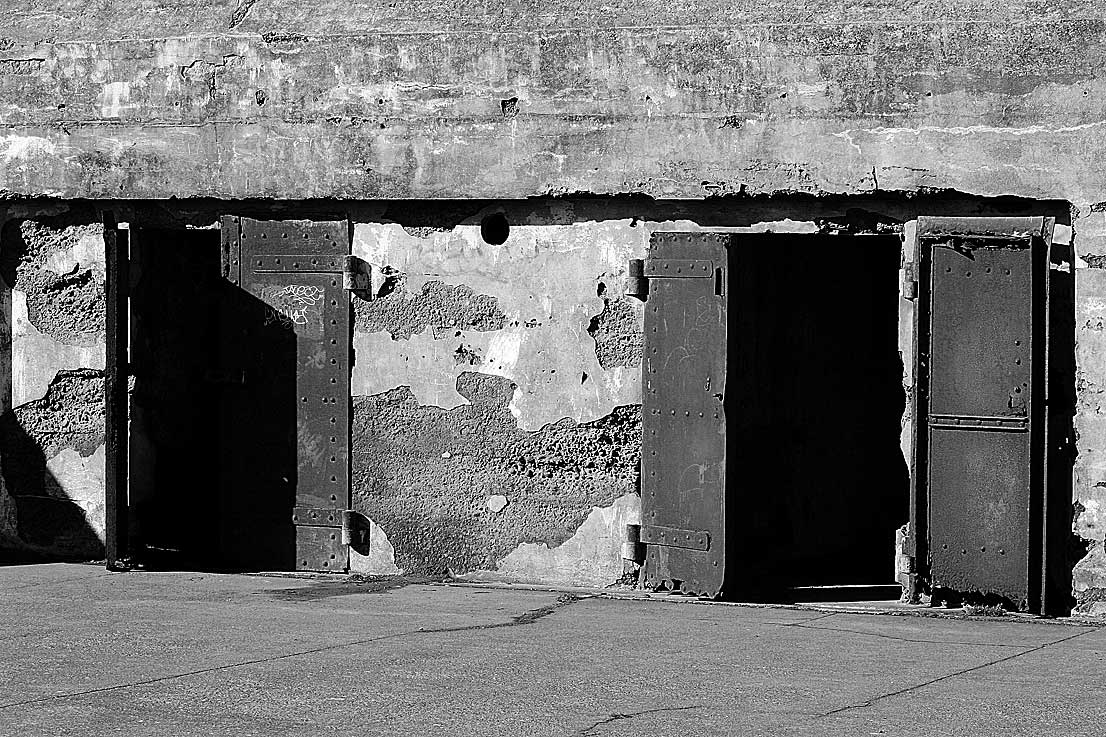
Figure 2. I first shot this image in color using a digital camera, then converted it to grayscale in Photoshop. Click on the image for a larger view.
I took the CD to two service bureaus, one with the wide-format HP Designjet 5500 inkjet printer and another with the Fuji Frontier, a commercial photo finisher. The HP Designjet 5500 uses six dye-based inks. The Fuji Frontier and the online service, Shutterfly, rely on traditional color photographic papers for their processing. I asked each service to print out an 8 x 10 of each file.
Disappointing Prints
The results were underwhelming for both the scanned negative and the converted digital camera shot. Because the Fuji Frontier, the HP Designjet, and Shutterfly are all optimized for color output, black and white pictures are not their strong suit. Compared to the fireplace photo I shot on film and printed in the darkroom many years ago, these new prints lacked the pop of a contrasty black and white paper. If I had been able to control the output in person, I could have tweaked each output scenario for better results. But many service bureaus don’t encourage such customer interference — er, involvement — and with the online services, of course, it’s impossible.
Even had the prints been outstanding, I would still be concerned about their beauty fading. Dye-based inks and regular papers don’t have the staying power of halides of silver or pigmented inks.
Try This At Home
I was discouraged. What’s the point of black and white images that just sit on a hard drive? But then I started experimenting with the Epson Stylus Pro 4800. This $1,995 printer accepts media (including museum-grade archival paper) up to 17″ x 22″. Its eight inks are pigmented inks, and three of the eight are black inks.
I fired up the 4800 and printed grayscale versions of Figures 1 and 2. After a little tweaking (easy to do because I had set up the files using Photoshop’s adjustment layers), both prints looked good.
However, I wasn’t yet satisfied. The printer driver for the Stylus Pro 4800 is equipped with an amazing feature: Advanced BandW Photo (Figure 3). To take advantage of it, you start with a color image — yes, a color image. I opened the RGB versions of my original images, selected Epson’s A3-sized, Premium Luster Photo Paper in the Media pull-down menu, and chose Advanced BandW Photo as my Color option. I unchecked the High Speed selection, checked the Finest Detail, and selected SuperFine – 1440 dpi in the Print Quality pull-down menu. This produced the high quality I was looking for.
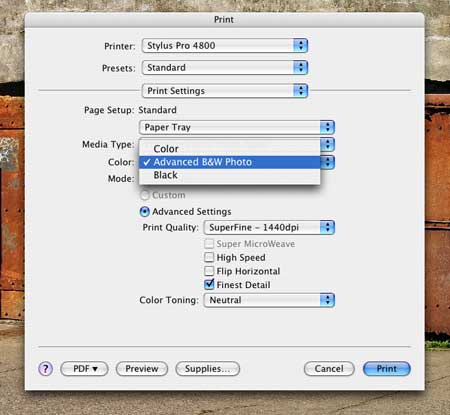
Figure 3. I heartily recommend the Stylus Pro 4800’s Advanced BandW Photo option.
I continued my explorations. What would happen if I chose SuperPhoto — 2880dpi in the Print Quality menu?
When I captured the image of the doors (Figure 2 above) with the Canon EOS-1Ds, Mk II, the file was 48MB. I opened the RGB version of this file in Photoshop, went to Image > Image Size, and re-sized the image to 300 dpi. But I couldn’t stop there, because this action would have produced a picture well over the A3 output size I had selected. So next, adjusting the pixel dimensions of the image, I resized the image down to the correct size, opened the Print dialog box, and went through the procedure I described above, selecting the SuperPhoto print quality.
My eyes, and an 8X loupe, were hard pressed to find any flaws in image quality. The print made using the SuperPhoto setting was, for all intents and purposes, equal to an extremely fine-grained photograph.
To confirm these observations, I opened the scanned negative and went through the same steps. I then compared the output from the scan to a black and white print made from the original film negative. The print from the scanned image was just as good as the original. (What’s more, manipulating the scan took me 2.5 hours in Photoshop, whereas I spent days in the darkroom with the film.)
The 4800 also gives you control over color tones. In the same Print dialog box, after you select Advanced BandW Photo in the Print Settings, you next select Printer Color Management. This brings up another dialog box with several parameters. Figure 4 shows the pull-down menu for Color Toning, ranging from Neutral to Sepia. For my printing tests, I selected Cool. The Tone menu let me fine-tune the tone from Darkest to Light. (If these two presets don’t meet your requirements, the several sliders in that dialog box provide infinitely variable adjustments.)
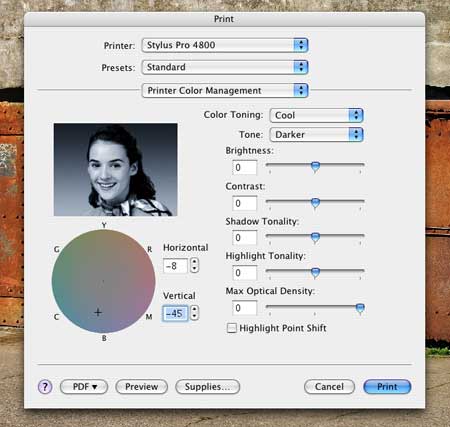
Figure 4. The default settings of the Printer Color Management dialog box are a good start.
The Print’s the Thing
Of all the devices I tried, I was happiest with the Epson Stylus Pro 4800. Its output has the pop I know so well from my film days, and its pigmented inks and archival paper selection mean my newfangled prints have a better chance of being visible decades from now. At $1,995, it’s obviously a significant purchase, but for people who need high-volume, salable prints, the price could be worth it. But if it’s beyond your budget, Epson’s Stylus Photo R2400 is sort of a little brother worth testing for yourself. Like the 4800, the R2400 can print on archival media (only up to 13 inches wide, though) and uses pigmented inks. It sells for a more reasonable $850.
This article was last modified on January 3, 2023
This article was first published on December 5, 2005
Commenting is easier and faster when you're logged in!

Recommended for you

Photoshop Tip: Using History Snapshots
Whether you call them do overs, Mulligans, or second chances, we all need those...

Creating Rounded Text in Illustrator
Rounded text is great for adding a soft, human look to text, and is a good solut...
Using Perspective Warp in Photoshop CC
The big news in the latest Photoshop CC update is 3D printing—at least, that’s t...