

Whether or not you buy into the Adobe Creative Suite concept, and even if you find the new, highly confusing icons for the applications annoying to the point of dementia, Adobe Photoshop CS is, in its own right, a very worthwhile upgrade. The most compelling changes, at least from this reviewer’s perspective, are in the area of digital photography and imaging, but creative types who like to work with layered compositions will find a lot to like, too.
One of the less-obvious aspects of this release is the amount of work that has been done under the hood to bring Photoshop into the 21st century, doing away with limitations that haunted earlier versions. The number of layers you can add to an image is now limited only by memory and storage, including layers in 16-bit/channel images (the limit for channels has been raised to 56). The old 30,000-pixel limit, which has been hardwired into Photoshop since the 1980s, has been replaced by a 300,000-pixel limit (that should hold for another 10 years or so). Existing file formats have limits that Photoshop can’t control, of course — TIFF files, for example, max out at 4GB — but the new Large Document Format (.PSB) will happily let you create files in the terabyte range (if you have enough scratch disk space to work with them and storage space to save them).
We’re happy to have some useful new tools, and downright ecstatic with the ability to use layers on high-bit images, but what makes Photoshop CS a must-have upgrade for the digital photographer is the integration of the Camera Raw plug-in with a much-revamped File Browser. One of the biggest bottlenecks in a digital capture workflow, especially when you shoot Raw rather than JPEG, is simply finding out what you’ve captured, and making the initial select between the “hero” shots and the less-successful ones you want to toss or revisit later.
Camera Raw and the File Browser
Camera Raw is Adobe’s converter for raw digital captures. In a typical striped-array digital camera, the actual raw capture is a grayscale file, because each sensor in the array captures only one color — red or green or blue. To make an RGB image, the raw capture must be converted into the corresponding colors.
The initial Camera Raw plug-in, released earlier this year as a for-pay download, allowed the Photoshop’s File Browser to display thumbnails and previews of raw captures. But the thumbnails were small and the previews weren’t sufficiently detailed to let you make good decisions about the image. The only automation offered was to process a batch of images using identical Camera Raw settings, so that all images were restricted to using the same profiles in lockstep with the others. As a result, many shooters either stuck with the (usually wretched) software provided by the camera vendor or turned to third-party solutions.
In Photoshop CS, the File Browser has become a mini-application in its own right, with its own menus and preferences. It lets you set a custom thumbnail size up to 1024 pixels wide, and builds previews as big as you want them. If you had to rearrange the File Browser by hand every time you wanted to change the configuration, it wouldn’t be terribly useful. Fortunately, Photoshop’s Save Workspace feature, which lets you save different palette setups that you can recall from the Workspace menu, now extends to the File Browser too. You can set up different configurations of the File Browser for different tasks, then save them as custom workspaces using Photoshop’s Save Workspace command, and even create Actions assigning Function keys to the different configurations so that you can switch between a large preview view and a view that shows as many thumbnails as possible, with a single keystroke (see Figure 1).
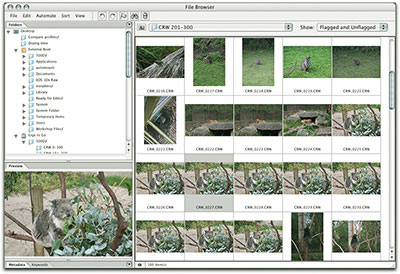
Configured for browsing

Configured for image evaluation with a large preview
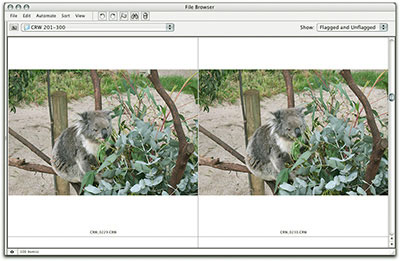
Configured for image comparisons with custom-size thumbnails
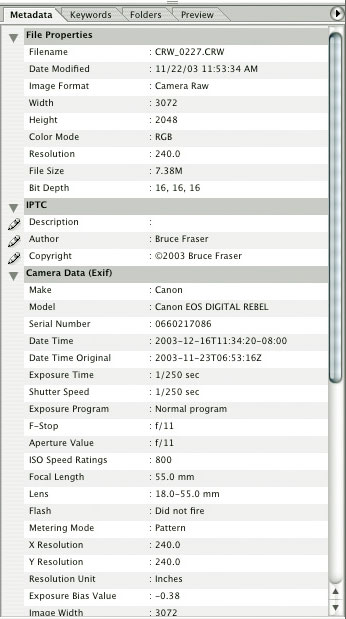
Image metadata for a photo selected in the file browser
The File browser also offers vastly expanded support for metadata (literally, data about data), including: EXIF data supplied by the camera; the IPTC metadata such as caption and copyright notice that was formerly accessible only from the File Info command; GPS info from GPS-enabled cameras; keywords; and last but not least, Camera Raw settings. The significance of this last item is that you can now save Camera Raw settings as metadata and apply them to raw images without actually opening them. That means you can apply individual settings to each image, then open them as a batch. Or you can use the Batch feature (which is now accessible from the File Browser’s Automate menu), to open the images, apply an action, and save them. It took me only a few minutes to create one action that saves images as 1024-pixel JPEGs, and another to save them as 16-bit, sharpened, layered TIFFs with adjustment layers already applied for editing. All in all, the combination of Camera Raw and the File Browser represents a huge step forward in creating a rational workflow for raw digital captures.
The Camera Raw plug-in itself — which although integrated into the program appears as an Import plug-in — has also been updated, adding support for new cameras (including some that don’t appear on the list on Adobe’s Web site, notably the Canon 300D and the Kodak 14n).
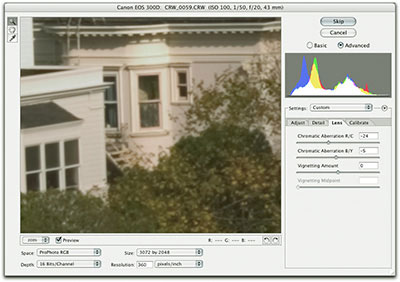
Other additions to Camera Raw include new controls for addressing chromatic aberration and vignetting as well as more-sophisticated noise reduction. Chromatic aberration causes color fringes along high-contrast edges when the lens fails to deliver the differing wavelengths of light to the same point of focus (see Figure 2). It’s a common problem at the wide end of zoom lenses, and digital captures tend to be more revealing of lens flaws than is film. Camera Raw’s chromatic aberration controls adjust the size of the red and blue channels relative to the green, and do an excellent job of eliminating the problem without doing violence to the image. Vignetting, where the lens fails to illuminate the sensor evenly and darkens the corners, is somewhat less common, but again the controls do an excellent job of fixing it.

The vertical edges of the windows and building show color fringes from chromatic aberration.

Camera Raw’s chromatic abberation sliders minimize or even eliminate the color fringes.
Camera Raw takes an unusual approach to handling color from digital captures, one that I believe holds great promise. Rather than relying on a single static profile to characterize the camera’s response to all lighting conditions (which despite considerable effort, I’ve never been able to get to work), Camera Raw contains two built-in profiles for each supported camera: one that characterizes the spectral sensitivity of the camera under D65 daylight, another that does so under 3200K tungsten. But these profiles are generic profiles: if your camera behaves somewhat differently from the units Adobe used to engineer the profiles, the resulting color will be somewhat off. The new Calibrate controls in Camera Raw let you address this by tweaking the color for your specific camera body. You can then save the resulting calibration as a Camera Default. Thanks to the magic of metadata, Camera Raw knows exactly which camera originated each image, so even if you have three Canon 10Ds or three Nikon D1x’s, each of which behaves slightly differently, you can create a different default for each one, and Camera Raw automatically applies the correct default to each image.
More Good News for Photographers
Two new Adjustment commands are also likely to be of particular interest to photographers. The PhotoFilter adjustment, which can be applied directly or as an adjustment layer, replicates the effect of traditional analog warming (81 and 85) and cooling (80 and 82) filters, along with a laundry list of other color filters, and the option to create your own filter color. As a result, you can simulate the effect that results had you used a lens filter when taking the picture. The Highlight/Shadow adjustment, designed to rescue images with too much contrast (adding contrast has always been easy, but removing it is hard), isn’t available as an adjustment layer, because it’s an adaptive pixel-by-pixel correction. But it’s a useful way to save underexposed images (see Figure 3).
The image has too much contrast, losing detail in both highlights and shadows.
After Shadow/Highlight correction

The Shadow/Highlight adjustment
One other goodie is also aimed at photographers — the Lens Blur filter does a very creditable job of simulating shallow depth of field, letting you blur distracting background detail so that the subject stands out (see Figure 4). What makes this filter special is that it does a great job of simulating the characteristics of actual lenses shot at wide apertures to produce a natural-looking effect quite unlike any of the other blurring options — no mean feat!
 Figure 4: The Lens Blur filter adds natural-looking blurring that simulates shallow depth of field, allowing you to minimize distracting background detail.
This article was last modified on January 18, 2023
This article was first published on January 6, 2004
Commenting is easier and faster when you're logged in!

Recommended for you

Scanning Around With Gene: When Chemicals Plus Electricity Equaled Beautiful Art
You could certainly argue that the graphic arts industry, even in its present co...
How to Turn a Photo into Graffiti with Photoshop
You can turn any photograph into a piece of graffiti artwork in Photoshop, witho...

CreativePro Tip of the Week: Increasing the Photoshop Canvas Size with the Crop Tool
This CreativePro Tip of the Week on Increasing the Photoshop Canvas Size with th...