
Photoshop How-to: Retouching with the Patch and Healing Brush Tools

This story is taken from “Adobe Photoshop 7.0 Studio Techniques.”

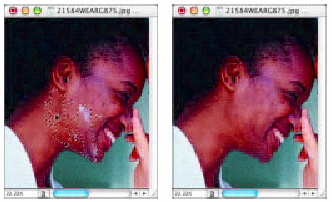
When Adobe Photoshop 7.0 came out, many people jokingly referred to two of its new features as capable of virtual plastic surgery. The Healing Brush tool is so adept at erasing wrinkles that you’d swear its icon in Photoshop’s toolbar should really be a Botox syringe. For fixing facial flaws, the Patch tool is like digital dermabrasion as it smoothes skin tones.
Vanity thy name is Photoshop.
Of course the Patch and Healing Brush tools have more widespread application than just providing instant facelifts. You can use them instead of the Clone Stamp tool to retouch images with subtlety and finesse.
Learn how to use these tools in this chapter from Ben Willmore’s acclaimed book, “Adobe Photoshop 7.0 Studio Techniques.” By the way, the Patch and Healing Brush carry forward to Photoshop CS, so exploring these tools is time well spent.
We’ve posted this excerpt as a PDF file. All you do is click this link “Retouching with the Patch Tool and Healing Brush” to open the PDF file in your Web browser. You can also download the PDF to your machine for later viewing.
To open the PDF, you’ll need a full version of Adobe Acrobat (5 or higher) or the Adobe Reader.
To learn how to configure your browser for viewing PDF files, see the Adobe Reader tech support page.
Excerpted from “Adobe Photoshop 7.0 Studio Techniques” © 2002 Ben Willmore. Reproduced by permission of Pearson Education, Inc. Publishing as Peachpit Press. ALL RIGHTS RESERVED.
This article was last modified on January 3, 2023
This article was first published on November 26, 2003
Commenting is easier and faster when you're logged in!

Recommended for you

Adobe Releases Lightroom 6 and Lightroom CC
This week (April 21, 2015) Adobe Released Lightroom 6 and Lightroom CC 2015, pro...

Image-Editing Review: Adobe Photoshop Lightroom 4
Pros: Improved develop engine extracts surprising dynamic range out of single im...

How to Use the Adaptive Wide Angle Filter in Photoshop
Grossly distorted wide angle photographs are ugly and confusing. Photoshop...