
Photoshop How-To: Quick-and-Easy Collages

This story is taken from “The Design Authority” (Element K Journals).

I’ve been using Photoshop for a while now, but I haven’t found a good technique to use when creating collages. Do you know of a special formula for putting collages together?
One of the most powerful features in Photoshop is the ability to create layers. This is especially useful when creating collages because with the aid of layers, you can place each element within your design separately and manipulate them freely. Not only that, but you can generate layer masks, apply effects, and more on each specific layer in order to create the perfect collage. In this article, we’ll introduce you to a variety of digital collage-making techniques that will save you time and make you wonder why anyone would want to make traditional cut-and-paste collages again.
Hunt and Gather
The first step in making a collage is, of course, collecting all the images for the collage. Try not to limit yourself to a few set images. This is one instance when the more you have the better off you’ll be. Because collages are more like organized chaos, things tend to change throughout the design process. What you initially thought would be perfect in the top-right corner may not work at all, so it’s good to have a few other backup images to choose from.
Once you’ve gathered all of your images, scan them in or download them, and then save each file in one folder. Also, make sure that each file is the same resolution, color mode and format.
Do the Drag and Drop
The next step is to place all of your images into one document. This allows you to pick and choose among all of the images without having to continuously open and close different files. So, open all of the images that you’ve gathered in Photoshop. Then create a new document, any size you want. Just make sure that you set the resolution and color mode to match that of your other images. Then drag and drop each image onto your new document. They’ll automatically be placed on separate layers when you do this, as shown in Figure 1.
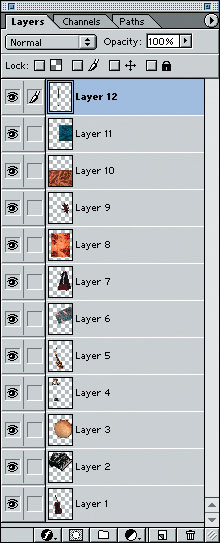
Note: If your images are on a white background and you won’t be including the white area in your collage, then before dragging it over to your new document select the image area only, not the white background and drag that over. This will save you time later when collaging the images together.
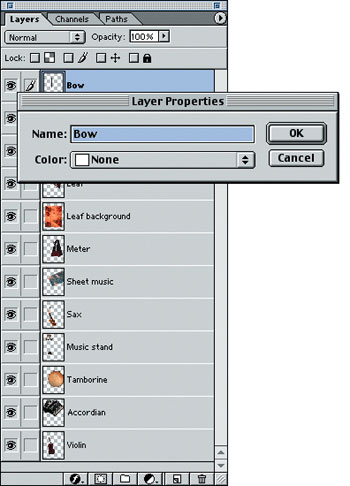
Don’t worry about the placement of your images yet. Once you’ve dragged all of the images onto your new document, name each layer. To do so, go to the Layers palette and select a layer by clicking on it. Then choose Layer Properties from the Layers palette’s pop-up menu. In the resulting dialog box, name your layer accordingly, as we did in Figure 2.
Musical Layers
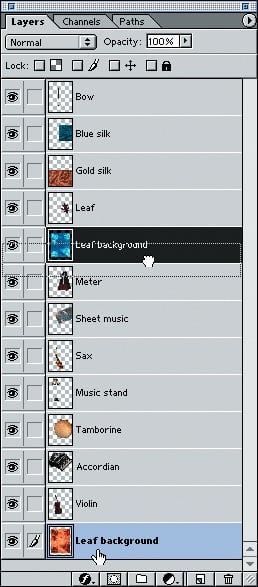
After naming all of your layers you’re ready to arrange them into sequence. For example, we know that we want our Leaf background and Silk layers as our collage base, so we’re going to select the layers and move them to the back in the Layers palette. To move your layers, click and drag the layer to a new spot within the Layers palette, as demonstrated in Figure 3. (Layers at the base of the Layers palette are in the back of your document, whereas layers at the top of the palette are in the front.) As you begin creating your collage, you’ll probably be moving your layers back and forth depending on how you want your final image to look. But, because it’s easier to work from the bottom up, it’s best to establish your background imagery first. So drag and drop your background image into place.
Build your Collage
The next step is to establish the basic layout of your collage. Rather than overwhelm yourself with multiple images, select a few to begin working with. Keep your background imagery visible and then hide the remaining images by clicking on the Eye icon (Indicates Layer Visibility box) next to each layer in the Layers palette. Then, if necessary, resize your graphic in the background layer and reposition it using the Transform command and the Move tool.
After positioning your background layer’s image, click on the Indicates Layer Visibility box to make the next image in your collage visible. Click on the layer to make it active and then position it where you want it. Now things can get complicated. How you manipulate your imagery depends on the style you’re going for and your images. There are many different techniques that can be implemented to combine your images. They’re as follows:
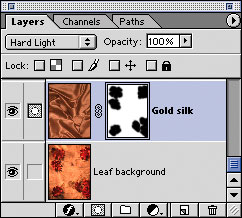
- If you want to combine two elements, one on top of another, as we did in Figure 4, you can use Photoshop’s blending modes. Place your image directly over the image behind it and make the image the same size. Then, select a blending mode from the Set The Blending Mode pop-up menu located in the Layers palette. Test out all the different modes to see what works the best for your imagery.


- If you only want areas of an image to show, you can use a layer mask. Click on the appropriate layer. Then click the Add A Mask button at the base of the Layers palette. Now set your foreground color to black and click on the Airbrush tool. Then paint over the areas that you don’t want visible, as shown in Figure 5. If you want to paint information back in just switch your foreground color to white. This technique allows you to create soft edges around your imagery and you can constantly go back and revise which areas are hidden or visible.

- Another way to blend images using layer masks is by filling the mask with a gradient. This creates a nice soft union of two images, as shown in Figure 6.


- If you want to create a collage with crisp edges around your figures, you can do so using the Pen tool. Trace around the edge of your image and then convert the path into a selection by choosing Make Selection from the Paths palette’s pop-up menu. Then delete the background or inverse your selection, as we did for the image shown in Figure 7.

- Another option is to create a collage of simple shapes, such as squares and/or circles, as displayed in Figure 8. You can do this using the Rectangular and Elliptical Marquee tools.

All of these techniques help to create interesting collages. You can combine all of these approaches when making your collage or use one set method for consistency. There’s no right or wrong here.
Limit your Layers
Once you’ve created your collage, it’s good to step back and look at each component in the layout. Hide one layer at a time to see how it affects the final piece; you may discover that your design looks significantly better with or without a particular image, as we did when looking at our design shown in Figure 9. Think of it as the checks-and-balances process of collage making.


This story is taken from “The Design Authority” (Element K Journals).
This article was last modified on January 3, 2023
This article was first published on July 4, 2002
Commenting is easier and faster when you're logged in!

Recommended for you

Easy 3D with Photoshop and Adobe Dimension: Part 1
If you’re not experienced with 3D software, you’ve probably had to pass on the i...

The Most Powerful Panel in Illustrator
Imagine a panel that is so powerful it can control everything about the appearan...
Creating a Blend Mode Test Layer in Photoshop
Blending Modes use a top layer to change the appearance of the layer, or layers...