
Rehabilitate Old Photos
The value of rehabilitating family photographs blows the top off the emotional Richter scale. When I recapture amazing print quality from seemingly worthless snapshots, my clients cry, hug me, and send flowery thank you notes. And they pay lots of money — gladly.
Photo rehabilitation is not just repairing the typical tears, age, and fading of an antique portrait. It’s not reshooting or remaking from scratch. Photo rehab means remodeling and rebuilding important, but initially unsatisfactory, images to recover the emotional impact of an event. As memories fade, people cling to striking images that recall their feelings of a landmark occasion.
A Second Chance
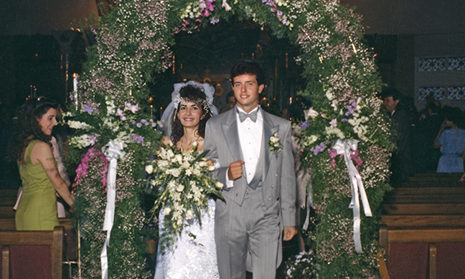
A bride brought me her 18-year-old photographic horror story. Angry and distraught over poor-quality wedding pictures, she fumed bitterly through close to two decades and several children before deciding to invest in recreating her dream nuptials into a contemporary wedding storybook.
All she ever received was a disappointing proof set; her photographer soon went out of business and disappeared. There were no negatives.
Kept in a proof book, the 147 prints looked relatively undamaged. They were mostly dark and underexposed, poorly composed and lit, with many out of focus and lots of color variation.
Careful Preparation Pays Off
Cleaning prints individually pays dividends later on. Accumulated dust and dirt may seem negligible or almost invisible, but it will scan and therefore compromise the results.
Step 1. Wear white cotton lab gloves for best results. A sticky tack cloth (less than $1 at paint and hardware stores) will remove loose dust and grit. Wipe prints again with a lens cloth or antistatic darkroom cloth. You can eliminate or lessen stubborn fingerprints with liquid film cleaner.
Step 2. Clean and re-clean the scanner glass, preferably with graphic arts no-static foaming spray. Recheck frequently for dust and inadvertent smears.
Figure 1. A few seconds spent with these tools saves lots of time later.

Scanning Tips
Inexpensive high-speed scans are not an option in cases like this; you’ll need to work with high-resolution files that give you plenty of color and density correction options during the scan.
Step 3. Single out the best exposure and color image in each similarly posed and lit series. Scan these first as master or guide images.
Step 4. I chose 600 ppi resolution and 8-bit depth settings (24-bit total) because the maximum final print size was to be 8″ x 10″, with most at 4″ x 5″ or smaller. For larger prints, or if there were just a few images, time-consuming 16-bit scans with much larger files would have been the best choice.
Step 5. In the scanning software’s advanced settings, change the histogram sliders in luminosity (RGB) for density corrections, and the individual color sliders for tonal tweaks. The most important slider is usually the middle one, because that’s where differentiation of tones matters most.
TIP: Scan, save, and leave each master guide image open on your desktop. This allows direct comparison while you scan and match other images in the same series.
Equalize Color
Making images in a series match is obviously harder for a rehab job then when working with original files. You’ll probably encounter color crossovers between faces, clothing, and backgrounds, so decide which elements are most important and match those. You’ll have to selectively alter the others in Photoshop.
Figure 2a. Typical color variation and crossover can be this bad, even after adjustment during scanning. Click on the image to see a larger version.

Figure 2b. Especially when two prints will be montaged side by side on the same page, you have to make them more visually appealing and similar. Click on the image to see a larger version.

Step 6. Set Photoshop CS3 to open the next image scan in RAW. Make sure the RAW window is small enough that you can see your master image as well.
Step 7. Work the color balance sliders first.
TIP: Remember the all-important color pairs: cyan-red, magenta-green, yellow-blue. For instance, to correct strong yellow bias, move the temperature slider left, toward blue. Have you been planning to convert to black and white, so poor color doesn’t matter? Think again. To get decent monotone images, it’s essential to color-correct before converting.
Step 8. Work the light/dark relationships. Photoshop CS3’s quarter-tone adjustments work miracles and are one of the best incentives to update to CS3. Move the Fill Light slide right to magically lighten detail in medium-deep tones without making darks milky-looking. When moved right, the Brightness slider almost always dramatically enhances both faces and medium colors.
Step 9. Enlarge the image to at least 100% in RAW and evaluate grain/noise. Moving the Color noise slider (chrominance) to as much as 100% helps to remove little specks of red, green, and blue that often appear in very dark areas, without affecting sharpness much.
TIP: Even if you carefully cleaned the original, you’ll probably be horrified that the enlarged image seems covered with dust specs, finger prints and mars you never saw on the original. Resist the temptation to substantially increase the Luminance noise correction. Doing so at this point throws the dust out of focus, but brings unacceptable softening to the whole image. You need to retain every bit of sharpness, because you’re already two generations away from the original.
In Photoshop
Use the secrets in this section and you’ll look like a magician. These tweaks pull stubborn details in to line, take just a few seconds each, and are worth big bucks. You own color judgment is the key ingredient.
Step 10. Selectively fix neutrals. Color variations in whites and grays are the most troublesome.
TIP: The Sponge (a little-known tool nested with the Burn and Dodge tools) is your fast and simple secret weapon. Set the Sponge’s tool mode to desaturate, medium soft brush, and as high as 100% opacity/fill. Of course, use a duplicate layer to be safe, but you’ll rarely need to reverse desaturation. Brush confidently over areas with a bad color cast, such as the grey suits in my example, and the color cast vanishes. It’s the same with blue and yellow shadows in the bride’s dress. A stylus and tablet simplifies the process to a flick of the wrist.
Change the Sponge mode to saturate to solve the opposite problem. Age-faded color or dulled details will pop with selective saturation. I suggest about 25% opacity/fill to start; use several passes to incrementally deepen the effect.
Figure 3a. You’ll achieve dramatic changes with the Sponge tool. Yellowish gray easily becomes neutral and washed-out pink gains some oomph. The red circles in this “before” image outline huge areas of severe damage, unremovable dust and spots.

Figure 3b. The artistic enhancements in the “after” image include facial retouching, body slenderizing, and a much more attractive expression. I also cropped off most of the damage.

Step 11. Now it’s time for selective face recovery, which you should perform on a duplicate layer for alterability.
A too-deep yellowish tan or overly saturated red face are the most frequently needed corrections. Draw a close, but loose and quick, selection around a face with the Lasso tool. Often simple lightening is all you need to bring the tone into line with your master image.
Three suggestions to further tweak face color:
1. Color balance sliders may need just a few points of correction, mostly on the middle slider.
2. Saturation correction on the offending color can be moved just a few points to the left to desaturate.
3. Selective color adjustment, set on the color to be de-emphasized, pulls black slider slightly to left. Experiment with other color sliders for additional effect.
Once your correction is complete, refine any spillover in your loose selection by enlarging the area and erasing the spillover using a mask.
Damage Control
This part of the process involves fixing all the dust, dirt, and flaws picked up by your scanner, without softening important detail.
Step 12. Enlarge the image to at least 300% to assess damage. Don’t panic! Estimate where the eventual crop will fall: edges are naturally the worst and often you can crop off much of this area.
Step 13. Duplicate the layer and run Gaussian Blur, varying the strength until many specs and scratches disappear. Ignore what happens to faces and the main subject matter.
Using a layer mask, paint back in all critical detail areas: faces, flowers, some background elements, and clothing details (but usually not dark clothing).
Step 14. Every step up to this point has maximized results and minimized effort. Now you have to expend the time and effort to remove the remaining spots and scratches by hand. Many seemingly tiny spots will bloom into obvious flaws when you eventually sharpen for print output. A tablet and stylus are a must, otherwise this step could make you a bit nuts with repetitive motion.
Three suggestions for repairs:
1. The Spot Healing Brush is best for individual spots with uniform surroundings.
2. The Patch tool is best to handle lines, scratches, and larger areas, and to smooth areas of plain color.
3. The Healing brush, sometimes in normal mode but more frequently in replace mode, is best for tiny details and complex areas.
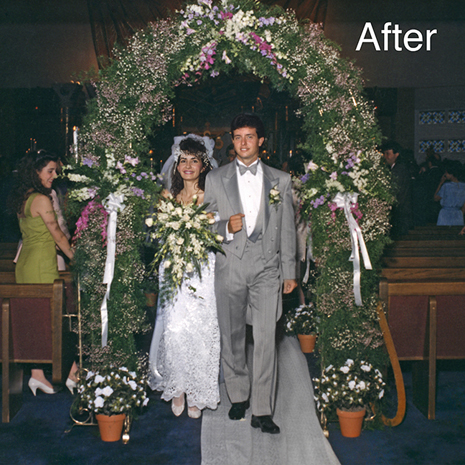
Figure 4a. This shot, the couple’s favorite, was a mass of scratches, spots and smudged fingerprints. Red outlines show that almost the entire image was covered with damage.

Figure 4b. Enlargements of the favorite shot reveal that the bride and groom’s faces are too far out of focus to make a decent 8×10 print. Click on the image to see a larger version.

Figure 4c. For the final version, I imported heads from another scan where the size, angle, lighting, and expression were sufficiently similar.
Now you should have a clean, workable image file. If you can rehab four to five images an hour, your retail billing for a job this size will top $2,000 for just this initial phase alone.
Once the drudgery is done, you can get on with the creative parts of cropping for impact, restoring sharpness, and sequencing and montaging to tell the story. Add design, print and album binding, and one such rehab job will easily net a generous month’s salary. It’s a great niche market concept!
This article was last modified on January 5, 2023
This article was first published on July 14, 2008
Commenting is easier and faster when you're logged in!

Recommended for you

Creating a Panorama: Photoshop, Camera Raw, or Lightroom?
When a scene is wider than your widest lens, merging images into a panorama is a...


Create Amazing Computer-Generated Art With Amberlight
Amberlight is an app for Windows and Mac from Escape Motions (makers of Fla...