

Back in 1986, Adobe introduced a postscript-based drawing program called Illustrator. A lot has happened since then, including Adobe’s acquisition of Macromedia and Apple’s adoption of Intel-based hardware. Now, more than 20 years since its first release, Adobe has released Illustrator CS3, which is part of the Adobe Creative Suite 3 family of products.
Considering how little competition Illustrator has (FreeHand, which seems to be in limbo, is also owned by Adobe), you might think that Adobe has little incentive for putting much effort into a new version. But one look at Illustrator CS3 and it’s obvious that Adobe hasn’t shown any signs of slowing down. With innovative new features, improved integration with other applications, and many small enhancements, Illustrator CS3 impresses on many levels. The $599 ($199 upgrade) question is, does it impress enough to part with some of your hard-earned cash? Let’s take a look.
Get Your Work Done Faster
Getting your work done quickly is paramount, and Illustrator CS3 helps you make your deadlines and even make it home in time for dinner in several ways. Adobe has promised better performance in past upgrades, but Illustrator CS3 is the first version where you can actually believe it. Illustrator ships as a universal binary application and therefore runs native on Intel-based and PowerPC-based Macs running the Tiger OS. Illustrator also runs on both Windows XP and Windows Vista. While you can feel the performance enhancements on just about any system, CS3 really takes advantage of systems with multiple processors. On my PowerMac G4, Illustrator redraws complex artwork twice as fast. And large files simply fly on my MacBook Pro.
Making it easier to navigate within the application, Illustrator CS3 features a new panel-based user interface that lets you turn panels (formerly known as palettes) into icons and dock them to the sides of your screen (Figure 1). The new interface is consistent with Photoshop, InDesign, and even Flash CS3.

Figure 1. You can reduce panels (the new name for palettes) to icons that attach to the side of your screen. Clicking an icon activates that panel. Click on the image for a larger version.
The context-sensitive Control panel at the top of the screen now offers links to more functionality, and it’s also aware of your monitor resolution (Figure 2). The Control panel adjusts its content according to how much room is on your screen.

Figure 2. If Illustrator senses there’s not enough room to display icons for each function, hyperlinks appear instead. In this example, one click gives you access to the entire Align panel. Click on the image for a larger version.
Creating new documents is less of a chore with New Document Profiles, which contain important document settings, such as document size, color mode, preview mode, measurement settings, and even raster effects resolution settings (Figure 3). Illustrator ships with profiles optimized for print, Web, mobile and devices, and video and film documents, and you can add your own customized profiles, as well. With these profiles, you can create a new file with all of the correct settings with a single click of the mouse.

Figure 3. Due to the enhanced performance in Illustrator, the Print document profile sets the Document Raster Effects setting to 300 dpi — automatically. Click on the image for a larger version.
Some Kind Of Colorful
Go to Adobe’s Web site and you’ll see lots of talk about a feature the company refers to as “Live Color,” but in the app itself, you won’t find any tool, menu item, or panel called by that name — only one dialog box has the name Live Color in it in all of Illustrator CS3. In fact, Adobe’s marketing draws so much attention to this thing called Live Color that you can overlook what Illustrator CS3 really has — robust color support throughout the entire application. Put another way, if there’s anything at all that you want to do with color, there’s a good chance Illustrator can do it. For example, ever tried looking for the closest Pantone color that matches an existing process color? Ever tried to change a color within a pattern or a gradient (or gradient mesh)? Ever tried to convert all of your vector art to grayscale? How about turning one of those boring charts with all those shades of gray into something more exciting? Illustrator CS3 can do all of these things.
Before I get ahead of myself, let me start by describing some of the color enhancements you’ll find throughout the application. You can create groups of swatch colors, making it easy to organize your colors and manage their relationships. I have swatch groups that contain colors for different clients, and for different parts of an Illustrator file. For example, to simplify coloring fall leaves, I created a group of several shades of red, orange, and yellow (Figure 4).
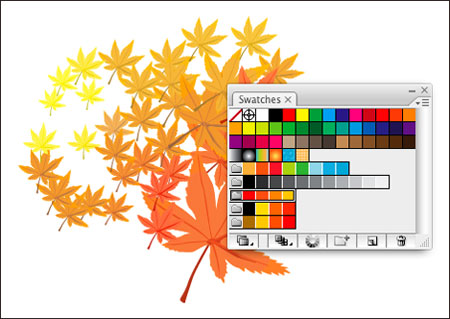
Figure 4. Groups of colors appear as folders within the Swatches panel.
Speaking of different shades of colors, Illustrator CS3 features a new panel called the Color Guide, which is designed to inspire your color choices. Anytime you pick a swatch color, the Color Guide gives you variations of that color. You can choose the kinds of variations that the Color Guide provides, but the real power is when you can feed the Color Guide a specific palette of colors to choose from (Figure 5). For instance, if you’re working on a job that will be printed in spot colors, you can instruct the Color Guide to only suggest variations from a library of Pantone colors.

Figure 5. By limiting the Color Guide to a specific library of colors, you’ll see suggested color variations that already conform to your needs.
The feature Adobe calls Live Color is actually a single dialog box that contains two seemingly simple functions: editing colors, and assigning colors. These tasks appear as separate tabs in the Live Color dialog box. Notice that I said “seemingly” simple. There are so many little buttons and pop-up menus and options in this one dialog box that you’d think you were flying the Space Shuttle.
Compounding this confusion is the fact that you often have to move back and forth between the Edit and Assign tabs to perform tasks. For example, in the Edit tab, Illustrator identifies every single color in my selection with a circle that appears on a color wheel. I can recolor my artwork simply by dragging the circles around on the color wheel. To see which circle corresponds to the artwork in my document, I need to switch to the Assign tab, click a button to highlight where the selected color appears on my artboard, and then switch back to Edit to make a change (Figures 6, 7, and 8).

Figure 6. Upon launching the Live Color feature, all colors in my artwork appear as circles mapped to a color wheel in the Edit tab of the dialog. Click on the image for a larger version.

Figure 7. To find out the leaf stems color, I use the Assign tab, which has a magnifying glass icon that highlights the selected color on the artboard. Click on the image for a larger version.

Figure 8. Having identified the correct color, I can return to the Edit tab to adjust the color on the color wheel. Click on the image for a larger version.
Like the Color Guide panel, you can instruct the Live Color dialog to only work within a specified range or library of colors. This is extremely helpful when you’re trying to convert a full-color illustration to two Pantone colors (Figure 9). You get total control over all of the colors in your file, and it works on gradients, meshes, patterns, symbols, live effects — everything other than placed linked or embedded raster images. With Live Color, you don’t have to be a color scientist to do some pretty cool color studies and adjustments with your artwork. The problem is, you just may have to be a rocket scientist to figure out how to use it.

Figure 9. Having created a color group with two spot colors, I was easily able to remap all of the colors in my file to those two colors. The two color bars (called rows) identify which colors are being mapped to each spot color. Click on the image for a larger version.
However, you can benefit from all of this color technology without even going to the Live Color feature. Illustrator CS3 has one-click options to convert art to grayscale or to adjust color saturation, both accessible from the new Edit Colors submenu in the Edit menu. Also, built-in support for N-Channel (also referred to as Device-N) makes it possible to now place native Photoshop duotones and files with spot channels — very helpful for those in the packaging industry. It also means that you can use multiple spot colors with gradient mesh, and the file will separate correctly.
Illustrator Embraces Flash
Flash was one of the driving forces behind Adobe’s acquisition of Macromedia. It’s refreshing to see from changes to Illustrator CS3 that Adobe recognized that designers have always used Illustrator to design artwork that was later brought into Flash for development. (It’s obvious that the Flash team is aware of this as well, because Flash CS3 Professional has numerous enhancements that come from Illustrator.)
Symbols are the lifeblood of Flash, and while Illustrator has been able to create Symbols since version 10, the feature had many shortcomings, such as the hoops you had to jump through to edit symbols. In Illustrator CS3, you simply double-click on a symbol to edit it, just as you do in Flash. Illustrator also allows you to define symbols by pressing F8 — again, same as in Flash. Symbols have certain properties that are specific to Flash so they’re easily referenced from ActionScript code. Illustrator CS3 now lets you define a symbol as graphic or movie clip, specify registration, and set guides for nine-slice scaling (Figure 10). You can even name each symbol instance in your layout. Beyond symbols, there’s an entire new Flash Text panel, in which you can define interactive text right from within Illustrator (Figure 11).
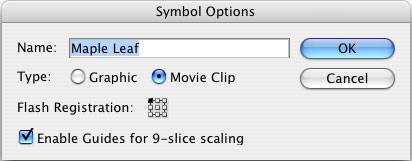
Figure 10. After tapping the F8 key to define a new symbol, you can specify Flash-specific settings for the Symbol. These settings have no effect on a symbol’s behavior within Illustrator.

Figure 11. Instead of waiting to do it in Flash, Illustrator CS3’s new Flash Text panel is the place for defining interactive type.
The question of course is, how do you get your rich information from Illustrator into Flash? Past versions of Illustrator required you to export your artwork as SWF, and the results were never pretty. You would think this would be easy considering that Flash and Illustrator are both vector-based applications, but their underlying graphic engines were different. Flash CS3 incorporates Illustrator’s graphics engine, so path fidelity, clipping masks, gradients, text, and more are all preserved beautifully. You can either copy and paste from Illustrator into Flash, or you can import native Illustrator files directly onto your stage. Flash allows you to choose which Illustrator layers and objects to import, and even lets you create movie clips on the fly. If you’ve struggled with bringing artwork from Illustrator into Flash in the past, this new functionality will save you a ton of time and frustration.
But What About FreeHand?
At the time of this review’s publication, Adobe hasn’t talked much about FreeHand’s future. But it’s clear from some of the features in Illustrator CS3 that Adobe is making it a lot easier to migrate from FreeHand to Illustrator.
Illustrator CS3 has a new import filter that opens native FreeHand MX files. File integrity is quite good, and almost all of your art is preserved and editable. Even multiple page documents are imported quite nicely.
In addition, it seems that Illustrator is starting to take on some of FreeHand’s features, especially in the area of path editing. It’s now easier to select anchor points (they can be set in Preferences to highlight when you mouse over them) and you can use the Direct Selection tool to select a single anchor point, even if the entire object is already selected. Previously, you had to deselect the entire object first. Illustrator CS3 also has an entire preferences panel dedicated to working with anchor points (Figure 12), including the ability to adjust the display size of anchor points and control handles.

Figure 12. The Selection & Anchor Display preferences panel makes it easier to tailor Illustrator’s behavior to your own needs.
Illustrator users often request the ability to crop placed images more easily. In other programs, such as InDesign, you can place an image and then adjust the frame. In Illustrator, you must create a mask, which is not only painful but also harder to edit afterwards. FreeHand users often wish that Illustrator would have a Paste Inside option, which would also make this process easier.
Illustrator CS3 now displays a Mask button in the Control panel when you select placed images. You can click on the button and immediately adjust the mask to your liking, thereby cropping the image with what feels very much like a frame. A toggle in the Control panel for all masks lets you quickly switch between modes that edit either the mask, or the contents of the mask. While not exactly Paste Inside, this is step in the right direction and certainly makes working with masks simpler (Figures 13, 14, and 15).

Figure 13. With any image selected, you can instantly create a mask for it via the Control panel. Click on the image for a larger version.

Figure 14. Once Illustrator creates a mask, you can resize it to effectively crop the photograph. Click on the image for a larger version.

Figure 15. Toggling between Edit Clipping Path and Edit Contents in the Control panel makes it easy to work without masks getting in the way. Click on the image for a larger version.
Removing What You Don’t Want
Illustrator CS3 includes a new vector eraser tool. It acts and feels much like the Paintbrush tool and is pressure-sensitive, which is good for Wacom users (Figure 16). The Eraser works on all vector objects across all layers if no art is selected. If something is selected, only the selected artwork is affected. It’s cool, but it won’t change my life much.

Figure 16. Double-clicking on the Eraser tool brings up the options dialog, which is quite similar to the Calligraphic Brush dialog.
What would change my life is a tool that could crop artwork or images inside Illustrator, much like the Crop tool found in Photoshop. Unfortunately, Illustrator CS3 has no such feature. Illustrator does have a new Crop Area tool, but it defines the areas or portions of a document that are visible when you export artwork for placement into other applications, such as Photoshop or After Effects. A document can contain multiple crop areas, though only one can be active at any time (Figure 17). Illustrator CS3 provides preset sizes for print, web, video, and mobile uses. If you do a lot of video work, the Crop Area tool is useful because it can be set to display pixel aspect ratios and safe areas.

Figure 17. While you can store multiple crop areas within a single document, only once can be active at any one time. Click on the image for a larger version.
It’s All in the Details
More often than not, it’s the little things that matter the most. So I was especially enthused to see that Illustrator CS3 features a laundry list of what can only be defined as cleanup items. These small enhancements are things that have made a difference in how I use Illustrator every day.
Live Trace was a fantastic feature that debuted in version CS2, but it was annoying that the white parts of a black and white trace weren’t transparent. In CS3, Live Trace has a new setting to ignore white.
Illustrator CS2 introduced the ability to double-click on groups to edit them in isolation. An odd gray box would appear to indicate this, and it was non-intuitive. Now, double-clicking a group grays out the rest of the screen, making it easier to edit groups (much like the way Flash behaves). Illustrator now also has a preference setting, should you want to turn off the ability to isolate groups.
The Align panel has received a much-needed upgrade: Its functions now work on individual anchor points. In addition, a new button lets you toggle the Align tools to align to your artboard or to your current crop area. Clipping masks are now correctly aligned, as well.
And finally, the Swatches, Brushes, Symbols, and Graphic Styles panels all now incorporate an easy way to access libraries (Figure 18), whether they come with Illustrator and you create your own. Folder hierarchy is maintained, and once a library is open, you can quickly step through each library using arrows at the bottom of the panel.
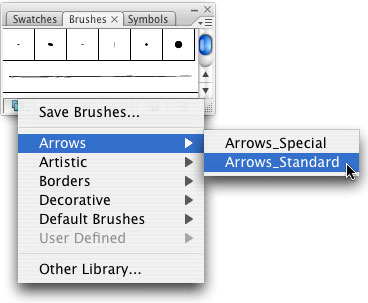
Figure 18. Accessing additional libraries (those that ship with Illustrator, as well as ones that you define on your own) are now easily accessible.
Lab Experiments in Illustrator CS3
Two experimental features in Illustrator CS3 are projects from Adobe’s Labs division. The first, called knowhow, defines a new way to access help within Illustrator; the second is called kuler and is a cousin to Adobe’s popular online community around color. Both of these experimental features seem like normal panels, but don’t be fooled by their appearance. They’re actually Flash-based panels with the ability to connect to the Internet and bring lots of interactive goodness directly into Illustrator.
The context-sensitive knowhow panel provides helpful feedback for the current Illustrator tool or function (Figure 19). It lists all keyboard shortcuts, provides links to articles, Web sites, and blogs that are relevant to the tool you’re using.

Figure 19. knowhow provides a complete list of keyboard shortcuts for the currently selected tool.
The kuler panel lets you view RSS feeds from Adobe’s kuler site within Illustrator (Figure 20). You can search kuler, and results from the Web, and then instantly convert a theme of colors into a new color group in the Swatches panel.

Figure 20. Browse color themes from around the world without ever leaving Illustrator.
The Final Word
Illustrator CS3 costs $599, and you can upgrade for $199. In addition, Illustrator CS3 is part of almost all of Adobe’s numerous Creative Suite editions. Refer to https://www.adobe.com/products/creativesuite for the different configurations’ pricing.
Illustrator CS3 is a fast, solid release that delivers on all of its promises. While I find Live Color extremely powerful, it isn’t very intuitive. And some features I wanted to see in this version are missing, such as rollovers and hyperlinks for creating interactive PDF documents, and an updated graphing tool, to name a few. But the impressive list of smaller enhancements, the path editing functionality, and the Flash integration are reason enough to upgrade.
This article was last modified on January 18, 2023
This article was first published on April 18, 2007
Commenting is easier and faster when you're logged in!

Recommended for you

InDesign Magazine Issue 74: Flipbooks
We’re happy to announce that InDesign Magazine Issue 74 (June, 2015) is now avai...

InDesign How-to Video: Make Color Themes from an Image
In this week’s InDesignSecrets video, Erica Gamet demonstrates how to use InDesi...