Review: Adobe InDesign CS6

Rating: 
Body: 

Pros: Huge advances in the ability to resize layouts, alternate layouts can be housed in one document, PDF form tools, auto-sizing text frames, EPUB, HTML, and PDF enhancements.

Cons: Some of the new features are complex and come with a steep learning curve, some need more refinement. No improvements on footnotes and other existing long document features.

Score: 90 out of 100

What is the number one problem facing publication designers today? Crowd-sourcing? Pinterest time-sinks? Misused drop shadows? I would submit that the number one problem is finding a way to efficiently design and deliver content for an ever-increasing number of outputs, both in print and on screen, on time and on budget.

It feels like every week another phone or tablet is announced, with a unique size and/or resolution that you have to account for when designing content. And with each new device, that task of designing publications for multiple screens threatens to become overwhelming. The folks at Adobe agree with this, to the point where they made "Design for Mobile" one of the guiding themes of CS6. When it comes to InDesign, this has led to the creation of several major new tools and features aimed at allowing users to repurpose content efficiently and create designs that look good on a slew of mobile devices.

So did they succeed? Is InDesign CS6 up to the task? While there's always room for improvement, I think yes, Adobe has succeeded in addressing some of the big problems of today, while laying the groundwork for even more impressive leaps in the near future. They also managed to add significant new features for people who may never deliver content to mobile devices. Let's examine the new features of InDesign CS6.

Liquid Layout and Alternate Layout

When you're designing publications for multiple screen sizes and resolutions, you need some degree of automation, or else you're going to find yourself in a nightmare workflow of duplicating files, making manual changes to each one, and then hoping that the content doesn't change afterwards. Prior to CS6, the automation that InDesign could provide for this task came from the Layout Adjustment feature. For very simple, consistent page designs, Layout Adjustment could be useful, and at times, even a life saver. But for more complex designs, the feature yielded inscrutable results, and a frustrating amount of trial and error was necessary to get anything usable (if you didn't just give up and rework the layout manually). Layout Adjustment is still present in CS6, but it has been superseded by a new feature called Liquid Layout.

Liquid Layout is a method used in web design where objects automatically resize along with their container. InDesign CS6 implements the concept of Liquid Layout via Liquid Page Rules. These rules are settings which can be applied to each page in a document, and they guide the size and position of each object when the page size changes. I'll avoid the cliche of saying that Liquid Layout is Layout Adjustment on steroids. Rather, let's call it an evolutionary leap forward.

There are four Liquid Page Rules to choose from: Scale, Recenter, Object-based, and Guide-based.

Scale and Re-center are pretty much self-explanatory, and of limited value. When a page is resized with the Scale rule, objects on the page scale up or down so they always fit inside the page. It's very tidy, but it won't always yield acceptable results. When a page is resized with Re-center, objects don't resize, and they stay centered on the page. Re-center won't stop objects from falling outside the page, so it probably is the least useful of the Liquid Page rules, and only might help in cases where you're going from a smaller page to a larger one.

Object-based and Guide-based are much more powerful and flexible methods for adjusting layouts. Of these two, Guide-based is the easiest to grasp. InDesign CS6 has a new kind of ruler guide called a Liquid Page guide. Objects that are touched by a horizontal liquid guide can resize vertically. Objects that are touched by a vertical liquid guide can resize horizontally. If that sounds odd, it makes much more sense in practice when you're actually using the feature. Liquid guides are really just a way to tell InDesign in which direction you want items to move and resize when the page size changes. This degree of control is a clear step up from the Re-center and Scale rules.

The final Liquid Page Rule, Object-based is at the top of the heap, both in terms of precision and complexity. It allows you to control the size and position of each object individually, by pinning the edges of objects to the edges of the page. When you select a page item with the Object-based rule applied, eight circles appear around the object, four on the inside, and four on the outside.

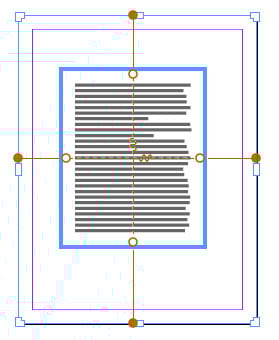
You can click an outer circle to pin the object in relation to the page edge. You can click an inner circle (or the lines connecting the inner circles) to lock or unlock resizing of the object. If it sounds like a lot of manual work to do this for each page object, well, it is. If you were just doing a single alternate version of a layout, you wouldn't bother with all that pinning. But the genius of Object-based rules becomes apparent when you have multiple versions of a layout to create. In that scenario, you may be able set the rules once and you're good to go for as many alternate sizes as you need, which could yield a huge savings of time and effort.

In addition to using one of the four Liquid Page Rules on each document page, you also have the option to set a rule on a master page and have it apply to all document pages based on that master. Not surprisingly, this setting is called Controlled by Master, and it can save much time and effort, especially with pages that have consistent, standard designs.

All in all, the Liquid Layout features represent a huge leap forward in the degree of control InDesign can provide you for adapting layouts to new page sizes. This is not to say they provide a huge leap in automation for everyone. The simple rules are easy to use and understand but don't get you anywhere near a finished job in many scenarios. The more complex rules require thought, planning, and testing, but can yield a big payoff when you have a slew of alternate layouts to create in a small amount of time.

And speaking of alternate layouts…

Where did you plan to keep all those different versions of your design? Previously, you'd have to save separate versions of each document and be careful to keep each one handy and up to date. "Herding cats" is the phrase that comes to mind. Well, InDesign CS6 includes a built cat herding feature called Alternate Layout.

Alternate Layout allows you to store all the versions of a layout within the same InDesign file. When you create alternate layouts, you can also apply liquid page rules, create new styles and style sets to reformat text, and link the content of stories to the original layout, so when the text changes you can simply update it to synchronize the layouts.

Creating an alternate layout is simple. Just go to the Pages panel, and choose Create Alternate Layout. In the dialog box, you have the option to choose the source pages for your new layout, the new size and orientation, as well as the options I mentioned in above.

For navigating your multi-layout document, you can now view pages in the Pages panel by alternate layout.

This is essential to keep things organized, and it's well executed. The one gripe I have about this feature is that it's an application wide preference. So if you create a new alternate layout in any of your documents, then all of your documents will be set to View Pages By Alternate Layout in the Pages panel. A minor thing perhaps, but I find it somewhat obnoxious.

There's also a semi-nifty new feature that allows you to split a document window to view alternate layouts side-by-side for comparison. Why only semi-nifty? Because the split views are fully independent, and don't scroll in sync. This feature would be so much more useful if you had the option to lock the views so you could see the same content in each layout. Like many of the new features devoted to mobile publishing, this one's unfinished, but a solid step in the right direction.

Primary Text Frame

Another feature built to help in the creation of alternate layouts is the new primary text frame. It's a replacement for the old master text frame, and it's a clear step up. The primary text frame acts the way old master text frame should have but never did. It allows you to apply different masters to document pages and always have the text flow through the correct text frames.

Content Collector tools

Sometimes there's just no way to create a new version of layout automatically—you just have to build it from scratch. With a truly complex layout, you might spend hours copying, pasting, and transforming objects from one document to another. With InDesign CS6, the folks at Adobe have attempted to re-invent that copy-paste workflow and enhance it with flexible options for re-using content both within and across documents.

The Content Collector, Placer, and Conveyor tools represent an ambitious approach to rethinking copy-paste. The Content Collector tool allows you to select content for reuse by clicking or dragging over it. When you do this, another tool appears called the Content Conveyor. The Conveyor is an odd thing until you get used to it. It feels like a foreign body lodged inside InDesign. It's like a mash-up of the clipboard, a traditional library, and Mini-Bridge.

Content you grab is arranged in sets that you can place together, or as individual items with the Content Placer tool. Furthermore, you can transform content as you place it, resizing it, and applying style mapping to instantly reformat text. There are also different modes for placing content once (like traditional copy-paste), or multiple times (like a snippet or library).

There is a lot that could be done to improve the content collector tools, both in terms of user interface and capabilities. At some point, you'll likely be frustrated, trying to place content with no result because you forgot to switch from the collector to the placer. Or you'll have the conveyor in the wrong mode and content will disappear when you want to keep it in the conveyor (or vice versa).

It can also be hard to tell which content you're about to place, since the preview of text is usually unreadable, and unlike snippets and libraries, you can't name or tag collected content in any way. Another limitation is that collected content isn't persistent, meaning that it goes away when you close the document you collected it from. You can't save it or share it with your co-workers. But even with these limitations, the content collector tools are a bold step toward bringing one of the most fundamental production tasks, copy and paste, into the 21st century.

Auto-Sizing Text Frames

This is one new feature that is sure to be a hit. You can now create text frames that will resize in any direction to fit the content within them. When text is added or deleted, the frame grows or shrinks accordingly. It works with threaded frames, non-rectangular frames, spans and splits, and yes, even frames containing footnotes. You may never have to deal with overset text again.

EPUB Export

With the ebook market continuing to grow rapidly, EPUB export is becoming an increasingly important feature. In addition to a handful of key bug fixes, several new features have been added to reduce the amount of post-InDesign work to clean up your EPUBs and make them ready for publication. It's much easier to break content into multiple HTML files, by selecting any paragraph style as a break point. There are also improvements in the handling of margins, and anchored items, and support has also been added for floats and multiple linked CSS files.

HTML Import

You can now place HTML content into InDesign with a simple copy and paste. For example, you can add a working Google map to a document by copying the iframe code and pasting it directly into InDesign. When you do so, a frame is automatically created to house the map. You can also tweak the code inside InDesign with a new Edit HTML command.

PDF Forms

Prior to CS6, if you were producing PDFs that included forms, you needed to do a lot of post-InDesign work in Adobe Acrobat. Now, you can you can greatly reduce the amount of Acrobat work by converting InDesign objects into text fields, signature fields, radio buttons, check boxes, and combo boxes.

Unfortunately, there are some frustrating limitations that will force you to finish the job in Acrobat. For example, you can't produce a PDF form that Adobe Readers users can fill out. You still have to use Acrobat to enable Reader users to save form data. Even so, the inclusion of PDF form tools is a great new feature.

Misc.

There are also several smaller fixes and feature enhancements that are sure to make InDesign users smile.

  • Recent Fonts: There is now the option to have a running list of your most recently used fonts appear separate from the rest of your active fonts in the Control panel, Character panel, and Glyphs panel. The longer your font list, the more you'll appreciate this feature.
  • Grayscale support: You can now export full color documents as true grayscale PDFs and even proof the color conversion onscreen beforehand.
  • Align to Key object: As in Adobe Illustrator, you can now designate any InDesign object as the key object and use it to align others on the page.
  • Link Badges: Icons now appear directly on the frames of linked items showing their status (linked, missing, modified). You can click link badges to update modified links and fix missing ones, saving you a trip to the Links panel.
  • No more ALLCAPS user interface: Yes, InDesign has stopped SHOUTING at you by default.
  • Export to interactive PDF as pages: Previously, interactive PDFs exported from facing pages documents would be exported as spreads. Now you have the option in the export dialog box to choose spreads or single pages.
  • Export to PNG: You can export a selection, a page, or multiple pages as PNG with transparency.
  • Placeholder text language: You can choose from a list of nine different languages when creating placeholder text.
  • Extension Manager Sets: If you use multiple 3rd party extensions, you have the ability to arrange them in sets that you can enable or disable with a single click.
  • Improved screen sizing: InDesign CS6 correctly accounts for your screen resolution when displaying objects. The result is one inch onscreen now equals one inch in real life.

Conclusion

With InDesign CS6, Adobe made a strategic decision to address the steep challenges of designing for multiple screens. While several of the new features for reusing content need further refinement, InDesign CS6 is a clear step in the right direction. Some users will no doubt be disappointed by what was not done. There are no enhancements of footnotes or other long document features that people have been wanting for several years. On the other hand, steady progress is being made on the quality of EPUB export, and the inclusion of PDF form tools is huge for those people who need them. Plus several of the smaller features (link badges, screen sizing, align to key object) are pure wins that most users will quickly incorporate into their daily routines and will certainly miss if they have to use an older version of InDesign at some point.

Is it worth the upgrade? If you produce ebooks, interactive PDFs, or documents that have to be delivered in multiple sizes and formats, the answer is an unequivocal yes. If you produce print-only output in a single size and format, then the benefits of upgrading are far fewer and you'll have to weigh out the value of what's new for your workflow. All in all, InDesign CS6 is an ambitious release, packed with high-end, forward thinking features, as well as many small refinements. Almost every InDesign user will find something in CS6 to love.