

Pros: Improved develop engine extracts surprising dynamic range out of single images. White balance and noise reduction added to local adjustments. Soft proofing brings more predictable output. Book module much easier than learning a layout program. Map module takes advantage of geotagging. Huge price drop.
Cons: No face recognition. Much larger install than Lightroom 3. Awkward video adjustment process, and slide shows can’t include video. Modular design is sometimes limiting.
Score: 9/10
The history of digital image editing is largely the story of Adobe Photoshop, which is still the most powerful image-editing application. But as the world shifted to digital cameras that fit hundreds of images on a card, and moved to new camera raw files that were nothing like the RGB or CMYK files one normally edited in Photoshop, a new wave of photo workflow applications emerged, including Adobe Photoshop Lightroom.
Instead of permanently altering original pixels, Lightroom and similar applications edit non-destructively by storing changes separately from original images. Instead of editing documents one by one, entire shoots can be edited at once. And instead of organizing photos within the limits of hierarchical folders, these applications use metadata to organize and locate photos in ways folders can’t. Lightroom 3 was already considered a premier application in this category. The Lightroom 4 upgrade makes interesting choices that enhance every part of a digital photographer’s workflow, resulting in a very worthwhile upgrade.

Figure 1: Lightroom 4 is visually similar to Lightroom 3, except for the addition of the Map and Book modules discussed later in this review.
Before diving into Lightroom itself, there are some changes in system support worth noting. Mac users need a Mac with a fully 64-bit Intel CPU, and Windows users must run Windows Vista or later. Earlier versions of Lightroom were rather small files that downloaded quickly, but Lightroom 4 adds new modules that increase the installer package and installed size significantly. On my Mac, Lightroom 3 installed is 101 megabytes, while Lightroom 4 is 909 megabytes. The Windows installer package is twice as large as the OS X package because it still includes both 32-bit and 64-bit versions. This shouldn’t matter much if you use a hard drive big enough for the demands of serious digital photography; the bigger impact will be on those who download the upgrade through slow Internet connections.
An Upgraded Raw Development Engine
Adobe always seems to find more ways to improve how Lightroom processes images, and that’s a great thing for photographers. Building on the completely rewritten raw processing engine in Lightroom 3 that included a new method of raw developing called Process Version 2010, Lightroom 4 brings Process Version 2012 as well as a rethinking of the Basic panel controls in the Develop module. Together, Process Version 2012 and the redesigned Basic panel controls help you more easily recover highlight detail and open up deep shadows. It’s now easier to get great results, especially with images that have extreme contrast ranges.

Figure 2: For images that use the earlier Process Version 2010, you can switch to the new Process Version 2012 by clicking the exclamation point icon at the bottom right corner of images. Alternatively, you can choose it from the Process menu in the Camera Calibration panel.
Images using Process Version 2010 (typically those brought forward from Lightroom 3) continue to display the same Basic panel sliders names seen in Lightroom 3. Using Process Version 2012 displays the new Lightroom 4 set of Basic panel sliders. The Exposure slider is now a combination of the old Exposure and Brightness sliders plus automatic protection of highlight and shadow detail. Setting Exposure and Contrast correctly is an important first step, minimizing the amount of correction you’ll need to perform with the other four sliders. After you set Exposure and Contrast, you then continue down the panel. The Highlights slider and Shadows slider control the tonal ranges further out from the midtones, but not quite at the extremes. The last pair of options, the Whites slider and the Blacks slider, let you take care of any remaining clipping issues that Lightroom didn’t already resolve.
Lightroom 3 users may notice that the Recovery and Fill Light sliders (along with the Brightness slider) have gone away. The functions aren’t actually gone; they’re just implemented slightly differently as part of the overall realignment of the controls. If you’re looking for the old Fill Light slider, in Lightroom 4 use Shadows instead; and if you’re looking for the old Recovery slider, use Highlights instead.
The three pairs of Basic panel sliders are arranged from top to bottom so that easy images might only need Exposure and Contrast adjustments, images with more challenging dynamic range issues might also need Highlights and Shadows adjustments, and images that still have clipping issues can be reined in with the Whites and Blacks sliders. But for many well-lit images, you may not need to use more than the first three or four sliders. The improvements make it much easier to get HDR-like results out of a single image.
If this sequence seems opposite to the way it was done in the old versions, that’s because it is. It’s useful to think of using the older Basic panels as an “outside-in” process, where you set the extreme clipping levels first and then refine the contrast and distribution of the tones within those extremes. In comparison, you can think of Lightroom 4 as using a “inside-out” philosophy, anchored from the midtones, where you first set the overall exposure and contrast and deal with any remaining highlight and shadow clipping later.

Figure 3: The most obvious difference between the Lightroom 3 (left) and Lightroom 4 (right) develop options in the Basic panel is the new set of tone sliders that centers consistently at zero.
How does Adobe get away with not being concerned with highlight and shadow clipping from the start? Essentially, it’s because Process Version 2012 does its best to resolve clipping so you don’t have to. As you adjust Exposure and Contrast, Lightroom does two things. It tries to recover highlights when needed, and it also attempts to make a smooth, film-like transition from shadows and highlights to black and white instead of the harsh clipping normally seen in digital images. It’s also important to understand that the content-aware finessing by the Basic panel sliders can be refined by Tone Curve adjustments, but cannot be replicated by a Tone Curve alone.
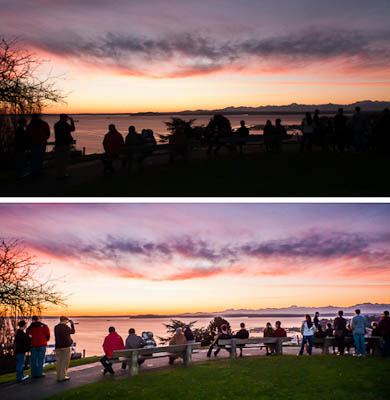
Figure 4: At first glance, this raw image looks unusable (top). But the Lightroom 4 develop controls extract enough shadow detail to produce a wide range of tones in the final image (bottom). Note that I did use my camera’s pop-up flash to lift the foreground a little to make it easier to process shadows later.
There’s another subtle but important change. In older versions of Lightroom, Basic sliders for raw files had starting values that were all over the place. In Lightroom 4, all slider values start centered at zero: dragging below zero always darkens the image, and dragging above zero always lightens. This makes the Basic panel much more intuitive to use.
If you often use the Adjustment Brush and the Graduated Filter in Lightroom 3, you’ll appreciate the new ability to use White Balance and Noise Reduction in those local adjustments. For example, if lightening a dark part of an image with a Graduated Filter brings up noise out of the shadows, adding Noise Reduction to that same filter instance will bring the noise level back down in that adjustment. Being able to paint White Balance means you can more easily correct mixed-lighting situations. If your images contain distracting moiré patterns (typically seen in photographs of clothing and textiles), you can paint them out using the new Moiré option with the Adjustment Brush.

Figure 5: Lightroom 4 adds Temp, Tint, Highlights, Shadows, Noise (reduction), and Moire (reduction) to the Graduated Filter and Adjustment Brush tools.
There isn’t a direct visual translation from Process Version 2010 to Process Version 2012 because so much of the underlying math changed. This means converting to Process Version 2012 can alter the look of an image. For this reason, Lightroom 4 preserves Process Version 2010 for photos in catalogs upgraded from Lightroom 3. I would advise against converting images to Process Version 2012 in bulk; instead, leave images in Process Version 2010 until you’re ready to evaluate the effects of converting them and have time to make any necessary adjustments. Also, if you use Lightroom with Adobe Camera Raw, you’ll need a copy of Camera Raw 6.7, which understands the new Lightroom settings but can’t edit them. To be able to edit images in Camera Raw using the same options as in Lightroom 4, you’ll need Adobe Camera Raw 7.0, which is available only with Adobe Photoshop CS6. Both Camera Raw 6.7 and Photoshop CS6 are available as free public beta versions at labs.adobe.com.
There are other enhancements in Lightroom 4, like separate RGB point curves (another popular feature request), and a much more manageable Clarity slider with greatly reduced halo artifacts. All in all, many could upgrade based on the improvements to the Basic panel alone. I would.
Soft Proofing for Better Output
A long-standing feature request has been soft proofing — the ability to simulate on screen how your printer or other types of output will reproduce the colors of an image. Lightroom 4 finally delivers soft proofing, and in a way that’s more straightforward than the somewhat scattered implementation in Photoshop. In Lightroom, soft proofing controls are brought to the surface and visible in the Develop module, and they can be turned on with a single press of the S key.
Editing on a dark background can make you think an image is too light, which can sometimes be a factor in why prints seem too dark. It’s a nice touch, then, that turning on soft proofing displays the image on a white background. Another nice touch is that Lightroom integrates soft proofing with virtual copies, so you can maintain a master image and multiple instances tuned for different types of output. These may sound like minor things, but in Photoshop they require jumping between dialog boxes, menus, and sets of layers and alternate views that you have to manage by hand. The Lightroom approach seems like a nice fresh start in comparison.
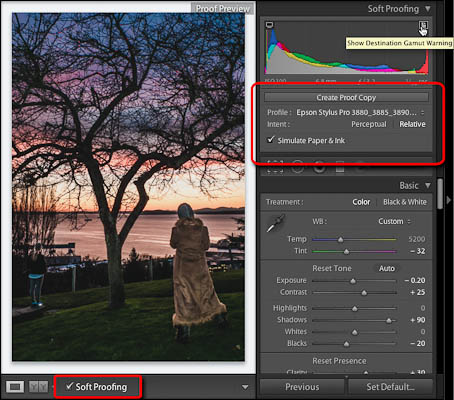
Figure 6: Turning on soft proofing adds options under the histogram, as well as displays the image on a white background that can optionally simulate paper and ink.
Remember that for accurate soft proofing, your monitor must be calibrated precisely, and you must select a profile that correctly represents the output (for example, the paper and ink) you want. When everything is set up correctly, soft proofing can help you spot problems onscreen so that you can spend less time and money making test prints you’ll have to throw out.
Enhancements to Video Support
While there are still-frame photographers who question why video is part of Lightroom, it makes sense now that new cameras typically capture HD video, and many photojournalists shoot both stills and video on assignment. There are other reasons as well, such as avoiding data loss. If you wanted to import a card containing stills and video into Lightroom 1 and 2, only the stills would be imported. If you forgot to take the additional step of importing video separately before formatting the card for reuse, you’d lose the videos. Lightroom 3 added video support as part of the general Lightroom philosophy of supporting formats produced by a camera, and not supporting formats that don’t come out of a camera such as GIF. (There are exceptions such as CMYK images, which Lightroom can catalog but not output.)

Figure 7:Video tools appear under a video in Loupe view, including playback controls, trim controls for setting in and out points, and commands for capturing a still frame and setting the poster frame.
Lightroom 4 adds a limited set of video editing features. You can preview and catalog video, trim the ends, adjust the appearance (though precise adjustments require an awkward workaround involving presets), and export individual clips. But you can’t combine clips or include them in a slideshow.
At the moment, Lightroom video support is most useful for exporting trimmed and color-corrected individual clips to be edited in another program, such as Adobe Premiere Pro. That level of involvement in video may be appropriate for Lightroom. When you put together the ability to trim and correct a clip and export it in DPX format from Lightroom, you have a feature set that’s potentially useful for submitting DSLR video clips to stock agencies.
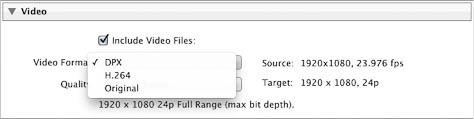
Figure 8: Video can be exported as DPX, H.264, or the original format.
Putting Images on the Map
Geotagging, the ability to attach longitude and latitude metadata to images, is already widely supported by other image-editing applications such as Apple Aperture. Lightroom 4 addresses this popular feature request with the Map module. As you’d expect, the Map module contains a Google map that displays colored pins for photos in your catalog that already have location data in them. For images that don’t already have location data, dropping and positioning them on the map embeds that location data into them. You can look for pins on the map or search for a location to see if you have any photos there. The Saved Locations panel lets you create collections of locations that you can then apply to images. If you have a GPX-formatted tracklog, Lightroom can import it. A private data option lets you prevent location information from being included with images you export.

Figure 9: The new Map module lets you display geotagged images or apply location data to images you position on the map.
The weak link right now is the limited availability of cameras that record location data. For DSLRs, GPS units are an expensive addition. Most of the photos you have that include location data are probably from your smart phone. While Lightroom does let you assign locations to photos manually, doing that for a large number of photos is a lot of work. While not every photographer today will use the Map module, real estate, travel, landscape, location scouting, and wildlife photographers will probably find it to be a valuable addition.
Creating Photo Books
As with geotagging, the new Book module could be seen as a response to the well-known book feature in Aperture. While you won’t find industrial-strength layout features at the level of Adobe InDesign, that’s probably a good thing since InDesign and the publishing workflow it’s designed for take a long time to master. Instead, in Lightroom you get a template-based book maker that’s pretty easy to use: apply a layout template to a page, drop images on it from the filmstrip or grid, then click in text boxes to type captions and other copy.
There’s a cool text adjustment tool that lets you change type specs like size and leading by dragging the tool over selected text, similar to the Targeted Adjustment Tool for images. Although you can’t move image containers on the pages or create your own templates (yet), there are so many photo page templates that there’s a good chance you’ll find the layout you want. The Collection panel stores the books you save.

Figure 10: The new Book module makes it easy to add and customize pages based on included templates.
The Book module is tied to Blurb (blurb.com) right now, but it isn’t hard to imagine the Book module being expanded to support other print-on-demand companies. You also have the option of creating a PDF file instead of sending the book to Blurb. If you set up a Blurb book, the Book module displays the estimated cost based on the settings you specified.
The Book module is designed for highly visual coffee-table-style photo books, so don’t try to lay out a magazine or a text-heavy book — that’s still a job for InDesign.
Organizing and Managing Images
If you set a pick/reject flag in Lightroom 4, that designation applies to that photo wherever it appears in a catalog. In previous versions, a flag was limited to a folder or collection. While I always wanted flags to apply catalog-wide, quite a few Lightroom 3 users prefer the old behavior, so if you do, be aware of this change.
Everyone says hard drives are cheap, but they aren’t free. And you can never really buy just one bigger drive, because your backup drives must also be upgraded to match. The problem of growing archives also gets worse as megapixel counts rise, making your drives hold fewer pictures before they fill up. One way to address this is the new lossy compression option for DNG files exported from Lightroom 4.
While the concept of lossy DNG compression may alarm photographers who expect DNG to preserve the original quality of raw files, the fact is that the majority of photos will never be reproduced at a size that will stretch the limits of the original raw format. You can think of lossy DNG compression as a way to save your non-hero images so that they don’t take up as much space as a true raw file, while archiving them at a usable size and quality level in case they become important later. Lightroom 4 also supports fast-load DNG, which helps images open more quickly in the Develop module only. Both Lossy DNG and Fast Load Data are options when you choose the DNG format in the Export dialog box.
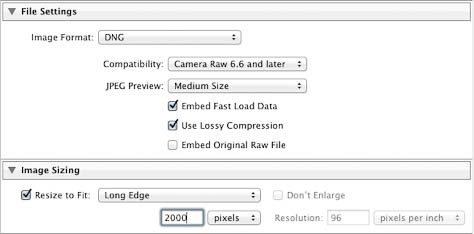
Figure 11: New options for exported DNG files can speed up Develop module loading time and save space in your photo archives and backups.
In summary
One of the best features of Lightroom 4 is its new low price. In the United States, Lightroom 4 is now $149 retail and $79 for the upgrade. Some might say that adding soft proofing and the Map and Book modules in Lightroom 4 are catch-up moves versus Apple Aperture. But Lightroom has also had its own unique advantages over Aperture such as its superior noise reduction and lens profiles.
Is there anything Lightroom 4 can’t do? Sure. I’d like to be able to rename files using search-and-replace, a feature Adobe already has in Adobe Bridge CS5. I also wish I could tag photos with keywords and other metadata in modules other than the Library module, and to be able to break off the panels and put them on my secondary monitor so that my main monitor is all image. Other users hope for face recognition or built-in panorama or HDR features.
Still, Lightroom 4 is extremely capable and feature-packed. When considering the pros and cons of Lightroom 4, the fact is that most people will benefit from the pros and won’t be affected very much by the cons. In my view, Adobe has a winner in Lightroom 4.
This article was last modified on July 20, 2021
This article was first published on April 9, 2012
Commenting is easier and faster when you're logged in!

Recommended for you

Photoshop How-To: Adding Bleeds and Crop Marks
One question that I receive on a fairly regular basis, is how to add bleed to an...

Fly the Creative Skies
Excerpted from “Window Seat, The Art of Digital Photography and Creative T...

Adobe Announces PDF Print Engine 3
Adobe has announced a new version of the PDF Print Engine, the platform used to...