

Pros: Much improved interface; Control Point tools are unmatched in other applications; Selection Control Point allows for complex masking of additional effects; completely non-destructive.
Cons: Underpowered browser; highlight recovery is not as good as other Raw converters; only supports Nikon Raw files
Score: 90
Two years ago, Nikon retooled its Raw conversion software. The new app, called Nikon Capture NX, had a better Raw conversion engine and radical new image editing tools with capabilities not found in any other image editing tool, even that one that Adobe makes — oh, what’s it called? PhotoMat, or something like that?
Despite a crowded field of new post-production options (Capture NX was released not long after Apple’s Aperture and Adobe’s Photoshop Lightroom came on the scene), Capture NX attracted a large, loyal user base. The fact that this occurred in spite of the competition is a testament to the quality of the program.
Version 2 of Capture NX (regularly $179.95, now $146.95 on amazon.com) brings important upgrades to the program, including major interface revisions, workflow improvements, and some important new editing tools.
And while Capture NX 2 still serves as a Raw converter for Nikon shooters, you can use it with TIFFs and JPEGs shot with any camera.
However, if you’re a non-Nikon shooter, you now have a compelling alternative, as I’ll explain in the final section of this review.
The Browser
Capture NX 2 is designed to handle all of the major stages of your workflow. While it doesn’t include an import capability of its own, the NX installer offers the option of a free download of Nikon Transfer, a very capable downloading app that can ease some of the initial stages of your workflow. Once your images are transferred, you’re ready to start making selects in Capture NX 2’s integrated browser.
With the browser, you can view folders full of images, rate and label files, edit metadata, and open images in the Capture NX editor. It’s competent but a little underpowered, so if you’re used to programs such as Adobe Bridge or Photo Mechanic, or you regularly use Aperture or Lightroom, the NX 2 Browser’s organizational facilities will seem anemic.
Figure 1. The Capture NX 2 Browser provides basic filtering, rating, and sorting capabilities, and has some important interface changes from the previous version. Click on the image for a larger version.

The main point of a browser, though, is to start your workflow. By examining thumbnails, your can cull the select images from your entire shoot, so that you know which images you want to pass on to the rest of your workflow. With its label, rating, filter, and sort tools, the NX 2 browser does facilitate this process. However, it lacks a number of its competition’s features. There’s no stacking, so you can’t group similar images in any way. While you can display thumbnails at a variety of sizes, the program’s compare feature — which lets you see two images side by side at a fixed, slightly-larger-than-biggest-thumbnail size — is not useful. (However, maximum thumbnail size is larger than it was in the first version of Capture NX.) The browser also lacks a magnifying tool for examining fine details, which makes sharpness assessments difficult.
Navigation in the browser is easier thanks to a new Up Folder button at the top of the browser, and because of the addition of Favorites, a pane where you can drop commonly used directories, providing single-click access to those locations.
Rating and labeling are also improved. You can specify ratings from 0 to 5 stars and use nine different customizable labels. Through simple preference changes, you can alter the color and name of any label and even use presets to match label colors and names to those of other popular browsers.
Metadata editing is easy and intuitive, and the mechanism for defining and applying keywords and presets makes batch metadata changes very easy.
Capture NX 2’s capable browser won’t win any awards, but it will let you get your workflow started. The interface tweaks and changes in the browser are very welcome, and regular users of Capture NX don’t need to worry about a steep learning curve; it’s simple to adjust to the changes.
Note that, like its predecessor, the NX 2 browser cannot display icons for non-Nikon Raw files. So, non-Nikon shooters will need to use a different browser for the start of the their workflow.
Also, the Capture NX browser is strictly a browser. Because there are no library facilities, you can’t create anything akin to collections in Lightroom or projects in Aperture. (However, this is not a knock on the browser, as these are not typical browser functions.)
Simpler Editor
Double-clicking on a thumbnail in the browser automatically opens the image in the Capture NX editor. You can also open an image as you would in any other image editor: by dragging and dropping an image into the application, by using the Open dialog box, and so forth.
Like the first version of Capture NX, the NX 2 editor consists of a stack of palettes along the right side of the screen, and a toolbar across the top. While palettes snap to the side of the screen and dock together, clicking a small widget on each palette floats it so you can position it wherever you want. A second click returns the palette to its default position.
Figure 2. The Capture NX 2 editing environment. While largely unchanged from the previous version, many interface refinements make for a more streamlined editing environment. Click on the image for a larger version.
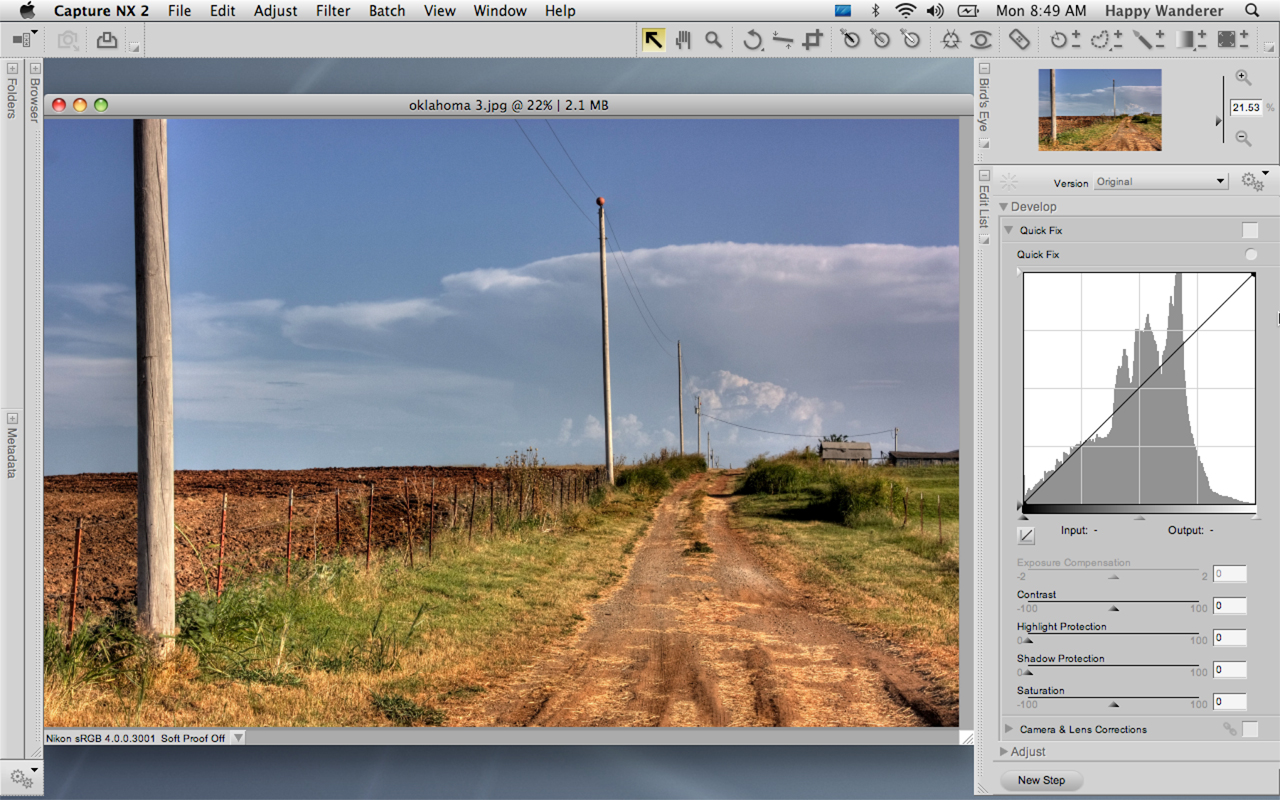
The Toolbar houses the program’s editing tools: crop, straighten, selection, and Capture NX’s unique U point editing tools. New to version 2 is an Options bar, which sits directly beneath the Toolbar and holds context-sensitive tool parameters. This is a great improvement over the dialog-based approach to options that NX 1 used.
Where version 1’s Toolbar was divided into a number of small palettes, Nikon simplified version 2 into two palettes you can float and move, just like the palettes on the edge of the screen. I like this change.
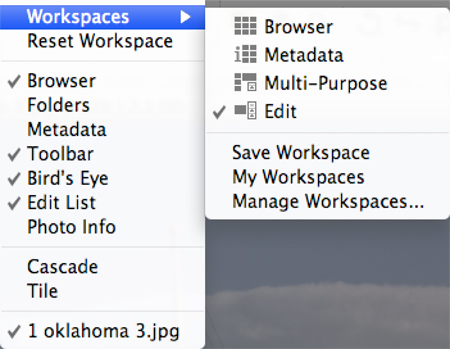
A new Workspace feature lets you save your palette arrangements. Simply select a saved workspace, and your palettes immediately snap to their previously defined locations. Workspaces respect multiple monitors, and even though Capture NX 2 doesn’t have suffer the palette glut that Photoshop has, the feature is still welcome.
Figure 3. The new Workspace feature lets you save palette configurations and easily switch between them with a simple menu option.
Non-Destructive Editing
Capture NX is a completely non-destructive editor. This means that your original file — be it Raw, JPEG, or TIFF — is never altered. Instead, the software stores your edits in a list and applies those edits to your original master image in real-time whenever the computer needs to display the image on-screen, print it, or write it to a file. This is the same approach used by Adobe Photoshop Camera Raw, Lightroom, Aperture, and others.
The obvious advantage of non-destructive editing is that you can alter or remove any edit at any time, and in any order. If you’ve worked with Adjustment Layers in Photoshop, you understand the value of non-destructive editing.
Any time you use one of Capture NX’s editing tools or pick an editing function from its menus, a new entry is made in the Edit List, one of the main palettes that sits on the right side of the screen. In this Edit List, you can adjust an edit’s parameters, delete the edit, temporarily hide it, and change the order in which edits are applied.
The Edit List in NX 2 has been greatly improved. In the previous version, when you clicked on an edit, a little dialog box-like thing opened up to the side of the list. You adjusted parameters there, then clicked OK. With version 2, the Edit List simply houses controls that you adjust. There’s no extra sub-interface to hassle with, which greatly streamlines editing and makes controlling the Edit List simpler.
Users of Capture NX 1 (as well as Nikon Capture versions 1 through 4) will immediately notice a profound change in the Edit List: the Base Adjustments edit is gone. In previous versions, Base Adjustments was where you controlled basic Raw conversion parameters and image processing controls that could be set within your Nikon camera. Base Adjustments always confused me because its controls were very similar to other edits in the program, so it wasn’t always obvious whether you should perform an operation with a Base Adjustment, or a “regular” edit.
The Edit List is now divided into two major areas: Develop and Adjust. Develop is where you perform all of the basic adjustments to globally tone- and color-correct an image. Adjust is for additional, refined edits. Capture NX 2 automatically puts the edit in the appropriate pane within the Edit List.
With version 2, the bulk of the Base Edit adjustments are in a new edit called Camera Settings. There you find all of the Raw conversion controls and other camera parameter settings that used to reside in Base Adjustments. Camera Settings only appear if your image is a Nikon Raw file. The rest of the former Base Adjustments have been spread through other edits.
To facilitate a speedier editing workflow, a new QuickFix edit appears just below Camera Settings (or at the top of the list if there is no Camera Settings). QuickFix includes Capture NX’s Levels and Curves control, along with some basic tonal adjustment sliders. These are probably all you’ll need for the majority of your images, and it was a good choice to group these controls together. The rest of the Base Adjustments fall into the new Camera and Lens Corrections edit.
Because of these changes, the program is much easier to learn and faster to work with, whether you’re making quick tone and color adjustments or more complex edits.
Global Editing
Capture NX 2 has the same tone and color adjustments that were in NX 1. You control these edits through sliders and buttons within the Edit List.
New to version 2 are Highlight Protection and Shadow Protection, which work like the Shadows/Highlights tools in Photoshop and Photoshop Lightroom. These tools automatically identify shadow or highlight areas and darken or lighten only those areas. Their implementation in Capture NX 2 is very good.
As with the previous version, Capture NX offers highlight recovery for Raw files. When working with Raw files, it’s often possible to recover overexposed highlights, restoring image detail to areas of complete white. Nowadays, this is a standard feature in any decent Raw conversion program and an essential capability for Raw shooters.
Both the Exposure Compensation and Highlight Protection sliders perform highlight recovery. While the program’s recovery capabilities are good, on most images they don’t offer as much recovery capability as Photoshop Camera Raw or Aperture. What’s more, on very rare occasions, if you use both the Exposure Compensation and Highlight Protection sliders, NX will produce strange, unusable results. This is an area where the program could use some improvement.
Selective Editing
Capture NX’s already excellent localized editing tools are now even better. In fact, Capture NX 2’s biggest strength is selective editing, the process of applying edits to specific parts of an image, rather than globally adjusting the entire picture. Capture NX’s Control Point tools are like nothing found in any other image editor. With them you can easily create complex selections and masks that are very difficult to achieve in other image editors — even Photoshop. What’s more, you probably won’t ever click your mouse more than once or twice in Capture NX to create even a complex mask.
To use a control point, simply click it on the part of the image you want to adjust. A small control appears with sliders that let you adjust brightness, contrast, and saturation, as well as the radius of the Control Point’s area of effect. Capture NX samples the color beneath the Control Point, then uses that color sample, combined with the specified radius, to calculate a mask. The brightness, contrast, and saturation adjustments are automatically applied through that mask.
Figure 4. A Capture NX Control Point. With it, you can easily make incredibly sophisticated localized adjustments.
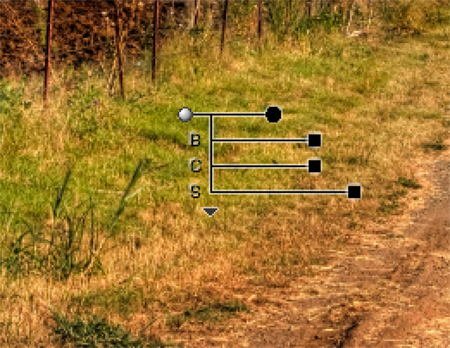
While being limited to a circular area of effect may sound like a severe liability, it’s not, thanks to the intelligence behind the Control Point. Because Control Points are color-dependent, it usually doesn’t matter if your circular area encompasses areas beyond what you would like to edit. Capture NX also does an excellent job of attenuating its edits so that they blend seamlessly into non-edited areas.
You can change a Control Point’s editing model from brightness/contrast/saturation, to red/green/blue and hue/saturation/brightness, or activate all sliders at once.
The Control Point technology in Capture NX is so good that version 1 of Capture NX was worth buying even if you already used Photoshop or another image editor. For especially tricky selections and masks, it was often a huge lifesaver.
Nik Software, the developers of Capture NX, have spun off NX’s Control Point technology and turned it into Viveza, a Photoshop plug-in. For non-Nikon shooters, or for anyone who likes to keep the bulk of their work in Photoshop, Viveza is a great way to wnjoy the best part of Capture NX.
Back to Capture NX 2: You can use the Control Point mechanism to make a selection that constrains the effects of any other Capture NX edit. This allows you to use the same sophisticated masking mechanism whenever you apply Levels and Curves, sharpening, noise manipulation, or any other edit. Needless to say, it’s an amazingly powerful addition and one that makes the upgrade well worth the money.
When combined with the new selection tool, it’s now very easy to apply the same selection to multiple edits, saving you the hassle of building the same mask over and over.
A new Auto Retouch brush removes sensor dust and other image artifacts. While it won’t perform complex cloning operations, it provides everything you need for day-to-day cleaning. Like the rest of NX’s editing tools, it’s non-destructive.
Batch Processing
In addition to flexibility and the means to make changes at any time, one of the great advantages of a non-destructive editing system is that it’s very easy to apply the same set of edits to multiple images. Since edits are separate from image data, a non-destructive editing system merely has to copy the list of edits from one image to another.
Capture NX offers basic copy and paste controls for moving edits from one image to another and provides a simple batch-processing control for applying the same set of edits to entire folders full of images. Along the way, you can also automatically rename.
While unchanged from version 1, Capture NX 2’s batch-processing capability is still an important component in managing a shoot’s worth of images.
Definitely Worth the Price for Nikon Shooters
NX 2 has many more welcome adjustments, from a revamped, easier-to-use Size/Resolution edit, to improved sorting in the Browser, to a re-tooled Preferences dialog that’s easier to navigate. If you’re a regular user, though, the interface changes and Selection Control Point tool alone make this an obvious upgrade.
If you’re new to Capture NX, the decision of whether to adopt the program is a little more complicated. If you normally work in JPEG mode, Capture NX 2 is a great alternative to other editing tools. You might still want a more sophisticated browser, and if you need to perform compositing or other fancy effects, you’ll need a stronger editor. For what most people need for most of their images, though, NX 2 delivers. And if you’re a Nikon user who shoots Raw, your workflow will be exactly the same as if you’re shooting JPEG.
However, if you’re a non-Nikon Raw shooter, you’ll have to do your sorting and Raw conversion in another program, save TIFF files, and then bring those into NX for editing. That added step can be a hassle. And while NX’s Control Points are great, you can now get those with Viveza and plug them into Photoshop, which probably supports your Raw format.
So, for non-Nikon Raw shooters, the only reason to go with NX is if you simply really like the editing environment, want to work with a completely non-destructive editor, and/or want to use Control Point technology to apply some other kind of edit. Otherwise, I recommend Viveza.
This article was last modified on December 14, 2022
This article was first published on August 20, 2008
Commenting is easier and faster when you're logged in!

Recommended for you

Scanning Around with Gene: Scuba-Diver Chic
[Editor’s Note: Today we present the first installment of Gene Gable...

Photoshop CS6 updated
Adobe has released an update to Photoshop CS6 (version 13.0.1) that fixes a tota...

How to Choose the Right Image File Format for Print
Excerpted from Real World Print Production with Adobe Creative Cloud b...