

For more reviews like these, plus how-to’s, news, and in-depth articles, subscribe to “InDesign Magazine“.
Gluon’s Cropster ID
Rating: 4 out of 5
Moam’s QwikMarx 2.5
Rating: 3 out of 5
Cacidi Systems’ Cropmarks 3.0
Rating: 2 out of 5
PDS Associates’ Text Styles Reporter
Rating: 5 out of 5
Slendro Solutions’ StyleReporter
Rating: 4 out of 5
Ratings Key
1 = Not worth it even if it’s free
2 = Not recommended
3 = Average
4 = Exceptionally good
5 = A must-have
Cropmark Plug-Ins
Cropmarks are the indicators added around pages that help print shops cut the final printed sheets to the correct trim size. Ordinarily, all you need for basic output are the built-in printer marks in InDesign’s Marks and Bleeds settings for printing and PDF exports. Yet there are some people — most often at ad agencies and book designers — who like to work on a page that’s larger than the final ad, brochure, or book cover. These people then need to add trim, bleed, and other production marks to the live area within the page layouts.
Several products make it easy to create a wide range of printer marks. Both Gluon’s $99 Cropster ID and Moam’s $100 QwikMarx can create every possible type of printers marks — even fold marks.
Gluon Cropster. Gluon has a long history creating XTensions and now InDesign plug-ins. One of Gluon’s more popular XTensions for QuarkXPress has been Cropster, which adds a wealth of features to QuarkXPress’ crop and information marks. As InDesign matured, Gluon got requests for a similar product for InDesign. Hence the birth of Cropster ID.
Although Cropster ID doesn’t yet have all the bells and whistles of its Quark sibling, the InDesign version of Cropster well serves the needs of most ad agencies and publishing houses.
Cropster ID lets you choose an object on the page to define the trim size of the ad. The plug-in then adds cropmarks, bleed marks, and guides around that object (Figure 1). If you don’t select an object, Cropster ID uses the document page as the trim size.

Figure 1. The Cropster dialog box creates a complete set of printer marks around an item or page. Click on the image to see a larger version.
Once installed, Cropster ID appears under its own Gluon label in the menu bar. Choose Cropster ID from the menu and the Cropster dialog box appears. There are five tab controls for the settings: Crops, Position, Folds, RegMark, and Presets.
The Crops tab lets you set the size for the bleed, trim, and safety areas of the document.
You can choose to create marks and/or guides for these areas. In addition, you can apply dimension arrows that label each of the crop dimensions. (One variation lets you apply the arrows without the crop marks, which resembles the markups on architectural drawings. It’s an elegant way to present work to clients who may not understand what the lines around the layout mean.)
Use the Position tab to set where marks should appear within the page, either offset from the top-left corner or centered on the page. You can also set the spacing, line weight, and length of the marks. The Reset Ruler control lets you move the document ruler so that the zero-point starts at the upper-left corner of the designated trim area. This is the type of nuance that shows how well Gluon has thought through its product.
The Folds tab lets you specify vertical or horizontal fold marks for the document. You can set them to automatically fold the document in halves, thirds, quarters, etc., or to position the fold marks at custom positions. (This is necessary to accommodate the creep for multi-page brochures.) The fold marks create dashed lines.
In the RegMarks, Etc. tab, you can set the position and appearance of the registration marks. Instead of the ordinary circle, you can create the square box that some printers find easier to use for registration. You can also set the marks to black on white or white on black. In the Notes area, you can add special information, such as the publication date and production contact. There is also an option to include the document title as well as the date and time that the file was prepared. (This is not the same as the date and time that the file will be printed.) The tab also allows you to insert custom color bars and/or a logo file. Any ad agency will appreciate the ability to brand its own documents.
All of these settings can be stored in the Presets tab. This makes it easy to switch from one ad to another without entering new settings.
Cropster ID also places all these elements on its own Cropster layer, which is automatically locked. You can add new marks to the existing ones or delete the old ones as you create new marks. can apply the crop marks to a master page so that the marks appear on all the document pages.
Moam’s QwikMarx. Moam’s QwikMarx plug-in provides a similar set of features to Cropster ID, with a few notable — and perhaps deal-breaking — differences. Like Cropster ID, QwikMarx is installed in its own Marks menu. The differences begin when you invoke the plug-in: You must create a new document page that’s larger than the trim size, then add the marks, guides, and other elements to that document page (Figure 2). If you have existing artwork, you have to copy and paste the art into the new document. That’s inconvenient, to say the least.

Figure 2. The QwikMarx settings for creating a page with printer marks. Click on the image to see a larger version.
QwikMarx can’t add custom logos or color bars. However, it does offer two features missing from Cropster ID.
Instead of Cropster ID’s single dashed stroke style, QwikMarx gives you three dashes — one for an ordinary fold, another for perforations, and another for both fold and perforations. Like Cropster ID, there are dimension arrows with labels that define the areas between objects. Unfortunately, neither QwikMarx nor Cropster ID ties these stroked objects to an object style. Nor are any of the labels tied to text styles. This would be a terrific way to let users customize marks and labels.
QwikMarx has one brilliant feature for working with oversized output, such as billboards and outdoor advertising. The Scale setting lets you set a size ratio for the document so, for example, you can set .1 inch in the layout to equal 1 inch in the final output. This scale ratio is then printed on the side of the document. (The Quark version of Cropster can do this, but not the InDesign version.)
In addition to the guides for bleed, trim, and safety, QwikMarx creates rectangles that define those areas. These rectangles are colored with a 1-point cyan stroke, which reminds me of the non-printing blue pencils we once used to mark up mechanical boards. Annoyingly, these items are printing elements. Didn’t anyone designing the software realize they could assign the Non-printing command to the objects? Even worse, those objects are left unlocked, on the main layer. This makes it difficult to place text and images into their own frames. It would have been much better if QwikMarx placed these frames as non-printing items on a locked layer.
It’s a tough choice between Cropster and QwikMarx, but the ability to add a company logo and custom colorbars makes Cropster more attractive for ad agencies and book cover designers. However, anyone working on brochures and other pieces with fold and perforation marks should consider QwikMarx.
Cacidi’s Cropmarks 3.0. At the lower end of the feature list (and price range) is Cacidi’s $25 Cropmarks 3.0. It provides only a bare-bones version of crop and bleed marks — no registration marks and no fold marks. While this product isn’t professional enough for ad agencies and publishing houses, it is an excellent choice for the designer who needs to set up a few items on a page that will be trimmed by hand.
Once you install the plug-in in the InDesign Plug-Ins folder, Cacidi adds a Cropmarks submenu at the bottom of the Object menu.
To add marks, select the objects and choose either of the Cropmarks Setting. This opens the Cropmarks dialog box (Figure 3). Although the settings are extremely simple, the layout is slightly confusing. The radio buttons let you choose to add cropmarks, bleedmarks, or guides. Because of the way the fields are arranged, you might think that the only controls for cropmarks are for Length and Distance. This is not the case. The settings for Length, Distance, and Line Weight are applied to either cropmarks or bleeds.

Figure 3. The Cacidi Cropmarks dialog box used to create bleed and trim marks around multiple objects on a page. Click on the image to see a larger version.
You can select an individual group or all the groups on the page and Cropmarks will create the marks for each group. The marks come in correctly styled with the Registration color. Cropmarks 3.0 behaves more like a script than a plug-in. For instance, although all the marks are neatly grouped around each of the objects, the Undo command doesn’t delete all the marks at once. Instead, each mark is deleted one at a time. With, say, a page full of business cards, it can be very cumbersome to undo setting the marks.
And for a real bargain, check out the free CropMarks script that’s included on the Creative Suite Resources disk (Technical Information > Scripting > Adobe Sample Scripts) and downloadable from www.adobe.com/products/indesign/xml_scripting.html
To install, just copy the script file into the InDesign CS 2 Scripts folder. The script then appears in the Scripts palette (Window > Automation > Scripts).
While there’s no setting to create guides, this script has a dialog box that lets you choose almost all the same options that are in the Cacidi product. Considering the price — free — this script is my choice over the Cacidi product. –Sandee Cohen
Plug-Ins that Extract Styles
I have often lamented the fact that there’s no way to extract all the information about your paragraph and character styles out of InDesign. At best, you can take screenshots of each of the 15 different paragraph style sections (General, Basic Character Formats, Advanced Character Formats, etc.) for each of your styles, but you might as well stick a fork in your eye, because that’s how much fun that’ll be. True, there’s a Style Setting summary under the General section for each style, but there’s no way to get that information out of InDesign. Worse, the summary window shows only seven lines of your style’s settings, forcing you to scroll to see it all because you can’t expand the Paragraph Styles Options window. Grrrrr.
Recently, I’ve come across two solutions to this problem, and I’m happy to report that I’m ready to remove that fork.
Text Styles Reporter. Text Styles Reporter is a donation-ware JavaScript written by Dave Saunders at PDS Associates. If you haven’t heard of Dave Saunders, suffice it to say that he is to InDesign scripting what Ken Jennings is to Jeopardy! His cross-platform script consists of two files: a JavaScript and an associated snippet file, which you must move into your InDesign Scripts folder. (Because of the dependency on the snippet file, this is a CS2-only solution, and also rules out using it in InCopy.)
Once installed, the Text Styles Reporter script appears in your Scripts Palette. to use it, simply open the document whose paragraph styles you’d like a report on, and double-click on the script. When you do, you’ll be presented with a window containing all the sections of a paragraph style’s settings with check boxes (Figure 4), letting you choose the settings you want a report on. I appreciate this sectional reporting method. I rarely use the Underline and Strikethrough Options, and being able to turn these off saves time when running the script and reduces the length of the generated report. You can also choose to sort the report alphabetically by paragraph style name, or by their “Based On” properties. Finally, you can choose to use one of your Document Presets for the generated report.

Figure 4. Text Style Reporter’s Paragraph Style Report selector lets you choose which sections you’d like a report on. Click on the image to see a larger version.
Once the script is finished running, it creates a new InDesign document that lists all of your paragraph styles and their associated settings for each section (Basic Character Formats, Indents and Spacing, tabs, etc.) that you checked on (Figure 5). After listing your paragraph styles, the script also generates reports for your character styles. And of course, Dave used paragraph styles to build this document, so you can easily adjust the look of the report.
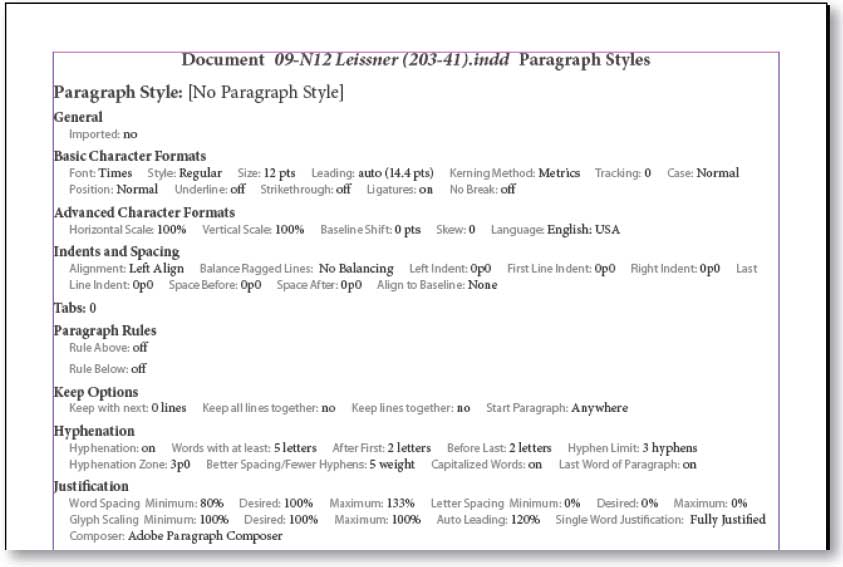
Figure 5. A sample report generated from Text Styles Reporter. Click on the image to see a larger version.
Text Styles Reporter is a simple solution to the vexing problem of extracting text style definitions. It’s easy to understand, quick, and customizable. Perhaps best of all, it costs as much as you’re willing to pay. That is, you can download and use it for free, but if you like this script, we encourage you to send a donation to Dave Saunders’s PayPal account or donate via Kagi.
StyleReporter. The $80 StyleReporter from Slendro Solutions is a cross-platform plug-in for InDesign CS or CS2 that functions similarly to text Style reporter but can do a whole lot more. After installing the plug-in, a new Plug-Ins Menu appears in the InDesign menu bar, from which you access the StyleReporter options (Figure 6). These options let you export your style settings in a couple of ways, as well as create style labels for your current document.

Figure 6. The StyleReporter plug-in options. Click on the image to see a larger version.
Reports. There are two export options available: ExportStyles and ExportStyles As. The first creates a new InDesign document consisting of a table listing a sub-set of your paragraph and character styles. Style types and names are listed vertically down the first column, with their corresponding settings displayed horizontally. This is good for a quick snapshot of the more important aspects of your style settings, such as Basic Character Formats, Advanced Character Formats, and Indents and Spacing. But with fifteen different paragraph style settings, each with multiple variables, there just isn’t enough room to present all of the data in a table format. As it is, the document StyleReporter creates is 18 inches wide by 12 inches tall (in 9-point type)!
To overcome this problem, use the “ExportStyles As” option to export all of your paragraph/character style settings to .csv (comma separated variables) format. You can open this format in any spreadsheet application, such as Microsoft excel. The report contains the attributes for every available setting in the paragraph/character style options — some 84 of them (Figure 7)! It’s a good solution to handling the amount of data associated with a paragraph style. However, I wish StyleReporter let me customize the settings it reports when using the “ExportStyles” command. While the company will happily customize the report for you, you need to contact them to do it. A check-box interface similar to text Style reporter, or at the least a user-customizable text file that controlled the report settings, would be welcome.

Figure 7. The .cvs tabulated report, opened in Excel. Click on the image to see a larger version.
Labels. As good as a tabulated report is, there’s nothing like a labeled example to communicate your styles to someone else. StyleReporter’s second set of commands handles this for you. When you select the ShowStyles command, StyleReporter scans your document for uses of all paragraph and character styles. For each instance it finds, it creates a label indicating which paragraph or character style is in use in your document. For the most part, paragraph styles are placed in the margins of your document, while character styles are placed on top of the character(s).
This works pretty well, although the default settings could stand to be tweaked. For instance, each label is placed in a colored box — orange for paragraph styles and blue for character styles — but it’s next to impossible to read the text in the blue boxes. Ideally, a tint of each color should be used for the label background colors. Fortunately, when you install StyleReporter, a new StyleReporter Options section is placed in InDesign’s preference panel to control these settings. Here you can pick which color to use as the background for the labels, as well as some other options, such as whether to ignore master page items, and whether StyleReporter should label every occurrence of a style, or just the first occurrence per story and/or per document.
Other nice touches include each label type being placed on its own layer, so you can choose to hide all the character styles, for instance. And the labels themselves are governed by a new character style created when the command is run, so you can easily alter the look of the text within the label. If you alter the font and/or font size to the point that the labels are now too small for the text, the FitStyles command will adjust each label accordingly. One thing StyleReporter’s labels won’t do, however, is travel with the text. If you add or delete text in your document, you’ll need to re-run the ShowStyles command.
Ideally, I’d like to see the CS2 version of the plug-in use an object style for the labels, so you could easily adjust their look with, say, 50% transparency. And other than instructions on how to install the plug-in, no documentation comes with the product. I had to ask the developers for that, and it was mighty slim. Still, Slendro Solutions is actively developing new capabilities for this plug-in, so here’s hoping these things will be added.
Reporter’s Report Both Text Styles Reporter and StyleReporter are great solutions to the style settings conundrum. If your needs are basic and you need only a report of your style settings, you can’t go wrong with Styles reporter. But if you prefer either a tabulated and/or annotated look at your style settings, Slendro’s StyleReporter is an easy choice. — Jamie McKee
Sandee Cohen is the senior contributing editor to “InDesign Magazine“.
Jamie McKee has never really stuck a fork in his eye, though he did staple his thumb once. It hurt, but not as much as not being able to get his style settings out of InDesign.
This article was last modified on January 10, 2022
This article was first published on February 2, 2007
Commenting is easier and faster when you're logged in!

Recommended for you

Where Was I a Moment Ago?
Here's a quick and easy way to get your text cursor back to where it was before...

ARTS PDF Releases Groundbreaking New Tool for Total PDF Document Workflow Automation
ARTS PDF (https://www.artspdf.com), the leading developer of PDF tools for PDF p...

Editor’s Picks for The InDesign Conference 2025
Our Editor in Chief lists his must-see sessions for the InDesign Conference 2025...