


Color accuracy is a big topic in digital photography. Photographers often speak of a camera being more or less accurate in its ability to reproduce colors. The problem with claims of accuracy is that color is a very subjective property, and most of us don’t have a perfect memory for color. Further complicating the issue is that the same object in different lighting will appear to be a different color.
However, while it can be difficult to tell if a purplish landscape is more accurate than a reddish landscape, the eye is a good deal more discerning when it comes to skin tones. A tremendous portion of our visual cortex is devoted to facial recognition, and skin tone is a big part of this process. The tone of someone’s skin can express everything from emotion to health, and our eyes are finely honed to recognize even slight adjustments.
As such, correcting skin tones is one of the most persnickety tasks a photographer faces. Even a slight change in hue or tonality can look dramatically better or worse. Because skin tone correction is such an important process, PhotoTune Software has created SkinTune 2.0, a $79.95 Photoshop plug-in designed specifically for correcting skin tones.
SkinTune doesn’t necessarily do anything more than Photoshop’s built-in tools, but its simple interface makes for very quick operation. For photographers who want to quickly correct a lot of portraits, SkinTune can be a real time-saver. It’s also great for mixed lighting situations and other scenarios that make accurate color more tricky than usual.
Ready for Your Close-Up?
SkinTune installs like any other Photoshop plug-in, and SkinTune version 2.0 is compatible with Photoshop 7, CS, CS2, CS3, and Photoshop Elements versions 2 through 5. SkinTune works with 8- and 16-bit images in either RGB or sRGB color space. The SkinTune window requires a screen resolution of at least 800 x 600.
SkinTune’s single window shows you your original image on the left, and the corrected image on the right. There are an array of controls for making color and tone adjustments (Figure 1).

Figure 1. SkinTune’s interface is a single window with simple controls for making refined skin tone adjustments. Click on the image for a larger version.
To use SkinTune, you select an eyedropper and click on a flesh patch in the original image. SkinTune presents a pop-up menu where you identify the race of your subject (Figure 2).
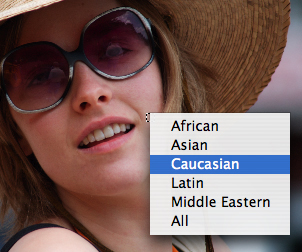
Figure 2. You can choose a race to focus SkinTune’s color-correction options.
SkinTune includes an internal database of 120,000 to 150,000 color swatches for each of the program’s race tones. The company says that these databases help the program understand precise characteristics of possible skin tone corrections. According to PhotoTune’s research, skin tone represents less than half of 1% of all available colors. Because your eye is so adept at registering skin tone, you need refined controls that can handle editing such a small range of colors.
After clicking with the eyedropper, SkinTune presents a corrected image on the right side of its window. Depending on where you clicked, the image may or may not be better than the original. To prompt SkinTune to re-render the image with a different correction, simply click again in a different area.
Once you find a correction you like, you’re ready to fine-tune. SkinTune has a unique interface for making fine adjustments. Located beneath the image previews is a spread of color swatches, which provide alternate skin tone corrections (Figure 3).

Figure 3. This skin tone color ramp lets you quickly and easily make fine alterations to Skin Tune’s color correction. Click on the image for a larger version.
As you can see, this is a very finely graded ramp of tones. The ramp is based on the tone you sampled, and the gradient goes from more reddish versions of that base tone to more greenish versions. You can click on any tone to apply that correction. It can be difficult to see the differences by looking only at the ramp, but the changes are readily apparent in the final image (Figure 4).

Figure 4. My initial color sample yielded an image that was better, but the skin tones were still a little red. After I clicked on a different color swatch, SkinTune came up with a new correction. Click on the image for a larger version.
This very simple interface provides a tremendous level of control and power. Most importantly, it allows for easy access to extremely subtle changes — the type you want when correcting skin tones.
Note that SkinTune’s color corrections are not constrained to the skin tones in your image. When the program makes an adjustment, it alters the entire image. In most cases, you’ll probably find that these global corrections are an improvement, as in Figure 4 above.
Tuning Fine Toning
SkinTune has additional controls that let you perform more generalized edits with a few skin tone-friendly twists.
Brightness and Contrast sliders allow you to brighten or darken an image, and to perform overall contrast adjustments. However, these are hue-protected adjustments. SkinTune operates in a color space that holds luminance information separate from hue. So, when you brighten or darken an image using SkinTune’s sliders, you shouldn’t see any change in the skin tones in your image (or any of the other colors, for that matter). The software applies brightness adjustments using a tone curve that predominantly adjusts shadow and mid-tones, leaving highlights largely untouched.
By comparison, changing the white or black point using the Levels dialog box can result in a hue shift. It’s usually very slight, but with skin tones that’s sometimes enough to make a difference.
The Saturation slider adjusts global saturation in the image.
The two Equalize sliders are basically warming controls (Figure 5). Moving either slider up warms your image, while sliding down cools things off.

Figure 5. I adjusted the Equalize sliders to give this image a little extra warmth.
Two Dynamic Range menus let you perform the equivalent of an Auto Levels adjustment, but with control over whether you want to move just the white point, just the black point, or both. Because SkinTune performs these adjustments in a hue-protected space, you won’t see a change in color tone when using these controls.
SkinTune’s controls are well-conceived, easy to use, and deliver very good results. The program is especially handy for bad white balance situations, such as mixed lighting (Figure 6).

Figure 6. SkinTune’s quick and easy fixes for bad white balance situations warmed this image in a snap. Click on the image for a larger version.
If you only occasionally adjust skin tones, this plug-in is probably not worth your $79.95. You can achieve in Photoshop most of what SkinTune does; however, your Photoshop chops must be fairly good, and the corrections will take longer than in SkinTune.
If you routinely shoot portraits, SkinTune’s powerful controls and speedy workflow make it well worth the investment. And event shooters will appreciate the program’s ability to handle difficult mixed lighting situations.
This article was last modified on December 14, 2022
This article was first published on July 16, 2007
Commenting is easier and faster when you're logged in!

Recommended for you

Thoughts on the Sony A6000 Mirrorless Camera
Mirrorless cameras have been both a hot topic and a subject of some debate. Duri...

Smartphone vs DSLR: Which Camera is Better?
Smartphone or DSLR camera, which one is better for you? On the surface this ques...

Say “iCheese,” with the ioShutter Camera Remote
Imagine if you could have an app on your iPhone that you could use to control yo...