

Score: 90
Pros: Great localized toning controls; very good grain emulation; well-designed interface
Cons: Needs a histogram display; missing some keyboard shortcuts
In these days of digital image editing, “Is that real or has it been Photoshopped?” is a common question. It’s also the sign of a common misconception about photographs. No photo is real, and even images never touched by an image editor are still interpretive representations.
Few things reveal the subjectivity of photography as starkly as black and white conversion, for the simple fact that there’s no objective standard for what gray tone should correspond to any particular color. For example, in a black and white photograph you might choose to represent a sky as a dark tone or a very light tone.
How you choose to map a color scene into grayscale is one of the most important stages in black and white work. Nik Software’s Silver Efex Pro is a $200 plug-in for Adobe Photoshop and Apple’s Aperture that does nothing but black and white conversion. You won’t find a more sophisticated tool for converting color images to grayscale. And because Silver Efex’s grain and film emulation are best in class, you can create images that look like traditional black and white photos.
$200 for a Black and White Converter??
If you already have Photoshop, you may be wondering why you should pay for additional software simply to convert your images to grayscale. Photoshop CS3, after all, includes an excellent Black and White conversion tool that’s completely non-destructive. And in previous versions of Photoshop, you can use the Grayscale mode change, Channel Mixer, and dozens of other techniques to convert to grayscale.
The fact that there are dozens of techniques reveals how critical black and white conversion can be. For a century-and-a-half, black and white shooters have experimented with film choice, development practices, paper types, and many other technologies — all while trying to master complex dodging and burning techniques. For digital shooters, the equivalent is the black and white conversion technique you choose.
Why Is the Conversion Method Critical?
With color, you have a very firm reference point when editing your images, because you can compare the color in your scene with the actual color of your subject. Sure, you may opt to veer from direct accuracy, but at least it’s possible to make that initial comparison. With black and white, there’s no such direct correlation between your image and the physical world. You can represent any color with any shade of gray.
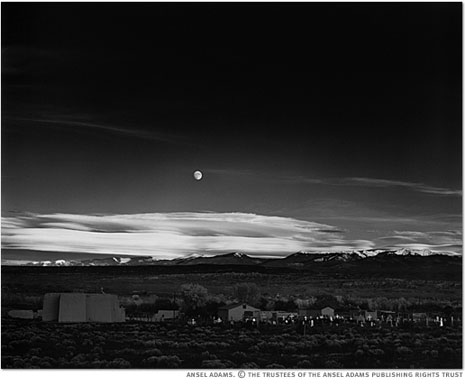
Probably the most famous black and white photo in the world, Ansel Adams’ Moonrise Over Hernandez (Figure 1), looks very different from one print to another, depending on how old he was when he printed it. As he got older, he made different decisions (largely in the sky, which he printed darker as he got older).
Figure 1. One version of Ansel Adams’ Moonrise Over Hernandez
If you’re serious about working in black and white, you need to be serious about the tools you use to convert your color images to grayscale. Given the power provided by Silver Efex, $200 is cheap.
Interface
Whether you install it in Photoshop or Aperture, Silver Efex has the same interface, a large dialog box that takes over your screen.
The interface includes a large center preview window, a pane on the right that houses controls, and a pane on the left that holds presets, which Nik calls Styles (Figure 2). Additional buttons and widgets let you zoom, pan, change the background color, activate split-screen before/after views, and the usual OK and cancel brushes.
Figure 2. Silver Efex’s easy-to-use interface includes split before/after views. Click the image to see a larger version.

Even though it has some unique interface elements, the plug-in is simple enough to figure out just by fiddling with it. For example, the loupe in the lower-right corner provides a magnified view of your image. Beneath it are gray swatches representing the ten zones of the zone system. Mouse over one, and the plug-in highlights all of the tones in your image that fit in that zone (Figure 3). Click on them and the highlights toggle on and off.
Figure 3. Using the swatches beneath the loupe, you can tell Silver Efex to highlight the tones that are within specific zones. Click the image to see a larger version.

If you’re used to thinking in terms of a traditional zone system, this can help you make some decisions about placing your tones and the dynamic range of your image. They also serve well as highlight and shadow clipping displays.
However, I’m so accustomed to working with a histogram that I missed it while using Silver Efex’s controls. It didn’t necessarily hamper my editing, but I still like to see a histogram when adjusting tone.
Aside from the lack of keyboard shortcuts, which could be handy for such things as the Preview toggle, the interface is well-designed and implemented.
Global Changes
When you first open the plug-in, it performs an initial black and white conversion. It’s almost always a fairly average, neutral conversion that’s very similar to what you get from a Mode change in Photoshop (Figure 4).
Figure 4. On the left, converting using a Photoshop Mode change. On the right, Silver Efex’s initial “neutral” conversion. Click the image to see a larger version.

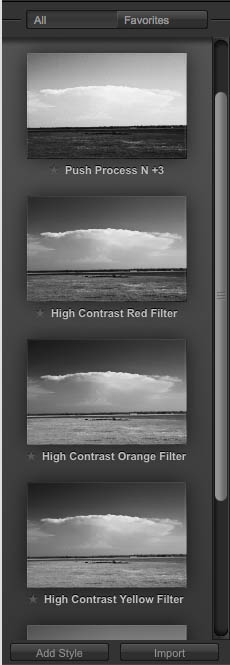
One of the best places to start with Silver Efex is to choose a preset Style. Silver Efex ships with a load of pre-defined conversions that run the gamut from high-key, high-contrast looks, to more subdued conversions, to antique-looking effects complete with burned edges and vignettes (Figure 5).
Figure 5. Silver Efex’s preset Styles are often all you need for a good black and white conversion.
Styles are all editable, making them a great way to get started. Deconstructing a style is also a good way to learn more about the plug-in. You can save anything you create as a custom style.
Whether you’re adjusting an existing style or starting from scratch, your first adjustments will probably be to use the Brightness, Contrast, and Structure sliders. Brightness and Contrast do just what you expect. Structure is like the Clarity slider in Photoshop Camera Raw. It increases lots of micro-contrast details in the image to make fine details stand out (Figure 6).
Figure 6. Using the Brightness, Contrast, and Structure sliders, I made global changes to the image’s tone and detail that were an immediate improvement. Click the image to see a larger version.

These controls may seem simple, but you’ll probably adjust the tone of your image before you bring it into Silver Efex. Consequently, while the plug-in’s controls are good, they don’t have to serve every tonal editing function you may need. Get your image in the ballpark with Photoshop or Aperture, then fine-tune brightness and contrast to your particular grayscale needs when you get in to Silver Efex.
Silver Efex’s Shadows and Highlights sliders can automatically brighten and darken only the shadows and highlights in your image, just like the Shadows/Highlights command in Photoshop. They’re a great tool for refining basic adjustments.
The Color Filters section lets you apply a basic tonal adjustment that’s akin to putting a colored filter over a lens when working with black and white film (Figure 7).
It can be a simple way to achieve a pleasing an overall contrast ratio.
Figure 7. Using the Color Filter controls, I created the effects of a traditional red filter, resulting in a different basic tonal value. Click the image to see a larger version.

As with any Photoshop filter, you can apply Silver Efex to individual layers.
Localized Adjustments
All the adjustments I’ve mentioned so far are global and haven’t gone much beyond what you can get in other applications. Where SilverEfex really shines is in making localized edits. Nik has taken its U Point technology, first introduced in Capture NX, and then released as a plug-in called Viveza and built it in to Silver Efex. With Silver Efex’s Control Points, you can easily make localized tonal adjustments, and they’ll benefit from the Control Point’s ability to automatically construct very sophisticated masks.
To use a Control Point, you click with the Control Point tool on a tone you want to lighten or darken. Handles on the Control Point let you define a radius of effect and apply brightness, contrast, and structure adjustments to that area. Control Points are so useful because they analyze the underlying color — the point where you place the control point — and then use that color to automatically create a mask.
In other words, Silver Efex is aware of the original color in your image and uses this information to construct a selection that constrains your black and white tonal adjustments.
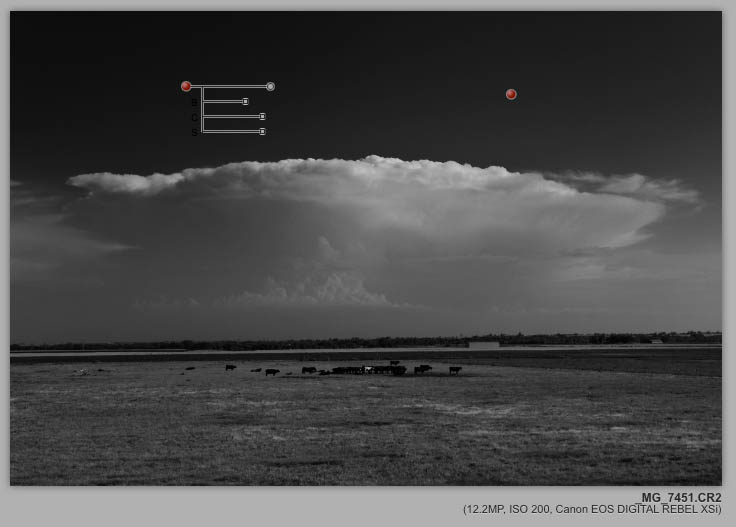
Say I want to darken just the sky in my example image. I click in the sky to place a Control Point (not on one of the clouds, because they’re a different color than the sky) and then drag the Brightness slider on the Control Point to darken (Figure 8).
Figure 8. Control Points have four sliders: Brightness, Contrast, and Structure, and a fourth for defining a circular area of effect.

Silver Efex automatically creates a mask that limits the effect of the darkening to only the blue of the sky (Figure 9). If I drag the same point onto the ground, then only the ground is darkened, because now the mask defined by the Control Point is based on a different color.
Figure 9. With two Control Points, I can darken the sky without having to create any masks to protect the clouds or the ground. Click the image to see a larger version.
Control Points in Silver Efex become incredibly intelligent, supremely powerful dodge and burn tools. You can easily copy a Control Point by Alt/Option dragging it to a new location. With just a few quick Control Point placements, I can create a very complex toning (Figure 10).
Figure 10. With just the Control Points, I managed to make a very complex adjustment, including some subtle work on the clouds. Click the image to see a larger version.

Using the Control Point controls on the right side of the screen, you can hide or show Control Points or view the masks created by particular Control Points. Unfortunately, there’s no way to deactivate specific controls on a Control Point. For example, you can’t add a point that only adjusts Contrast without affecting Brightness. Instead, you’ll have to adjust the Brightness slider so that it has minimal effect.
The Black and White adjustment in Photoshop is very good because it allows you to make changes to specific color values in your image. The problem is that if you tell it to darken the blue tones in an image, every blue tone will be altered. Silver Efex scores over Photoshop’s built-in Black and White because it can alter tone and contrast of specific areas, based on color, but constrain the alteration using an automatically created mask.
You could achieve the same effects in Photoshop using multiple Black and White adjustment layers, each configured differently and constrained using hand-built masks. However, masking around hair and clouds in Photoshop is much more complicated than Silver Efex’s Control Points.
Control Points are not only incredibly powerful, they’re fun to use. They work so well and accomplish complex edits so easily that you almost feel like you’re getting away with something. You’ll have more time to experiment and try different things.
This article was last modified on December 14, 2022
This article was first published on September 15, 2008
Commenting is easier and faster when you're logged in!

Recommended for you

CreativePro Video: Fix Distorted Perspective in Lightroom
In this week’s CreativePro video, Nigel French shows a quick way to adjust issue...

How to Prepare Raster Images for Use with Illustrator Brushes
In the process of testing Illustrator features released last June in the Creativ...

Learn About Photoshop CC While You Use It With the New Features Panel
We are all creatures of habit and develop our favorite ways of getting work done...