


In your career as a graphics pro, sooner or later you’ll encounter a moiré (pronounced moa-ray) pattern. If this term is new to you, rest assured that a moiré is not a form of exotic wildlife (that’s a moray eel); nor is it a varietal grape (that’s mourvedre). A moiré is an optical effect — in this case, a pattern created when two or more grids intersect one another and create visual interference.
To see a simple moiré pattern in action, take a look at Figure 1, which comprises two grids that overlap one another at a 5-degree angle. Notice that although the grids are themselves absolutely regular, the pattern they form is somewhat irregular. A moiré pattern can be a relatively sedate checkerboard, it can look like the dark wavy lines found in moiré silk, or it can remind you of a ’60s pop-art painting.
Figure 1
In this example, two regular grids intersecting at a 5-degree angle create an irregular moiré pattern.
A moiré pattern is a potential problem whenever you scan a piece of artwork that contains a grid. The grid that exists within the original image may interact in unexpected ways with the scanning grid (the array of sampling points typically measured as pixels per inch), the matrix of pixels on your computer monitor, or the dot patterns employed by desktop printers and offset presses.
In some cases, the grid in the artwork is an intrinsic part of the imagery. For example, a photograph of a regular structure — such as the grid in a screen door or the pattern of a checked fabric — can produce a moiré pattern when scanned. Even black-and-white drawings can contain regular grids. Moiré patterns created in this way are known as “content moirés.” Figure 2 illustrates what can happen when you scan a piece of line art that contains a radiating line pattern. The circular inset (lower right) provides a full-size view of the background pattern. And as you can see, the pattern itself is perfectly regular. But when zoomed out or reduced for display on a monitor, the symmetrical pattern is transformed into a kaleidoscopic pattern.
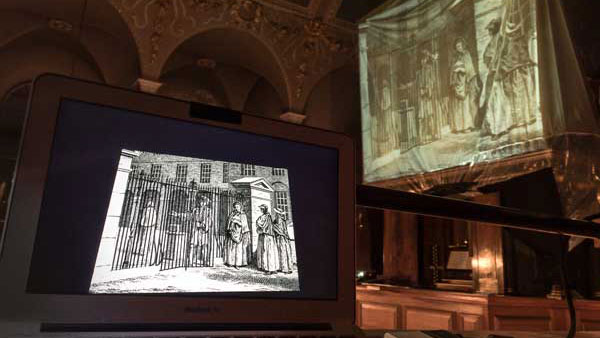
Figure 2
The kaleidoscope background in this line art drawing is the result of a moiré pattern.
In the vast majority of cases, however, the grid in the artwork will be a preexisting halftone screen, which indicates that the picture has already appeared in a book, a magazine, or a newspaper. All printed images use a dot pattern to simulate shades of gray or varying color tones. If you would like to learn more about halftone technology you can read a detailed explanation in a previous Scanning 101 column — Setting the Right Resolution.
Keeping It Legal
Before we proceed, we encourage you to think twice before blithely scanning a picture that is already in print. A picture that appears in print is probably the property of either the artist or the publication itself. Only the owner of the picture’s copyright can legally reproduce it or grant permission for its use. If you decide to scan a copyrighted picture without permission you are — quite simply — breaking the law.
There are, however, situations that make it permissible to scan previously printed material. In some instances, older publications may no longer be protected by copyright. You may also be forced to scan a printed version of an image to which you own the copyright, because the original artwork has been lost. Alternatively, you may be scanning an image from a paper-based clip art collection. In fact, all of the images used to illustrate this article were scanned from commercially available clip art books.
High Impact
If you have any doubts about the visual impact a moiré pattern can have on a scanned image, take a look at Figure 3, which shows you the results of scanning an already-halftoned picture. Figure 3 has been sized for screen display. But, if you are inclined you can click here to view (and then save) a 300-ppi version of the same image. Not surprisingly, when you print this picture to your desktop printer from within your image-editing software, you’ll likely see a moiré pattern. You may, however, be surprised to learn that the moiré pattern on paper differs from the moiré pattern on screen. The pattern changes because you are introducing new variables to the mix — namely a larger size, a higher scanning resolution, and the halftone screen that your printer employs to generate images.
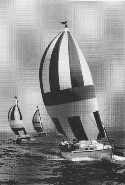
Figure 3
Scanning a previously printed image can result in a disturbing moiré pattern.
This practical example proves a basic point about moiré patterns: You cannot predict what the final moiré pattern will look like. To judge how a moiré pattern will appear on screen (for Web images or screen-based presentations) you must view the image on screen at 100-percent magnification of its final size. Likewise, if your images are bound for paper output, proof the image using the same resolution and linescreen you will ultimately use to print the finished output.
This article was last modified on July 18, 2023
This article was first published on January 3, 2001
Commenting is easier and faster when you're logged in!

Recommended for you

Inside the Publishing Revolution: How the LaserWriter and Photoshop Changed the World
Excerpted from “Inside the Publishing Revolution: The Adobe Story” (...
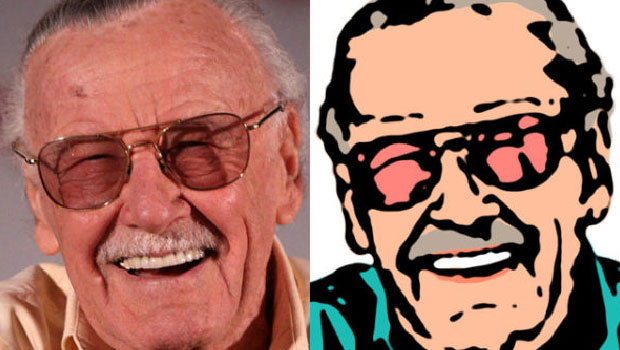
How to Turn a Photograph Into a Cartoon in Photoshop
Learn the simple steps for creating a seemingly hand-drawn cartoon from a photo,...
Fixing Slideshow Projection Problems With Photoshop
The church of St Andrew, Holborn, in the heart of London, was built by Christoph...