
Sharpen Photos Smartly


Most every RAW file requires some degree of sharpening to counter the blurring that occurs automatically at some stage of image capture or image processing. But when do you apply the sharpening? In Adobe Camera Raw, or later, in Photoshop CS2? The answer isn’t as straightforward as you might think. The fact is, there are compelling reasons to apply some sharpening to your RAW file using Camera Raw. There are also compelling reasons to turn sharpening off in Camera Raw, wait until your RAW file is open in Photoshop CS2, and then apply sharpening via the new Smart Sharpen filter or one of the many third-party sharpening tools. It really depends on what you want: optimal workflow or ultimate flexibility and user control. This article will help you help you take your sharpening skills to the next level so you can produce the best possible image.
RAW Sharpening 101
The challenge is to apply just the right amount of sharpening to the appropriate areas without introducing distracting noise or artifacts to other areas, as illustrated by Figures 1 and 2 below.
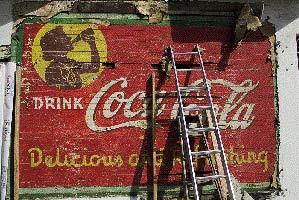
Figure 1. This image exhibits artifacts.

Figure 2. The halo is a sure sign of oversharpening.
When to Apply Sharpening
There is a lot of misunderstanding about when and how to apply sharpening. I find it useful to break sharpening down into three general categories. These categories can also be thought of as stages, applied sequentially in the order listed here:
- Capture sharpening: Sharpening that compensates for purposeful blurring at either the camera level or during raw conversion.
- Cosmetic sharpening: Sharpening applied to a specific part of an image and not another; e.g., eyes, but not warts.
- Print or output sharpening: Final sharpening based on a specific size and destination of an image.
I’m going to emphasize capture sharpening and just lightly touch the other two types of sharpening, which, obviously, are huge subjects in and of themselves. (Applying correct output sharpening, for example, depends on myriad factors, including the type of printer, ink, and media, not to mention image size.)
Capture sharpening is best understood by looking at an image with no sharpening applied. For example, see Figure 3. The photo was taken with a Fuji FinePix S3 Pro SLR using a very high-end Nikon lens for optimal sharpness. It was shot at f/8 at 1/250th of second and carefully focused.

Figure 3. Here’s a close-up of the image seen in Figure 1, but this time without any sharpening.
I used the Camera Raw sharpening slider to turn sharpening completely off and the result is not an accurate representation of the scene as I shot it. It also doesn’t do the equipment I used justice.
So we agree this image requires sharpening. But the question remains: What’s the best way to bring a RAW file back to its original state, yet not go too far and make the image worse?
Adobe Camera Raw, Smart Sharpen, or Other?
The sharpen feature in Adobe Camera Raw is very simple to use, and in many cases very effective. I recommend using it whenever you are processing large numbers of RAW files or when speed is an issue and you simply want to create an image that appears sharp on a monitor. I say this knowing full well that you’ll likely need to use other sharpening methods to apply cosmetic or output sharpening at a later point.
Photoshop CS2’s new Smart Sharpen filter is really powerful and offers many sophisticated user controls. (Depending on what setting you use, it can also be very slow.) I recommend using it when you have a problematic image that Adobe Camera Raw sharpening doesn’t do justice to, or if you have the time and desire to perfect a particularly special image. The Smart Sharpen filter in CS2 can also be effectively used both for Cosmetic and Output sharpening.
There are several other third-party sharpen options. My favorites include Nik Sharpener Pro, PixelGenius’ PhotoKit Sharpener, and PhotoWiz’s FocalBlade. These commercial products all streamline workflow by offering various sharpening presets appropriate to different stages of sharpening.
I can’t end this discussion without bringing up Photoshop’s Unsharp Mask filter, which has been part of Photoshop since Version 1. Some of you may have finally mastered this filter and find comfort using the familiar. But I highly recommend trying some of the options described above. Unsharp Mask relies on fairly old technology, now largely replaced by space-age edge detection methodology.
Sharpening with Adobe Camera Raw
When you open a RAW file for the first time in Camera Raw, a sharpening value is automatically applied. More often than not, the default Camera Raw sharpen setting works pretty darn well. There are good reasons for this. First, Camera Raw automatically applies a sharpening factor based on relevant data specific to a particular digital camera. Second, sharpening occurs only in the luminous channel, thereby reducing the chance of unwanted artifacts. Third, Thomas Knoll, the genius behind Adobe Camera Raw and Photoshop, built the sharpen algorithm from scratch and, in his own words, gave the sharpen feature his best shot.
Of course, if you have the time or inclination, you can tweak the Camera Raw sharpen settings and apply your custom settings to other similar images taken with the same digital camera.
For an example of how to adjust the sharpness setting, I used an image with a combination of detail (trees) and continuous tone (sky). I want sharp, clearly defined branches, but I also want to avoid adding noise or artifacts to the sky (Figure 4).

Figure 4. This image is a good sharpening challenge.
First I set the white balance and exposure controls. In this case, the Auto settings are fine. I check these settings first because it’s easier to judge detail appearances when the colors and exposure are correct.
I then identify a representative area of the image that contains both detail and continuous tone. Then, using Camera Raw Magnify tools — either the Zoom tool or the Zoom level controls — I enlarge the image at least 100% and use the Hand tool to position the area I wish to observe in the middle of the Camera Raw window (Figure 5).
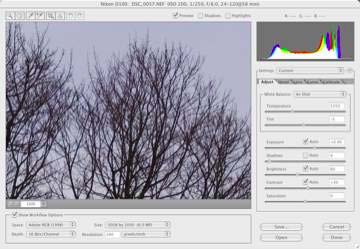
Figure 5. I want these branches to be more clearly defined.
The actual enlargement percentage you come up with will depend on the resolution of your image. My 6-megapixel image was shot with a Nikon D100 and 100% adequately enlarged the image, as you can see. With a higher resolution camera, a lower percentage may work; with a lower resolution camera, you’ll need a higher percentage.
I select the Detail tab in the camera raw controls (Figure 6).
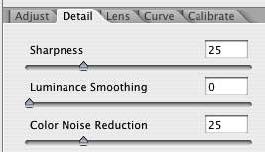
Figure 6. The Detail tab will help me sharpen the branches.
Unless you changed the number previously, the sharpening setting is 25, regardless of what digital camera you use. I find it useful to start by sliding the slider to 0 and then examining the image to establish a baseline for future sharpening (Figure 7).

Figure 7. Slide the sharpening setting to 0 for a baseline.
Keep in mind that the effect of no sharpening will vary from camera to camera. With some digital cameras the effect is barely noticeable. With others, it’ll appear extremely noticeable.
Toggle the view between no sharpening and “optimal” sharpening — as determined by Adobe Camera Raw — by turning Preview on and then off. Remember, when Preview is turned off you see a representation of your image determined by Camera Raw settings applied when the file first opened and before you changed anything. This means that if Sharpening is set to 25 at Camera Raw startup, with preview turned off, you are actually viewing your image with some sharpening applied.
Next I move the slider to 100%, which obviously is way off (Figure 8). Again, I’m going to the extreme to get a sense of the range I have to work with.
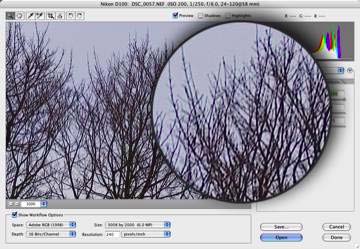
Figure 8. Ouch! These branches are too sharp!
Through trial and error I finally come up with the number 40 (Figure 9). Now I have the right balance between sharpness of the branches with no noticeable noise added to the sky. In general, I caution you to not to go to far with sharpening. It’s always best to err on the side of caution. If you overdo it, future Cosmetic or Output sharpening will suffer.

Figure 9. These branches look more realistic.
Fixing the Effects of Over Sharpening
For some images, such as the moon shot in Figure 10, you can use Adobe Camera Raw’s Luminance Smoothing controls to diminish artifacts caused by too much sharpening, or, as in this case, a combination of sharpening and a high 800 ISO.

Figure 10. This photo suffers from oversharpening and a high ISO.
To fix images with these problems, do the following:
- Enlarge your image using magnification controls.
- Select Detail.
- Find the optimal sharpening using the Sharpness slider.
- Increase the Luminance Smoothing slider slowly, observing the effects. Stop when you achieve a balance between edge sharpness and diminished noise or artifacts in the continuous tone areas (Figure 11).
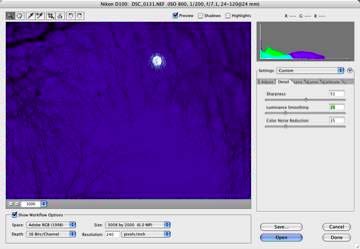
Figure 11. The corrected image is more appealing.
GO TO PAGE 2 FOR STEP-BY-STEP HELP ON SHARPENING IN PHOTOSHOP.
This article was last modified on January 3, 2023
This article was first published on October 5, 2005
Commenting is easier and faster when you're logged in!

Recommended for you

ShutterSnitch, the Wireless Photo Assistant for iOS
The iPad offers several advantages for photographers. Compared to a laptop, it t...

Using InDesign, Illustrator, and Photoshop Together: The Pen Tool
I remember the first time I tried to use the Pen tool in Illustrator back in 198...

CreativePro Tip of the Week: Viewing Illustrator Artwork as Outlines
This CreativePro tip for viewing Illustrator artwork as outlines was sent to Tip...