
Step-by-Step Image Salvage

![]()

Versions: 5, 5.5
Operating systems: Macintosh, Windows
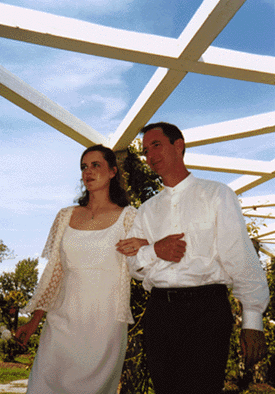
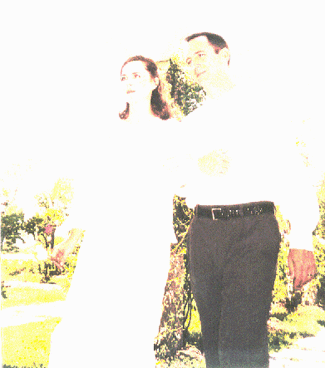
Quite frequently you’ll be given less than stellar scanned images to work with, so it’s useful to know several enhancement strategies that will boost an image’s overall quality. In this article, we’ll take you through the general process we used to correct our original image, shown in Figure A, and turn it into the image shown on the cover. As you can see, the original image shown in Figure A has so many things wrong with it that it’s hard to know where to begin. It’s out of focus, underexposed, and has a lot of random dirt, just to name a few of its imperfections. We’ll focus on certain techniques for bringing an image such as this one back to life.
Figure A: You can make substantial improvements to images as imperfect as this one.
A general approach
Image correction can follow a number of paths, but there are some things you definitely want to do before others. You should first correct scanning artifacts, dust, and unwanted highlights and shadows. Then, you should make overall brightness and color adjustments. Next, you should sharpen the image, and then finally remove any distractions, which is anything that draws attention away from the focus of the image. For our example image, we’ll fix the underexposure and brighten the couple’s skin tones by creating a custom high-pass filter and then overlaying a duplicate image onto the original. We’ll then mask the overlay layer so it only affects the skin tones. Since skin is a memory colorbasically a color people find easy to recallwe want to pay special attention to its accuracy.
Next, we’ll use the Unsharp Mask filter to make our image crisper. This filter may also generate some unwanted noise or bright spots that will need to be toned down. Finally, we’ll get rid of any distractions, such as the flowers in the lower-left corner and the contrasty areas. Now that you have the basics, let’s get started.
Noise-free environment
You always want to keep an original of your image on hand, so begin by saving an extra copy of your RGB image. Even though our original is blurry, it still shows plenty of dust and even some noise. A good place to start in ridding your image of noise is its Blue channel. The Blue channel is the RGB channel that most frequently contains noise, but you should make it a habit to examine all your channels. You can access the Blue channel without going to the Channels palette by pressing [c]3 ([Ctrl]3 in Windows). In Figure B, you can see a close-up of the Blue channel and a fair amount of noise.
Figure B: You can knock down some of the excess noise in the Blue channel by applying the Dust & Scratches filter to it.
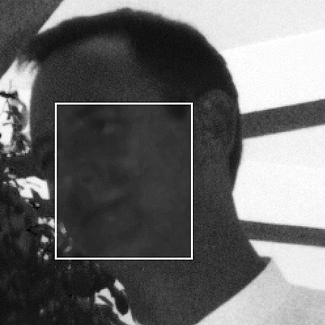
To rid yourself of some of it, choose Filter > Noise > Dust & Scratches. In the resulting dialog box, set a Radius of 2 and a Threshold of 1 and then click OK. (You may have to experiment with these settings depending on the resolution of your image.) As you can see in the inset shown in Figure B, we blurred our channel significantly. By blurring only the most offensive channel, you won’t degrade the image’s sharpness too much because the other two channels remain unscathed. Once you’ve finished, press [c][~] ([Ctrl][~] in Windows) to return to the normal composite channel.
Cleaning up artifacts
Besides having a lot of noise artifacts generated by scanning, your image probably also contains one of the most imaged object subjects in the whole world–dust. It’s everywhere. There are basically two strategies for dealing with dust; you may want to use a combination of the two depending on your subject matter. Most typically, you can use a spot-by-spot removal process by utilizing the Rubber Stamp tool. As an alternative, you can use the filter we used earlier, Dust & Scratches, to remove dust over an entire image or a selected area. Since this filter blurs the image, it’s usually best to use it on areas where focus may not be important, such as the background or the sky. Then, you can keep your spot fixes to a minimum. In our image, we ran the Dust & Scratches filter separately on the sky, the woman’s dress, and the man’s pants. All the other areas were fixed manually.
Retouching the image
Retouching bright spots and shadows is important, particularly when they’re on people’s faces. The woman in our image has significant under-eye shadows as well as a few shiny highlights, as indicated by the arrows shown in the image on the left in Figure C.
Figure C: The Rubber Stamp tool makes short work of highlights and shadows.
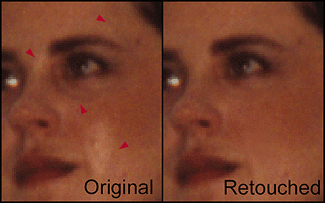
Fortunately, we can even out her skin tone easily with the Rubber Stamp tool. But first we’ll create a new layer to keep our touchups on. To do so, click the Create New Layer button at the bottom of the Layers palette. Name your layer Face Touchups, and then select the Rubber Stamp tool to access its options. Set its Opacity to approximately 15% and its Blending mode to Lighten. Also, be sure to select the Use All Layers and Aligned options. Now, choose a feathered brush of a suitable width for brushing across the dark area under the eye to make it look more natural. The brush size you choose depends on your subject as well as the resolution of your image. Next, [option]-click ([Alt]-click in Windows) to take a sample of the normal-looking skin area such as the cheek. Then, just brush under the eye to get rid of some of the darkness. You don’t want to remove so much that the eye socket starts to look flat, but just enough to keep it from looking cavernous.
Once you’ve lightened up any distracting dark areas on the face, change the Blending mode of the Rubber Stamp tool to Darken so you can tackle the highlights. Sample a nearby area of normal-looking skin tone, and again brush across the area you’re trying to darken. Whenever you use the Rubber Stamp tool, it’s easy to overwork an area, so try to make corrections with as few strokes as possible. You may also want to adjust the Opacity of the Rubber Stamp tool depending on the situation.
High-pass filtering
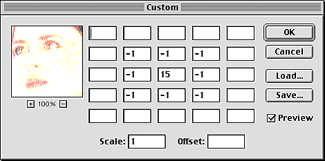
Now that the image is nearly blemish-free, we need to take care of the underexposure problem. The background colors and the clothing colors are essentially okay, but the skin tones are really out of whack. A simple way to correct the problem is to create a high-pass version of the image and overlay it with the original. This will brighten the skin tones and also add a touch of contrast. To do this, create a new layer and name it High Pass. Then, press [c][option][shift]E ([Ctrl][Alt][Shift]E in Windows) to automatically paste a merged copy of the image. To apply the high-pass effect, choose Filter > Other > Custom. We’re using the Custom filter because we need to create a brighter high-pass effect than Photoshop’s High Pass filter would offer us. We’ll do this by entering a filter kernal. In the resulting dialog box, match the numbered array shown in Figure D, and then click OK.
Figure D: Create a higher contrast version of your image by entering this filter kernal.
You’ve just created a bright, high-frequency copy, like the one shown in Figure E, of your initial image.
Figure E: This is the result of a high-pass filter with boosted brightness.
To see its affect on the original image, set the High Pass layer’s Blending mode to Overlay. The image is now too bright. However, since the high pass is on its own layer, just adjust the Opacity of the High Pass layer until you get a decent skin tone. We set ours to 35%.
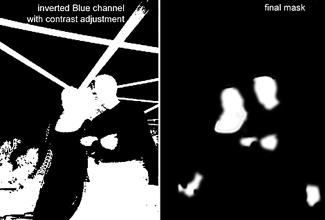
From Blue channel to layer mask
Now the skin looks decent, but the background is a little washed out. Fortunately, this is also easy to remedy. In the case of this image, we can quickly create the beginnings of a mask by duplicating the Blue channel and then inverting it. To make the mask, switch to the Channels palette and drag the Blue channel onto the Create New Channel button at the bottom of the palette. Your new channel is named Alpha 1 and it’s automatically selected. Now press [c]I ([Ctrl]I in Windows) to invert the image. Next, make the image high contrast by choosing Image > Adjust > Brightness/Contrast. In the resulting dialog box, set the Contrast to 100%. We also set the Brightness to -40%, but this setting will vary depending on your image. Click OK and you have the beginnings of a high-contrast mask.
To make a layer mask, return to the Layers palette and select the High Pass layer. Then, click the Add Layer Mask button at the bottom of the Layers palette. This attaches a mask to the High Pass layer, but the mask doesn’t contain any information. We’re going to paste information from the Alpha 1 channel.
To do so, switch to the Channels palette, turn on the visibility of the Layer Mask channel and Alpha 1, and then select Alpha 1. Press [c]A and then [c]C ([Ctrl]A and then [Ctrl]C in Windows) to select and copy the information in the Alpha 1 channel. Then, select the Layer Mask channel and press [c]V ([Ctrl]V in Windows) to paste the information into the layer mask. Now you can throw away Alpha 1 and deselect the image.
To modify the layer mask, use the Paintbrush tool to paint out all the rest of the image except for the skin areas. Once that’s done, choose Filter > Blur > Gaussian Blur to feather the selection a bit. We used a Radius setting of 2. Our high-contrast Blue channel and our final mask are both shown in Figure F.
Figure F: Use the Blue channel as the basis for creating the layer mask.
Once you’ve finished the mask, turn off its visibility and return to the Layers palette. Your image should look pretty good. However, select the High Pass layer and look at the image carefully to make sure no areas of the mask are noticeable.
Unsharp Mask filter
Scanner focus contributes a lot to an image’s sharpness. If your scanner’s focus is out of whack, you’ll still get blurry results from the sharpest original. Whether your image is particularly blurry or not, most need a pass with the Unsharp Mask filter before going to print. You may want to perform the filter in two passes–once for the general overall sharpness and a second time for details such as the eyes. For this section, save a flattened copy of your image and then open the copy in Photoshop to continue working with a less complicated image. To apply the Unsharp Mask filter, choose Filter > Sharpen > Unsharp Mask. In the resulting dialog box, choose your Amount, Radius, and Threshold settings. For the overall image, we used an Amount of 200% with a Radius of 1 and a Threshold of 6.
Now that your image is sharp, look at the eyes closely. If they don’t look snappy, zoom in and select the individual eye areas. To create a feathered selection, choose Selection > Feather and enter a radius. Then, access the Unsharp Mask filter once more and give the eyes another hit. The eyes in our image were sharpened an additional 100%.
Removing distractions
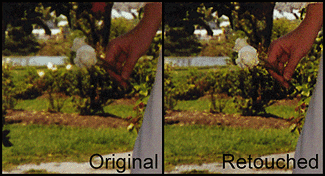
There may be a lot of unnecessary or distracting information in your image, so you should always keep its focus in mind. Now that the image is nice and sharp, look for things that lead your eyes away from the main subject of the image. Even objects that aren’t flaws can cause confusion in how an image is perceived. For example, you can see in Figure G that we darkened the river, removed blown out flowers, and eliminated other sharp jumps in contrast that were near the couple’s bodies. You can see how it’s now much easier to see the woman’s rose, which was sort of lost in the background before.
Figure G: By removing distracting elements, you can draw attention to the more important subjects in the image.
For these types of changes, you can use the Rubber Stamp tool or even the Burn tool. There are two important things you need to know about using the Burn tool. The first is to keep it at a very low Exposure setting, perhaps around 5%. Then, you can gradually add darkness to overly bright areas. Second, it’s best to use a feathered brush so you don’t end up with odd-looking harsh edges.
Saving the image and maybe the day
Throughout this article, we’ve shown you a general process that can be applied to a lot of image-enhancement situations. Now you know how to clean up many of the weak areas of scanned images and make their overall effects much stronger.
Copyright © 2000, Element K Content LLC. All rights reserved. Reproduction in whole or in part in any form or medium without express written permission of Element K Content LLC is prohibited. Element K is a service mark of Element K LLC.
This article was last modified on January 3, 2023
This article was first published on May 10, 2000
Commenting is easier and faster when you're logged in!

Recommended for you
Heavy Metal Madness: White Punks on Dope
Part of the reason, or should I say the only reason, I am behind in my garage pr...

Out of Gamut: Five Cheap Tricks in Photoshop 6
Curves, Levels, and Hue/Saturation are vital Photoshop tools I use on almost eve...

Paper Tips: Dare to Print on Colored Paper Stock
This story courtesy of PaperSpecs.com. In most cases, printing on a colored stoc...