

If you’re a fight fan — be it heavyweight bouts, professional wrestling, or schoolyard squabbles — then the next several months should be very interesting for you as Adobe and Apple square off against each other in the photography workflow market. You could say that Apple “started it” with their release of Aperture last November (read my review here), but Adobe has come back swinging with the announcement of Lightroom. Intended as a complement to Photoshop (or any other image editor), Lightroom provides a single environment for comparing and sorting images, performing basic image editing tasks and Raw conversions, and outputting your images to print or electronic media.
If that sounds familiar, it’s probably because it’s the same market that Apple identified with their release of Aperture. However, Lightroom is a program that has been rumored to be floating around Adobe in one form or another for well over a year. Aperture appears to have put the fire to Adobe’s feet and led the company to get its product, previously known as “Shadowland,” to market. To capture mindshare sooner rather than later, Adobe announced the first public beta of Lightroom on January 9. Currently, it runs only on Mac OS X, but Adobe says it will launch a Windows public beta in the future.
All cynicism aside, Adobe’s decision to openly beta test Lightroom is a very good one. Workflow is a difficult market to design for because there’s no one “best” approach. The user feedback that will come from public beta testing will go a long way toward helping Adobe craft a better final release.
Please note that this is not a review. The goal of this article is to help you understand Lightroom’s overall approach to photography workflow, and to outline what the current release’s capabilities are. Lightroom is a long way from release, and any issues I identify here are not meant as a criticism; instead, they’re to help you decide if you want to start working with the current beta, or wait for an update.
The Lightroom application is very small, making it an easy download. System requirements are a G4 processor, OS X 10.4, 768MB of RAM, 1024 x 768 screen resolution. You can download it from https://labs.adobe.com/technologies/lightroom.
You Say Non-destructive, I Say Adjustment Layers
So far, Adobe and Apple have thrown the most back-and-forth punches over the term “non-destructive.” Non-destructive editing means that the original pixels in your image are never altered. Instead, edits are kept as a separate list of operations that can be applied to your original data. Any time the computer needs to render the image to the screen, a file, or printer, it applies the edits to the original image data to create a finished, edited picture.
Non-destructive editing means you can undo any edit at any time, and in any order. What’s more, you can go back and change the parameters of any edit at any time and in any order. In a professional photography workflow, where production parameters and design ideas are constantly changing, non-destructive editing is particularly useful.
With its release, Apple heavily promoted Aperture’s non-destructive editing. Photoshop has long had many non-destructive editing features, such as Adjustment Layers and, with the release of CS2, SmartObjects. But Aperture has no destructive features of any kind.
Lightroom is also a completely non-destructive application. Like Aperture, your original document is never altered, and you can freely adjust and tweak any edit at any time, and in any order. This is true whether you’re working on Raw files, JPEGs, TIFFs, Photoshop documents, or any other supported format.
(In the interest of brokering a peace so that the companies’ marketing departments can use their bandwidth for other things, I would like to call this whole issue a draw and cede victory to Live Picture, which popularized the first truly non-destructive image editing application more than ten years ago.)
Interface Overview
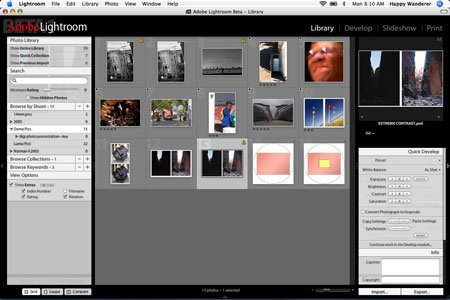
Lightroom’s interface is a single window divided into separate panes (see Figure 1). The top of the window displays buttons that let you switch between different modules. Each module includes tools for different parts of your workflow. The current beta ships with Library, Develop, Slideshow, and Print modules.

Figure 1. Lightroom’s interface is a single window divided into separate panes. The controls in each pane vary depending on the module you’re currently working in. Click on the image above for a full-sized view.
Separate panes on the left and right side of the window are populated with control palettes that change depending on which module you’re using. A filmstrip at the bottom of the window serves as an ever-present navigation tool that lets you quickly navigate thumbnails of the images you’re working with.
Lightroom was built from the ground up to be an extensible graphics processing platform, which means it should be simple for Adobe to add more modules. In addition, Adobe plans to release an SDK that will allow third-party developers to create their own Lightroom modules.
The Hybrid Library Module
The Library module lets you sort your pictures into categories and collections, and it provides the interface for comparing images, applying keywords, editing metadata, and adding ratings.
If you’re an experienced Photoshop/Bridge user, you might be tempted to use Lightroom to browse folders of existing images, as you can in Bridge. But Lightroom is more akin to Aperture than Bridge. Before you can work with any images, you must import them into the program. Lightroom creates a Library folder at a user specified location.
The current version doesn’t import directly from a camera, but you can import from any mounted volume, including a media card reader. The first option in the Import dialog is the File Handling pop-up menu, which lets you specify whether you want the imported images copied into the program’s library, moved into the program’s library or left where they are and simply referenced (Figure 2).

Figure 2. Among other things, Lightroom’s Import dialog lets you choose between copying into the program’s internal library or simply referencing the images in their original locations. Click on the image above for a full-sized view.
This flexibility provides you with a number of workflow options when it comes to cataloging, backup, and file management. If you choose to copy into your library, then you can easily back up your photos at any time by simply backing up your library folder. If you choose file references, then you can organize, back up, and manage your files just as you would any other document on your computer. More importantly, you can archive images to an offline volume, but still view their thumbnails and search within Lightroom.
If you try to edit an image that’s not on a currently mounted volume, Lightroom asks you to locate the file, giving you the opportunity to bring the relevant media back on-line.
This open, flexible library approach means that Lightroom is not only suitable for managing the workflow of your current projects, but for cataloging your long-term photo archives. This architecture was a great choice on Adobe’s part.
Imported images are divided into Shoots, and when you import, you can choose to further segment a shoot by existing folder structure (if you’re importing a folder full of images that are divided into subfolders, Lightroom will preserve this structure) or by date. The Import dialog also lets you specify copyright metadata and provides simple fields for entering keywords and a version name. Currently, keywording on import is primitive, requiring you to type in keywords from memory.
The Import dialog doesn’t let you select images within the batch you’ve selected for import. If there are images that you don’t want, you’ll need to remove them from the library later.
The Library pane lets you select which images in your library you want to look at (Figure 3).

Figure 3. Lightroom’s Library pane lets you sort, organize, and select images for viewing.
If you choose to Browse by Shoot, then clicking on a shoot’s name displays the images contained in that shoot. If the shoot was further segmented into sub-categories, you can open the reveal arrow next to the shoot name to access the nested segments.
The Library pane is the weakest part of the current Lightroom interface. Though they look like headings, those light gray bars — Photo Library, Search, Browse by Shoot, Browse Collections — are actually buttons that reveal and hide different options. Whenyou click Browse Collections, it expands to reveal any collections you might have defined (more on collections in a moment).
These buttons that don’t really look like buttons persist through all parts of the interface, and Adobe needs to make them look more like what they are, or remove them entirely to a button palette somewhere else on the pane. The Library pane is currently confusing and over-crowded with words. It doesn’t provide a unified visual sense of the hierarchy of your library, and buttons that denote the contents of your library are freely mixed with buttons that control program commands such as searching, and metadata display.
When you click on a shoot, its thumbnails are displayed in the main viewer pane, the large area in the middle of the Lightroom window. Here, you can re-arrange images, select images for editing, and launch into the program’s editing features. The same thumbnails are displayed in the scrolling horizontal strip at the bottom of the window.
To further refine your library organization, you can create Collections (which are analogous to playlists in iTunes). When you place images in a collection, a simple reference to each image is created. Lightroom also provides a unique Quick Collection feature. Select a series of images, press the B key, and Lightroom automatically adds the selections to the Quick Collection. You can have only one Quick Collection at a time. It’s easy to clear or replace whenever you want. The Quick Collection is a simple way to create a slideshow or proof sheet, without having to make a new collection.
Finally, beneath the Library pane are three buttons for switching viewing modes. The Grid button shows you thumbnails of the current image set. The Loupe button shows you the currently selected image scaled to fit the viewer pane. If you click the mouse on the image, it zooms to 100% around that point. The mouse pointer then turns to a scrubber hand that lets you pan around the image.
If you have multiple images selected, the Compare button shrinks them all to fit in the viewer pane so you can see them side-by-side. And that’s the extent of Lightroom’s comparison features, at least in this build. You can select compared images with the mouse and apply ratings or metadata, but you can’t rearrange them, and there’s no way to select images using only the keyboard (similarly, in Grid mode, you can’t use the keyboard to select multiple images for comparison). Lack of keyboard support makes the current build’s comparison features very clunky.
Pressing the Browse Keywords button reveals a list of all of the keywords associated with the images you’re browsing. Clicking on one of these keywords filters the images you’re browsing to show only those with keyword matches. The keywords list also serves as a way to apply keywords to images. You can drag any of the keywords in the list to an image in the viewer pane to assign that keyword.
Searching and filtering is a little weak in this first release. The Search box lets you enter keywords, but doesn’t search filenames. If you want to perform a multi-parameter search — images with certain keywords, shot on a certain day — you’ll need to segment your shoots by date when you import. Hopefully, Lightroom will provide better multi-criteria support in future builds.
Quick Edits
When you select an image in Lightroom, the program displays a large thumbnail in the right-hand pane, along with a three-channel histogram and a set of editing palettes. One very nice touch is that essential exposure metadata — ISO, shutter speed, aperture, and focal length — is automatically displayed next to the histogram. I’d love to see that in Adobe’s Camera Raw.
Being able to see a histogram of a thumbnail image is a great improvement over Bridge. With the presence of a histogram, it’s much easier to identify which image from a burst of shots or a bracketed set contains the most useful data for editing.
The Info palette lets you add a caption, copyright, and keywords, but this is currently the extent of the program’s metadata editing.
The Quick Develop palette lets you adjust white balance, Exposure, Brightness, Contrast, and Saturation, as well as perform grayscale conversions (Figure 4). The palette also includes buttons for copying and pasting settings from image to image. For editing multiple images simultaneously, a Synchronize button provides the same type of parameter syncing that Photoshop Camera Raw offers.

Figure 4. In the Library module, you can perform basic exposure adjustments, apply keywords, and add ratings.
For many images, these simple editing controls will be all you need. Even if your pictures ultimately need more complex edits, having quick access to basic exposure controls allows you to quickly get your images presentable.
The Develop Module
When you’re ready to process an image in earnest, click on the Develop button to switch to the Develop module. Lightbox then scales your image to fit its Viewer pane, displays a larger histogram, and brings up a set of exposure adjustment sliders. Though Lightroom is an entirely new code base, it uses the same Raw conversion engine as Camera Raw. However, Adobe has made a number of changes to the Raw parameter interface. Current users of Camera Raw might want to take a look at the Lightroom beta simply because it perhaps offers a glimpse into the future interface of Camera Raw.
One thing to bear in mind is that, with Lightroom, Adobe had to provide a set of exposure adjustment controls that could also be used for image formats other than Raw. In trying to strike a balance between the needs of all these formats, Adobe has done a good job in providing a set of versatile controls.
The adjustments pane is divided into sections, which each include a different category of adjustment tools (Figure 5). The Basic section is divided into three categories: Color, Range, and Tone.

Figure 5. In Develop mode, Lightroom’s control palette is divided into different sections that are further divided into sub-categories of sliders.
In the Color section, Lightroom includes white balance temperature and tint sliders, and a saturation slider. Preset white balances are included, along with a white balance eyedropper. Obviously, if you’re working with Raw images, the white balance sliders will provide a lossless color transform.
In the Range section, you’ll find two sliders: Exposure and Blacks. Exposure is basically a white point slider and operates just like the Exposure slider in Camera Raw. Also like Camera Raw, the Exposure slider provides highlight recovery features when you’re working on Raw files. The Blacks slider is a black point control and operates just like the Shadows slider in Camera Raw.
The Tone controls provide separate Brightness and Contrast sliders, both of which work like their Camera Raw counterparts. Brightness functions like a gamma adjustment, while Contrast essentially applies an S-curve adjustment.
The Tone Curve pane gives you an interesting variation of a Curves control (Figure 6). A normal-looking curve is displayed, but it’s important to note that, unlike Camera Raw, when you’re working with a Raw image in Lightroom, this tone curve is not an additional edit applied after your other exposure adjustments. The Basic exposure controls I just mentioned define the shape of the curve that’s shown in the Tone Curve pane. If you’re working with a non-Raw image, then the Tone Curve and basic adjustments are not connected.
Unlike a normal Curves control, you can’t reshape the curve by manually clicking and dragging points. However, six Tone Curve sliders perform additional tone curve adjustments.

Figure 6. Lightroom’s Tone Curve has a Curves interface that’s very different from any previous Adobe product.
The Tone Curve sliders are divided into separate Highlights, Midtones, and Shadows categories. Under Highlights, you’ll find sliders for Compression and Luminance. If you decrease the Compression slider, the top, highlight end of the curve flattens out, while increasing Compression causes the highlight portion of the curve to become more rounded. The Luminance slider brightens or darkens the highlight range.
Basically, the Compression slider lets you control the very high end of the highlight range, while the Luminance slider gives you a broader highlight adjustment.
The Shadows category includes Compression and Luminance sliders that work on the opposite end of the curve.
The Brightness and Contrast sliders in the Midtones category work like the Brightness and Contrast controls provided in the Basic section. The reason for these duplicate controls becomes obvious when you note the two small sliders at the bottom of the Curves display. These horizontal sliders let you change how much of the curve is considered shadow and how much is considered highlight. By moving these sliders, you can expand or contract each range to gain more control (Figure 7).
For example, if you slide the shadow slider to the left, resulting in a small shadow range, and the highlight slider to the right to create a small highlight range, then the midtone sliders will affect a much larger area of the curve.
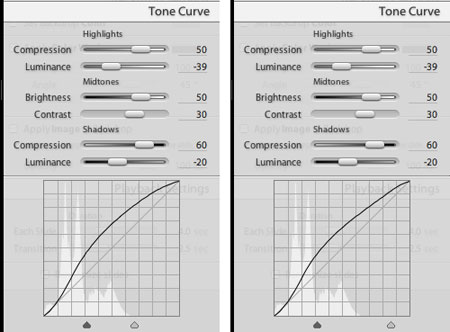
Figure 7. Here you can see the effects of the sliders at the bottom of the tone curve display. By Sliding the white slider to the right, we decrease the area of the curve that is affected by the highlight sliders, and increase the area affected by the midtone sliders.
This new interface doesn’t allow you to do anything that you couldn’t do with a normal curves interface. In fact, it actually offers less power. Making tiny adjustments to several small, specific areas of the curve is not possible. For almost all other edits, though, the interface might prove to be slightly easier for users who aren’t comfortable with curves.
Color Adjustments
Lightroom provides two other categories of controls for performing additional color adjustments. Split Toning and HSL Color Tuning provide a number of sliders that give you a very fine level of color control.
Split Toning is a cool feature that lets you independently control the hue shift and saturation of highlights and shadows. The HSL Color Tuning pane has separate sliders for altering the hue, saturation and lightness of the reds, yellows, greens, cyans, yellows, and magentas in your image (Figure 8).

Figure 8. The HSL Color Tuning panel provides a thorough amount of color tweaking power.
The Grayscale Mixer lets you create custom grayscale conversions but goes beyond the usual red, green, and blue mix controls by augmenting the mixer with sliders for cyans, blues, and magentas.
The Detail section gives you a single-parameter Sharpen control, along with simple noise reduction tools. For serious sharpening and noise reduction, you’ll probably want to stick with Photoshop. The Lens Corrections panel provides the same chromatic aberration and vignette correction controls that you’ll find in Camera Raw. It’s easy to save corrections to a Presets Browser pane.
While in the Develop module, you can use the Filmstrip at the bottom of the window to navigate to other images, meaning you don’t need to switch back and forth from Develop to Library to select images for editing.
Pressing the tab key while editing will hide Lightroom’s palettes, while pressing the F key allows you to go to full screen mode. However, because Lightroom doesn’t have floating palettes, there’s no way to work in full-screen mode but still have your image-adjustment controls available. You can hide the interface completely by pressing the L key. These features are nice, but they need a little more work.
The editing tools in this build of the Lightrooom beta are well-conceived and well-executed. However, the current build has some conspicuous omissions. There’s no crop control of any kind. And, while Camera Raw gives you multiple color samplers, Lightroom doesn’t provide any.
There are no masking or selection tools in Lightroom, so a good curves control is even more important, as it’s the only way to apply selective edits. However, for simple, quick edits, I miss a Levels adjustment.
Lightroom also lacks a cool feature in Adobe Bridge: When you first view a set of Raw images, Bridge performs an auto adjustment on each thumbnail. For low-light images, this is particularly useful, as it makes thumbnail browsing much easier.
The lack of Crop tool alone might mean that it’s too early to try out Lightroom for serious work, but otherwise, Adobe has a very good first set of editing tools.
Unlike Aperture, Lightroom currently has no facility for creating multiple versions of a master image. If you want to try out different edits, you’ll need to create a duplicate master.
Lightroom lets you open an image in an external editor with a simple menu command. A copy of your image is made and then passed to your pre-defined editor.
Output Options
Lightroom currently provides a few output options. You can export your images as JPEGs and TIFFs (curiously, this build offers no PSD support). The Export dialog includes very good naming controls, as well as color-space selection. You can enter new pixel dimensions for automatic scaling, but Lightroom doesn’t have “fit within” resizing, which might make things complicated when you want to scale a batch of images with different aspect ratios.
The Slideshow module has a wealth of controls for adding drop shadows, titles, backgrounds filled with color or a screened image, and the ability to add text overlays. The one conspicuous omission is the inability to play music along with the slideshow.
You can export your slide show as a standard HTML Web site, PDF, or Flash movie. Saving as HTML builds a gallery interface with a thumbnail display and navigation controls.
Photoshop users have have long wished for Lightroom’s printing features. With its simple interface, you can easily put multiple images on one page, create contact sheets, and more (Figure 9).
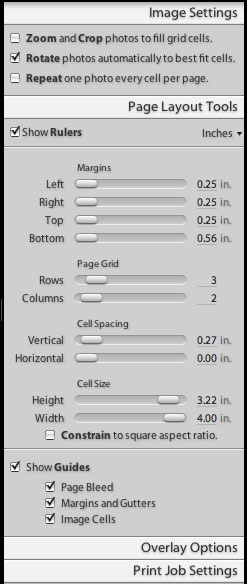
Figure 9. Lightroom’s Print module offers simple, flexible layout options that make it easy to create contact sheets and other complex layouts. You can also easily add watermarks and text overlays.
The Print module currently provides only rudimentary color management controls that let you select a printer profile and rendering intent (or you can opt to let the printer handle color management). However, the current build lacks soft-proofing capabilities.
Performance and Quality
It’s always difficult to judge performance in a beta release, as beta software is often riddled with performance-degrading debugging code. Given that, Lightroom is fairly snappy, even on a Powerbook. Both Lightroom and Aperture handle all of your document opening and saving for you, so you never explicitly tell it to open a document. While this streamlines workflow, it makes for a strange perception of performance. When you select an image and move to the Develop module, you feel like it should respond immediately, but of course it can’t because it has to open the image. If you had explicitly given an Open command, you probably wouldn’t feel as antsy.
Image quality is top-notch, especially with Raw files, thanks to the underlying Camera Raw engine.
The Wrap-Up
If the current Lightroom beta has an overall weakness, it’s that it’s slightly modal. Whereas Aperture provides access to all functions at all times — at any point, you can add keywords, edit metadata, adjust editing parameters — some of Lightroom’s features are accessible only from specific modules. For example, you can’t edit keywords and ratings while in the Develop module.
However, you can launch into the Develop module from any other module. For example, while creating a slideshow or printing, if you decide the currently selected image needs some tweaking, a click of the Develop button will move you to that module. Currently, module switching is a little slow, so Lightroom lacks Aperture’s streamlined sense of having all features available at all times.
The extensibility of Lightroom is particularly intriguing. If Adobe opens up the design to third parties, Lightroom could see the same type of innovative development that Photoshop fostered with its original plug-in architecture.
For a first beta, Lightroom shows a lot of promise. If you’re frustrated with a Photoshop/Bridge workflow, Lightroom is definitely worth taking a look at. The current beta, though, isn’t ready for real-world production work.
This article was last modified on January 18, 2023
This article was first published on January 11, 2006
Commenting is easier and faster when you're logged in!

Recommended for you

The Colorful Art Of Camera Tossing
This article is courtesy ColourLovers.com. Who exactly threw the first camera is...
Top Tips for Photoshop Book Now Available!
Twenty of our most popular Photoshop tutorials curated and collected in a conven...
Scanning Around With Gene: Five Years on a Flatbed
When I discovered that today marks my five-year anniversary writing a column her...