


Repetitive text formatting is a huge time waster, and even using paragraph and character styles is a bore when you have to apply them over and over again. But by using InDesign’s nested styles, you can bypass a lot of this tedium.
Nested styles sound more complicated than they are. In fact, they’re nothing more than a series of regular old character styles, with the transition from one to the next triggered by a character or command InDesign encounters in the text stream.
What makes these styles “nested” is that they’re part of a paragraph style, which when applied, causes the whole parade of character styles to be applied at once. You can also cause these sequences to loop back and start the series again. In one fell swoop, you can format listings, catalogs, tables of contents: anything with a predictable and repetitive structure.
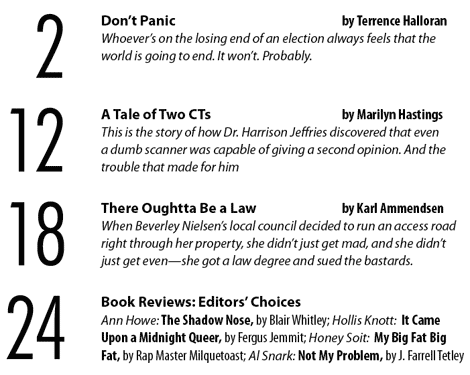
One look at the following table of contents in Figure 1 shows why this is such a wonderful tool.
Figure 1: I formatted this entire TOC automatically with one mouse click. Read on to learn how it was done—and how you can do things like this yourself.
The easiest way to proceed is first to build character styles for all the text you want to format. With those in hand, you next create a paragraph style in which to nest them.
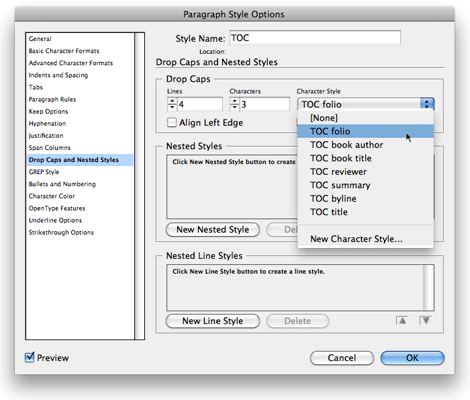
In the case of the TOC in Figure 1, I created one sample entry, formatted each distinct element by hand—page number, article title, byline, article summary, etc.—and then created a character style for each. To create a character style from formatted text, place your cursor in that text and Option/Alt-click on the New Style icon in the Character Styles palette, as shown in Figure 2.
Figure 2: An Option/Alt-click on the New Style icon in the Character Style palette opens a dialog box where you can give the style a name. Click OK, and you’re done.

Formatting the sample TOC entry took me a couple of minutes, creating the styles even less.
Create a new paragraph style the same way: Option/Alt-click on the New Style icon in the Paragraph Style palette, and give your new style a name. In the case of the TOC, the paragraph style I created (cleverly entitled “TOC”) contains very little formatting: a ragged right margin and a “space after” of 13 points, which equals one line space at the leading I chose for the for the text. All other type specs are defined in character styles.
The magic happens in the Drop Caps and Nested Styles dialog box, accessed from the list on the left of the Paragraph Style palette.
Here, InDesign gives you a template for creating a script for executing a series of style assignments. You just fill in the blanks.
For InDesign to apply a nested style, you have to tell the program three things:
1. the name of the style
2. how long it stays in effect
3. where it should end
Pretty simple, really.
The same is true of any drop cap you might apply to the paragraph, because InDesign considers this to be basically another kind of character style.
Let’s look at how all this works for the example TOC. As shown in Figure 3, I formatted the folio as a drop cap, which at once creates a large page number and running indents for the text to its right.
Figure 3: The “drop-cap” page numbers are four lines deep and three characters wide: two characters for the page numbers themselves, and one for the en space that follows them and creates the offset for the text that follows.
To get single-digit page number to align properly in the first TOC entry, I preceded it with a figure space from the Type/Insert White Space menu. (A figure space is the same width as a numeral, making it a perfect placeholder.) I turned off Align Left Edge so that the page numbers align properly, appearing to be flush right.
The Drop Caps Character Style menu is a pop-up that lists all the character styles that exist for a document. Choosing my “TOC folio” style formatted the numerals in Futura Light Condensed with a tracking value of -70.
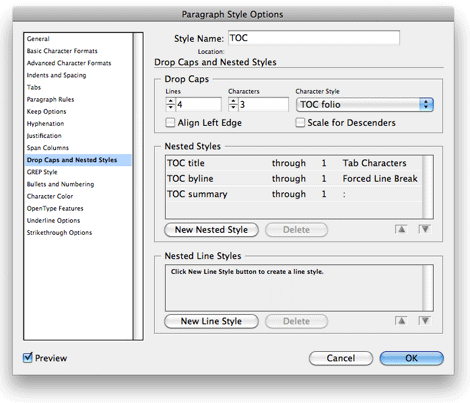
Next I moved down into the Nested Styles section of the dialog box, where each row consists of four fill-in-the-blank fields. To create a new nested style, I clicked the New Nested Style button. (Yes, it’s a pretty intuitive interface.)
In my TOC, the first style after the drop caps that I want to apply is the one for the article titles. A click in the left-hand field of my new nested style statement revealed a pop-up menu listing all existing character styles; I picked “TOC title,” as shown in Figure 4.
Figure 4: In the next three fields, I specified how long my selected style should be in effect. When filled in, the four fields—each with its own pop-up menu—complete a sentence describing how the style should be applied.

The instruction shown in Figure 4 translates into an instruction to InDesign to use the “TOC title” style until it has passed through the next Tab command in the text stream.
At this point, I encountered the byline, so the next nested style instruction read: “TOC byline through 1 Forced Line Break”. (A forced line break—Shift-Return—ends the current line without starting a new paragraph.)
I began the second line of the TOC entry, where the text consists of the article summary. So the third nested style instruction read:
TOC summary through 1 :
That last character is a colon, and even though it’s not in the right-hand field’s pop-up menu, you can type it in. For that matter, you can enter any character and have it act as a trigger to end one style and start the next. In fact, you can type in multiple characters—for example, :?!—and InDesign will end the style when it has encountered the specified number of any one of these characters. Pretty clever.
At this point, the dialog box looked like that in Figure 5.
Figure 5: With a few clicks of the mouse, I added three nested styles to the TOC paragraph menu.
Although it just so happens that all of my style changes happen after a designated character or command, this needn’t be the case. You could also say that you want a style in effect “up to” a certain character, and the style switch will occur before that character, as in Figure 6.
Figure 6: The top sample is formatted by a nested style that says to apply the style “through 1 em dash.” The lower one is formatted by an instruction to apply the style “up to 1 em dash,” causing the em dash to appear in the nest nested style in the sequence.

By now, you’re probably wondering why I chose to select a colon as the trigger character for that last nested style. The reason is that this style is also a transition into a series of nested styles for formatting the Book Reviews entry, with its apparently unique structure.
Figure 7: Although these two TOC entries look very different, the same nested style sequence works for both.
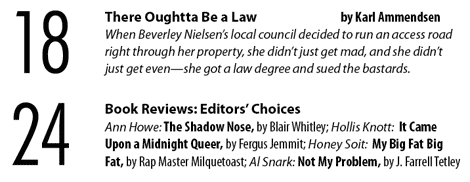
You may notice that there’s no byline on the first line of the Book Reviews entry. To skip the missing text without messing up the sequence of styles, just make sure the style triggers are still in place. Placing a Tab after the article title (as if a byline were to follow) tells InDesign to apply the “TOC byline” style, even though there’s nothing to apply it to. Following that with a Forced Line Break gets us to the next line and the next nested style. Tricky!
This underlines the basic principle of nested styles: The pattern and structure of the text must be consistent for nested styles to work properly. If you leave out a trigger—even one that doesn’t cause any text to be formatted—the scheme falls apart.
Some design strategy enters the picture as well. For example, I decided to use the same character style for the book reviewers’ names as I did for the article summaries in the previous entries. This also explains why I specified that the “TOC summary” nested style should end after a colon. The colon comes into play only in the Book Review section, where it triggers the style transition to the “TOC book title” style.
The fourth line of the nested style sequence, then, says:
“TOC Book Title through 1 ,” (that is, through one comma). This changes the typeface to Bold Condensed.
The last nested style in the series formats the name of the book’s author, and reads like so:
“TOC Book Author through 1 ;” (that is, one semicolon)
The final touch is to add one more instruction. On the line below that last nested style, I added the instruction:
“Repeat last 3 Styles”
This creates a looping effect that causes additional book review summaries to be formatted just like the first one.
All that remains now is to click OK to save the paragraph style. At this point the “TOC” paragraph style will correctly format any number of TOC entries that follow the structure you’ve defined. The only catch is that each TOC entry ends with a Return, making it a separate paragraph.
Line Styles
Parallel with these nested character styles, InDesign also enables you to create a series of character styles for individual lines of type. You don’t have to designate a trigger to create a transition from one line style to the next: The end of the line triggers the transition automatically. If you use a line style to make the first line of a paragraph blue, for example, that line will always be blue, whether you set it in 4-point type or 24-point. The line style ceases to apply after the designated number of lines.
A useful application for nested line styles is to alter the leading for a specific line in a paragraph, because leading in InDesign is a character attribute (although it only really works as such when applied to a whole line). Thus you could have extra leading in the middle of a paragraph, say, after the heading of a listing, as shown in Figure 8.
Figure 8: By using a Normal Leading character style for one line and a +6 Points Leading style for the second line, these nested line styles automatically add extra space between the first and second lines of a paragraph. A neat trick!

New Styles of Thinking
Nested styles may oblige you to work in a slightly new way. First, both your design and your text have to be predictably structured—you have to make sure all the triggers are always in the right places. This requires some strategic thinking.
For example, as clever as all the transitions are in the example TOC, what would happen if one of the article summaries contained a colon? The formatting would go haywire. The success of this set of nested styles relies on that extra degree of predictability: that colons will only appear in the book review summaries.
A little advance planning, though, is worth the effort. In particular, offering manuscript-preparation guidelines to content providers can save you a lot of time by assuring that text is properly structured and all style transition triggers are properly placed. When that system is working, one-click formatting isn’t far behind.
This article was last modified on August 12, 2021
This article was first published on January 31, 2011
Commenting is easier and faster when you're logged in!

Recommended for you

Type How-To: A River Runs Through It
The principal goal of typography is to create text that’s easy and pleasant to r...

Legibility and Readability: What’s the Difference?
Learn the difference between "legible" text and "readable" text and how to ensur...

Conquer Type-Killer Colors
The characters in the fonts we use have very distinct shapes, finely and painsta...