
Take Your Photoshop Work Further with Adobe Camera Raw

This excerpt is from Camera Raw Photoshop CS4, Volume 2: Visual QuickStart Guide. Used by permission of Peachpit Press. Copyright © 2009. Part of the Creative Edge Photoshop Resources Page.
Exclusive access for CreativePro.com readers provided by:
![]()
The Adobe Camera Raw plug-in lets you apply powerful correction commands to photos before opening them into Photoshop, and is a digital darkroom in and of itself.
Learning how to use this plug-in is essential if you want to maximize the potential of your digital photos.
In this chapter, you’ll choose Camera Raw preferences; correct white balance, exposure, contrast, and luminance problems; apply split toning; sharpen, crop, and straighten; use Camera Raw tools to apply local adjustments; blend dual exposures; process multiple photos; import photos as Smart Objects; and more!
CreativePro.com readers have special access to this entire chapter on the Creative Edge website. Click here to read “Take Your Photoshop Work Further with Adobe Camera Raw.”
What You’ll Learn:
- Choosing preferences for Camera Raw
- Opening ?les into Camera Raw
- The Camera Raw interface
- Choosing work?ow options
- Cropping and straightening photos
- Correcting the white balance
- Correcting the exposure
- Using the Tone Curve tab
- Reviving color
- Using the Detail tab
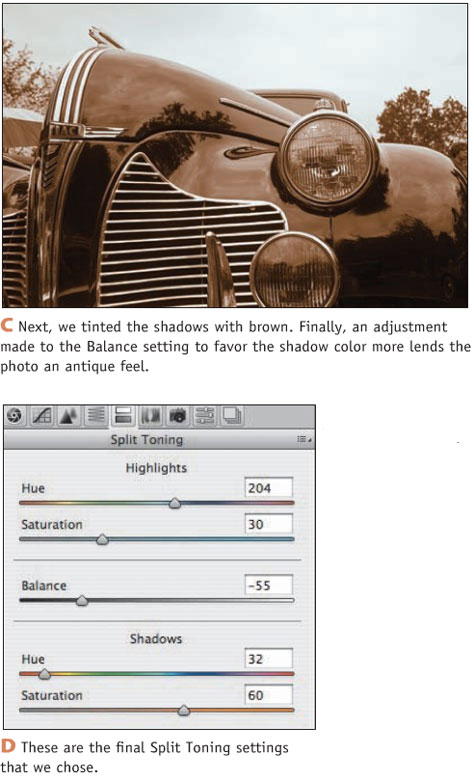
- Using the Split Toning tab
- Using the Lens Corrections tab
- Using the Adjustment Brush tool
- Using the Graduated Filter tool
- Combining multiple exposures
- Retouching photos
- Using Camera Raw presets
- Processing multiple photos via Camera Raw
- Saving ?les via Camera Raw
- Working with photos as Smart Objects
This article was last modified on January 6, 2023
This article was first published on December 27, 2010
Commenting is easier and faster when you're logged in!

Recommended for you
Essential Tips for Cropping Images in Photoshop
Whether it’s done to make images fit a specific space, or to make them tell a ce...
CreativePro Tip of the Week: Matching Zoom and Location in Photoshop
This CreativePro Tip of the Week on matching zoom and location in Photoshop was...

Creating a Panorama: Photoshop, Camera Raw, or Lightroom?
When a scene is wider than your widest lens, merging images into a panorama is a...