
You have some vector animation skills. You cut your teeth on tweening objects from point A to point B in either Flash or LiveMotion. Scaling your objects, rotating them, and adjusting their transparency all come easy to you now. And if you happened to catch my last article on Animating Masks, you can create subtle and alluring movement with aplomb. But what if you just want to make an object follow along a predefined curved path instead of the usual straight and narrow? Both Flash and LiveMotion make this possible, and creating motion paths is a lot easier than you might think.
Motion Path Sickness
A motion path is nothing more than a predefined course an object will follow during an animation, but Flash and LiveMotion take different approaches to setting up a motion path. With Flash, paths can be set up using Actionscripting, the powerful automation feature built into Flash, but in most cases, motion paths are created using a simple drawn path. You create a path, declare it a motion “guide” (Flash’s term for paths), attach an object to its start point, and then keyframe the object to the path’s end point.
LiveMotion takes a more direct approach: You define the route your object is to follow by dragging it from point A to point B. LiveMotion considers all position tweens as motion paths, resulting in a more accommodating, easily tweaked feeling in its manner of defining paths.
While both methods have upsides and downsides, neither does a great job of making it intuitive to start creating motion paths. Once you know the ins and outs of motion paths, though, you’ll have another handy trick to pull out of your bag when needed.
Seamless Motion Guides in Flash
When you start getting to know your way around Flash, you get the feeling there’s a lot lurking just below its inconspicuous interface and command set. Although you could say this about a lot of applications, Flash is high on the list of programs having many powerful features without throwing them all in your face at once. Motion guides in Flash are a perfect example of this: right there for you to utilize but tricky because you need to know some specific steps to make them work. The concept of how you go about establishing motion guides in Flash is simple enough, but you probably won’t feel that way until you’ve made a few of your own. Be patient and allow the process to sink in over time.
To create a motion guide in Flash and tween an object along it, do the following:
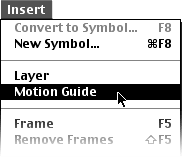
- Start a new document and Select Insert > Motion Guide from the main menu. A new motion guide layer appears above your selected layer — in this case above the default Layer 1. Notice that it also indents the Layer 1 indicating that this will be the layer used for the motion guide.
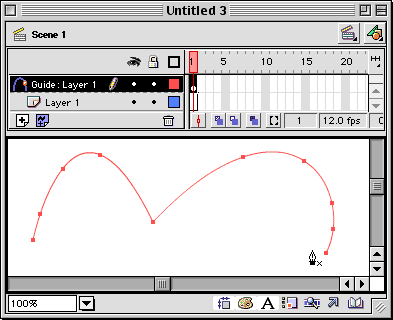
Create a motion using Select Insert > Motion Guide. - With the motion guide layer targeted, draw a curvy path that extends across the work area. If you’re using Flash 5, try using the new Bezier pen tool. It’s great for making smooth curves and arcs. Since we want the motion guide to be available throughout the animation tween, let’s extend the frames to 20 by clicking on frame 20 on the Motion Guide layer and selecting Insert > Frame (F5).
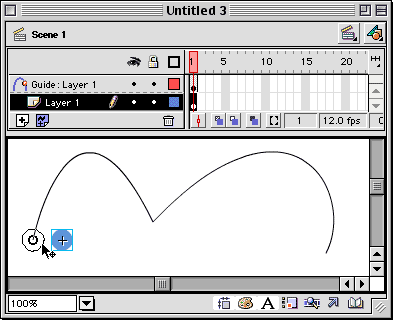
Draw a path. - Now select Layer 1 and add a simple shape such as a small circle. Flash requires all objects you wish to tween to be symbols, so let’s convert the shape to a symbol by selecting Insert > Convert to Symbol… Name the symbol appropriately and choose Graphic for Behavior.
- Drag our newly created symbol over to the start point of the motion guide. The anchor point should snap to the path when you get within a few pixels.
Drag the symbol to your starting point. - With Layer 1 still targeted click on frame 20 in the Timeline area and add a new keyframe by selecting Insert > Keyframe from the main menu (or hit F6). Then move your object to the end of the motion guide path making sure that it snaps in place. (Incidentally, you can snap to anywhere along the path of a motion guide not just the start or end.)
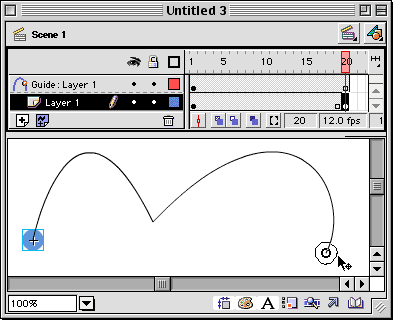
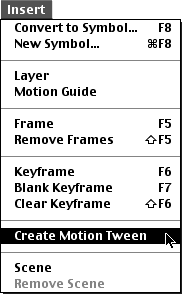
Move the symbol to the end point. - All that’s left to do is to create a motion tween. The fastest way to do this is to click anywhere in between the two keyframes created on Layer 1 and select Insert > Create Motion Tween from the main menu.
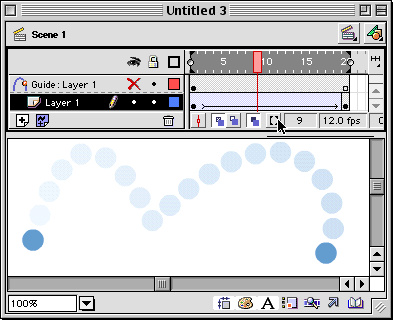
Create the motion tween using Insert > Create Motion Tween. - Preview your handiwork by choosing Control > Preview Movie. And don’t worry about the path you drew showing up. Since they are considered guides, those paths are hidden in the final output. Below, we activated the onionskinning feature to make the frames of the animated motion guide visible all at once.
Use Control > Preview Movie to preview the animation. - For some added motion finesse — to adjust velocity or even rotation — invoke the Easing control in the Frame panel while selecting the initial keyframe of the motion tween.
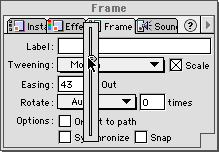
Use the Frame panel’s Easing control to adjust velocity and set other options.
The above process is a bit convoluted and leaves something to be desired. Once you’re comfortable with this basic workflow, though, you can experiment with various shortcuts and workarounds: There are many advanced techniques you can use when building motion guides. Try seeing how many objects you can attach to one motion guide, or add other types of tweening to your objects and really mix things up along the motion path.
LiveMotion’s Motion Paths… You’re Soaking in Them
Unlike Flash, LiveMotion doesn’t require you to first draw a path, define it as a motion guide, and then attach your object to it. Instead, you simply create new Position keyframes, or adjust existing ones. The motion path is automatically updated to reflect your changes.
Remember: All position tweens are considered motion paths by LiveMotion. In fact, LiveMotion helps smooth out any abrupt sharp turns with its Auto Bezier feature. If you’d rather have LiveMotion tween a path straight and sharp (“Linear” in LiveMotion lingo), the setting can be applied on a keyframe-by-keyframe basis. These methods of interpolation allow you to control the subtle movements your objects take along a motion path. You also have some degree of control over velocity with the Ease In and Ease Out options.
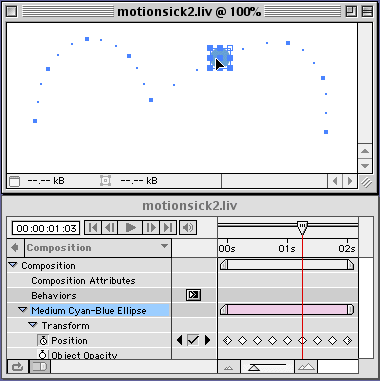
A series of dots and squares visually represent each motion path in LiveMotion. Each dot represents the object’s position at a frame, and a square defines the object’s position at each keyframe. This can be incredibly helpful when trying to visualize the positions and speeds of several different objects at once. Since frame rates are constant, the farther apart these dots or squares are, the faster the object moves along the path. Orchestrating a series of objects to arrive at the same point at different rates of speed is a breeze once you begin to understand the flexibility of LiveMotion’s motion path interface.

Each dot along the motion path represents a frame, so the wider the spacing, the faster the object will reach the end of the path.
Let’s step through creating a motion path in LiveMotion.
- First make sure Preview Motion Paths is selected. This setting is on by default but can be toggled by selecting View > Preview Motion Paths from the main menu or using the key command, Shift-Command-H (Mac) or Shift-Control-H (Win).
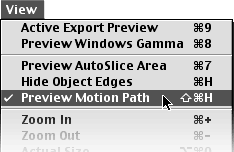
Use View > Preview Motion Paths to enable display of the motion path. - Create an object on one side of your composition.
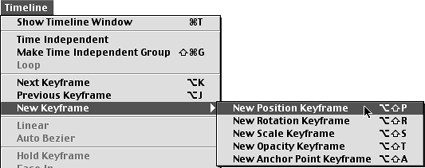
- To establish or “pin down” the starting position, create a new position keyframe. A quick and easy way to accomplish this is to select the object in the Timeline window and then choose Timeline > New Keyframe > New Position Keyframe from the main menu. Note all the handy keyboard shortcuts shown in this menu for future timesaving.
Create a New Position Keyframe to set your starting point. - Now drag the Current Time Marker (CTM) in the Timeline window ahead about a second.
- LiveMotion defines keyframes automatically, so all you need to do is drag the object across to the other side of the composition window. The dots representing the motion path will appear farther apart as you drag from your initial keyframe.
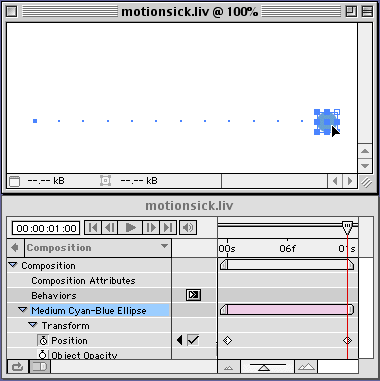
Drag the object to set the end point. LiveMotion automatically creates keyframes.Now that we’ve seen LiveMotion’s motion paths in action, at least in the basic sense, let’s adjust the motion path.
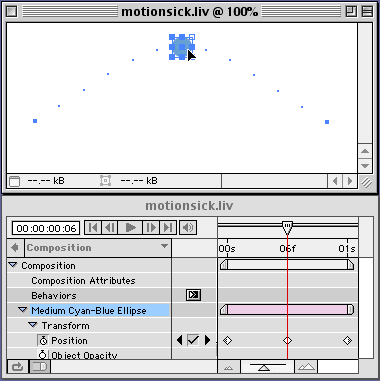
- Using the simple position tween we started, move the Current Time Marker to the middle of the two position keyframes — to somewhere around frame 6 (06f).
- In the composition window, drag your object upward. Once again, LiveMotion notes a change in position of the object and adds a new keyframe in the Timeline. Notice how the motion path arcs up smoothly to follow the position of the object. This is the Auto Bezier feature in action.
Drag the object to change the motion path. - In the main menu, select Timeline > Linear instead of Auto Bezier. The motion path should change from the smooth arc to a sharp angle. This may be less noticeable depending on the amount you moved the object upward.
- Switch the path interpolation back to Auto Bezier. Move the CTM along to other frames in the Timeline and then move the object to easily create additional motion paths. Try creating a bouncing effect by stringing along two simple arcs. You’ll need to tweak the path at certain points (adding keyframes along the way) to end up with smoothly curved arcs.
To create this bouncing effect, we had to move some motion points along the path, but this was as easy as tweaking paths in Illustrator. - To add a sense of velocity try playing around with the ease in and out controls for the object’s keyframes. Select a keyframe in the Timeline window and choose Timeline > Ease In (and/or) Ease Out from the main menu. These controls are also readily available from the contextual menu, Control-click (Mac) or Right-click (Win) from a selected keyframe.
Establishing motion paths in LiveMotion is usually easy in practice, but some simple tasks like attaching an object around a circular path — something that’s fairly easy to pull off in Flash — take some doing in LiveMotion. To enhance your prowess in creating and adjusting motion paths in LiveMotion, try moving the anchor points outside of an object while rotating them for a dynamic tailspin effect.
All Paths Lead to Somewhere
Motion paths are an interesting and powerful aspect to both of these vector animation programs. Both Flash and LiveMotion come with their fair share of quirks and strengths, and because their approaches to creating motion paths are so different from one another, it takes time to become familiar with the idiosyncrasies of each. Take your time getting familiar with the process and freely experiment. Whether you’re a die-hard Flash user or a new LiveMotioner, motion paths should become another technique to add to your animation arsenal. Just like walking, biking, or driving, the most direct path may get you there fastest, but there are plenty of reasons why a longer route might be the better choice, including the view.
This article was last modified on September 11, 2001
This article was first published on September 11, 2001
Commenting is easier and faster when you're logged in!

Recommended for you

InDesign How-to Video: Ignore Color in a Character Style
In this week’s InDesignSecrets video, Mike Rankin shows how easy it is to ignore...
Scanning Around With Gene: Les Merveilles Du Monde
Long before there were Happy Meals or super hero trading cards, many merchants g...

Illustrator CC 2018 New Features
Adobe Illustrator CC 2018 brings several exciting enhancements, including Variab...