

Many of us cringe when we think back to “picture day” in high school. If only we could have had a few minutes alone with our portrait and Photoshop how much better life would have been. The good news is that despite its “image-editing powerhouse” reputation, Photoshop is a pretty decent makeup artist as well. Photoshop can deal with embarrassing blemishes with ease, and can make bagged-out, tired eyes fresh again with but a few brush strokes. All you need to do is learn a handful of simple techniques and you’re on your way to making your subjects very happy with your work.
Start with a Little Foundation
The first thing to keep in mind is not to overdo your retouch work. As with real makeup, there’s a fine line between attractive and freakish). Keep it subtle. You’re not trying to transform your subject into some miracle of eternal youth or epidermal perfection; you’re simply trying to remove blemishes and other distractions that would otherwise detract from the portrait.
Before you start retouching your subject’s picture I suggest saving your original starting point as a new Snapshot in the History palette, by clicking the New Snapshot button. This provides you with a selective undo by being able to paint back to this original state with the History Brush. Read my article ““Back In Time” for more on this.
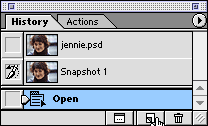
Begin by saving a Snapshot in the History palette, in case you need to selectively restore it later.
I also recommend switching your Display & Cursors settings so that your brushes are displayed at actual size and your other cursors show a “Precise” cursor. This is a better setup for most detail work, especially the type of retouching we’re doing now.
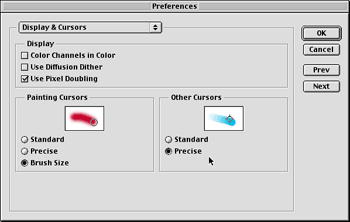
Try setting your cursor display to these more helpful settings.
Lastly, try disabling any sharpening being performed on your scans. An unsharpened image will give you a much better starting point for retouch work. Beginning with an unsharpened image will also help give the retouched image an overall consistent appearance after a final sharpening is applied in Photoshop.
Instant Blemish Remover
Removing blemishes is one of the easier techniques to perform. Just make sure to distinguish between a temporary imperfection in a person’s face and a distinctive, permanent mark that represents them or a part of their character. For instance, you wouldn’t dream of removing Cindy Crawford‘s mole or Harrison Ford‘s chin scar, would you?
Once you’ve separated the pimples from the dimples, the drill’s pretty easy.
- Select the Clone Stamp Tool then determine an area that best represents the skin tone and texture “under” the blemish. A neighboring area next to the blemish works best in most cases. Option-click (Mac) or Alt-click (Windows) this area to set a sample point for the cloning tool to read.
- Size your brush so it’s just slightly larger in diameter than the targeted blemish. You can use the left and right bracket keys to quickly decrease or increase the size of your brush.
- Now with the Option or Alt key released position the Clone Stamp brush directly above the blemish and simply click once on the blemish. Don’t attempt to click and drag because this will end up pushing the pixels around, resulting in a less-than-desired effect.
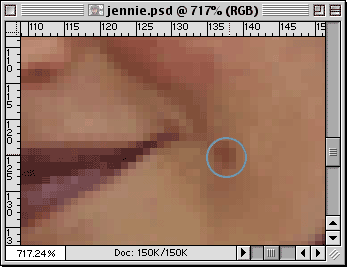
Removing blemishes is a simple one-click deal with the Clone Stamp tool. - If you’re not completely happy with the results, undo the Clone Stamp action and try adjusting your brush’s hardness. The Shift key combined with either the left or right bracket will adjust the hardness of the brush dynamically. You don’t necessarily want a hard-edged brush, but you want to get away from the blurring effect a soft brush will create. Play around with the hardness option until you wind up with the best setting for your situation.
This article was last modified on January 18, 2023
This article was first published on August 22, 2001
Commenting is easier and faster when you're logged in!

Recommended for you

Photoshop Fun: A Hole in the Hand
Creating surreal images is all about the idea. So what does this image mean? As...

Sharpen Focus with Photoshop’s Auto-Blend Layers
This tutorial is courtesy of the Russell Brown Show. There are times when low li...

CreativePro Tip of the Week: Increasing the Photoshop Canvas Size with the Crop Tool
This CreativePro Tip of the Week on Increasing the Photoshop Canvas Size with th...