


Ever since Adobe Illustrator gained the ability to edit the clipping paths of an imported Photoshop EPS, communication between these two powerhouse applications has steadily improved. Both applications have even gained a handful of capabilities that until recently were reserved for their counterpart. Photoshop now offers vector features in the form of Shape Layers and Vector Masks and Illustrator has the ability to include raster (a.k.a. bitmap) effects such as feathering, blurs, and soft-edged drop-shadows, to name just a few. While each has matured into versatile applications in its own right, there still is a call to use both in concert to create artwork, thereby exploiting the strengths of each.
Part one of this article, “Share and Share Alike with Illustrator and Photoshop” provided an overview of the fundamental export possibilities available in Illustrator 10 in order to preserve elements of your artwork such as layers, transparency, blend modes, and text. In this second part, I will go over more advanced options: writing compound shapes, slices, and image maps for the Web. So if everybody is ready, let’s begin.
Compound Shapes to Shape Layers
In order to take advantage of shape compounds in Illustrator 10 and move them over to Photoshop, we must first understand what they are. Shape compounds are rather new in both Illustrator and Photoshop. Unlike the original Pathfinder operations that have been around in Illustrator for some time now, compound shapes allow you to apply modes such as add or intersect to two or more shapes but keep the underlying shapes intact and editable (see Figure 1).
In Illustrator 10, Pathfinder operations result in compound shapes by default. Holding down the Option/Alt key when invoking a Pathfinder operation will result in shapes ultimately combined into a single shape (a la the classic Pathfinder operations). Adobe refers to this as “fully expanded.” The best way to think of compound shapes is as live Pathfinder operations that provide ultimate flexibility to change the basic underlying shapes that make up the compound shape.

Figure 1: This is what a compound shape looks like. Selected (left) you can see this compound shape is made up of two circles while unselected (right) it shows its real form, a crescent. These circles can be edited at any time and the compound shape will update.
Now that we covered what compound shapes are, it’s also important to point out that Photoshop’s shape layers and vector masks (layer clipping paths) are types of compound shapes. These types of layers can be imported into Illustrator as compound shapes and then edited further from there. On the flipside, you can export your compound shapes out of Illustrator to Photoshop.
Let’s try putting this to the test:
- Within Illustrator, create a compound shape by creating two basic shapes. If you wish the shapes to have strokes, be sure to change the stroke join type to Round in the Stroke palette (see Figure 2). Otherwise, you will not get the option to write compound shapes when exporting.

Figure 2: If you want to have a stroke on your compound shape, set the join to Round in the Stroke palette.
- With the shapes selected, click one of the four Shape modes (Add, Subtract, Intersect, and Exclude) in the Pathfinder palette (see Figure 3). Make certain the resulting compound shape lives on a top-level layer as opposed to a nested sublayer, which Illustrator supports but Photoshop doesn’t (see Figure 4).

Figure 3: The compound shape modes reside in the Pathfinder palette.

Figure 4: Be sure your compound shape lives in a top-level layer so that it exports properly.
- Choose Export from the File menu and then select Photoshop (PSD) for the Format. Decide on a location for the exported file and click Export. A subsequent Photoshop Options dialog should pop up (see Figure 5).
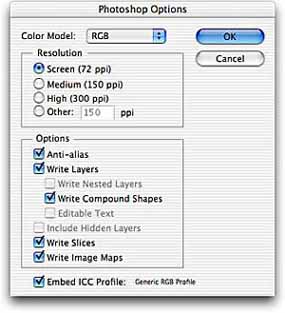
Figure 5: Illustrator’s Photoshop Options export dialog lets you specify Write Compound Shapes.
- If all went well, the option to Write Compound Shapes should be available. Check this option and click OK. If this option is grayed out, read over the some of the other caveats below.
- Now that the compound shapes are exported into a PSD file, open the file in Photoshop and review the results. Your artwork should come up vector-crisp (see Figure 6). The compound shape appears in Photoshop’s Layers palette with the nested information appearing as a Layer Style (see figures 7 and 8). Now you can continue working with it in Photoshop.

Figure 6: Open the exported file within Photoshop. Your compound shape should open flawlessly with all transparency and blend mode settings intact. Will wonders ever cease?

Figure 7: Here’s the compound shape now in Photoshop’s Layer palette. The layer structure has translated into a Layer set (Layer 1) and Layer Style (Stroke).

Figure 8: The assigned stroke has been converted to a Layer Style Stroke.
This is the best way to bring compound Illustrator shapes into Photoshop, but you can also copy-paste between applications, although be warned that copying-pasting compound shapes does not transfer over color, blend modes, or transparencies. If this is okay by you, just select your compound shape, copy it, and then paste it within Photoshop. You’ll need to have the AICB option checked in the Clipboard section of Illustrator’s Preferences (Files & Clipboard…). Selecting between Preserve Paths and Preserve Appearance does not seem to make a difference in this situation.
There are a few more things to note when exporting compound shapes. Along with having the stroke set to Round Join, compound shapes must not have any brushes, dashed strokes, or styles applied to them if they are to export successfully. If you do choose to have a basic solid stroke applied, be sure the stroke weight is a whole number (points or pixels), otherwise the compound shape will be rasterized when exported, defeating the purpose of keeping your vector artwork intact.
We started with basic shapes here to keep the process simple, but now that you know the steps, there’s nothing stopping you from creating rather complex compound shapes in Illustrator and moving them over to Photoshop.
This article was last modified on March 15, 2022
This article was first published on March 4, 2003
Commenting is easier and faster when you're logged in!

Recommended for you
Seeing Patterns
An object lesson in how to analyze patterns and recreate them in your favorite a...

Illustrator CC 2018 New Features
Adobe Illustrator CC 2018 brings several exciting enhancements, including Variab...

Knowing Your Camera: The First Step for Getting Better Results in Photoshop
Understanding the abilities of your camera and Photoshop can help you produce be...