The Digital Dish: Flash without Flash
At the recent Thunder Lizard Web Design Conference in Atlanta, a certain brilliant woman posited that “SWF is the PostScript of the twenty-first century.” While I’m not too sure SWF will be that important for the full hundred years of the century, she has certainly come up with a vital concept.
Just as Adobe Systems built most of its foothold on desktop publishing, Macromedia has gained a huge share of the excitement of the Web with its Flash (SWF) technology.
For those who haven’t gotten around to spending hours in front of the keyboard mastering Macromedia Flash, the proliferation of Flash animations may breed more dread and insecurity than excitement. But there’s good news even for the uninitiated: It’s easy to build some types of SWF animations using only Adobe Illustrator or Macromedia FreeHand. In fact, for some animations — such as the text-on-a-spiral example I lead you through here — Illustrator and FreeHand are better equipped to handle the animation than Flash: Flash lacks text-on-a-path capability and some other special effects for dealing with text, for instance, and makes it difficult to scatter multiples of an object all over a page.
Flash Backward!
The idea of creating SWF animations using an illustration package doesn’t seem so odd when you think about the genesis of Flash. Flash’s roots go back to a drawing package called SmartSketch, which won a MacUser Magazine MacEddy Award in 1995. The product was positioned for people who found the complex Bezier curves and handles in Illustrator and FreeHand hard to grasp. (Ironically, Flash 5 added Bezier handles and handle points.)
FutureSplash soon integrated the SmartSketch technology into FutureSplash Animator, which earned accolades of its own: In its January 1997 FutureSplash review, MacUser wrote, “because its vector-based animated elements download far more efficiently than the bitmap-based animations of competing technologies, FutureSplash Animator may prove to be the most important graphics product yet for Web-page designers.”
By August 1997, Macromedia had taken over FutureSplash and turned it into Macromedia Flash. With the addition of sound Flash animations began to pop up all over the Web. In 1997 Macromedia also released an update for FreeHand 7 that added the ability to turn FreeHand documents into Flash movies. These converted Flash movies weren’t as small as documents created in Flash (Macromedia has by now solved that problem), but the concept was very important: Instead of working with Flash’s more primitive drawing tools, designers could use more-sophisticated features such as text on a curve to create animations.
Another important development was Macromedia’s decision to make SWF an open format. This allowed Adobe to add SWF output to Illustrator, as well as to create its SWF-compatible Adobe LiveMotion animation package.
Spiraling Text
My favorite example of using FreeHand or Illustrator to create SWF movies is to create the spiraling text example shown here.
(SWF animation not available in printer-friendly format)
I like showing this example because although Flash has excellent animation tools, it would be incredibly time consuming to do this completely in Flash. Fortunately it is rather easy to create it in Freehand or Illustrator.
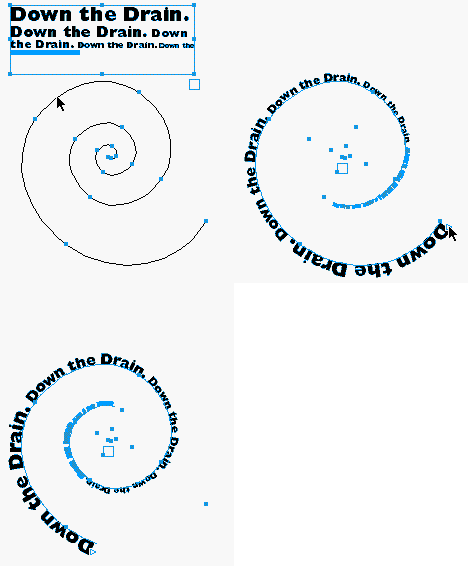
Start by creating a spiral using FreeHand’s spiral tool. (Illustrator users can use Illustrator’s spiral.) If you draw the spiral from the center outward, as we did, you will need to choose Modify>Alter Path>Reverse Direction so that the text moves from the outside of the spiral to the inside. (Illustrator users can reverse the direction of the path by clicking on the center of the path to make it the end point.)

Draw your spiral in FreeHand or Illustrator.
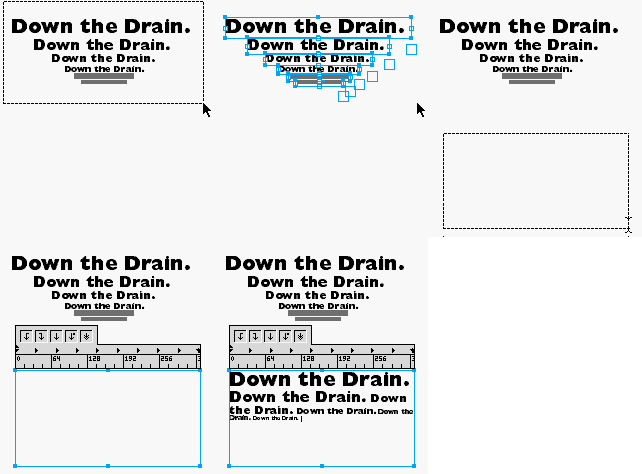
Next you need to create text that repeats itself as it gets progressively smaller. Although there is no direct command for this, it is actually quite easy to create. Hold the Opt (Mac) or Alt (Windows) key as you use the Scale tool to create a copy of the text that is slightly smaller than the original. Then just choose Cmd (Mac) or Ctrl-D (Windows) to repeat the transformation, making the new copies progressively smaller.

Create progressively smaller text by using scale tool and repeating the transformation.
This technique leaves us with multiple text boxes rather than one single box. But there is an easy trick to concatenate all the text in those multiple boxes into one text string: Select all the text boxes as objects, and choose Edit>Copy. Then draw a single text box, and choose Edit>Paste. All the text from the separate boxes is now combined into one string. (Yes, this trick works with Illustrator, too!)

Load your shrinking text into one box by selecting all text boxes, copying the text, creating a new text box, and choosing Edit>Paste.
To attach the text to the path, simply select both the text box and the spiral and choose Text>Attach to Path. (Illustrator users need to select all the text in the text box, copy it, and then use the Text on a Path tool to paste the text onto the spiral.)

Attach the text to the spiral using Text>Attach to Path (in FreeHand).
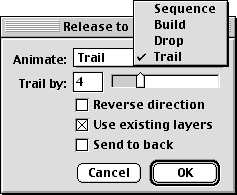
Both FreeHand and Illustrator animate using layers. In FreeHand, you can select the text on a path and choose Xtras>Animate>Release to layers. This opens the Release To Layers dialog box. There are four different ways to release to layers. In Sequence, all the objects are released one by one on each layer. In Build, the objects are released in a stacking effect. In Drop, all the objects are released to the layers except one that is sequentially added to each layer. In Trail, the number of objects released on each layer is controlled by the number in the Trail By field. This is the setting used in the original movie at the start of this article.

Create your sequence animation by releasing the objects to layers. FreeHand gives you four different ways to release objects.
In Illustrator, you create a Sequence animation by choosing the Release to Layers command from the Layers palette. If you hold the Shift key as you choose the command, you create a Build. (There is no Drop or Trail.)
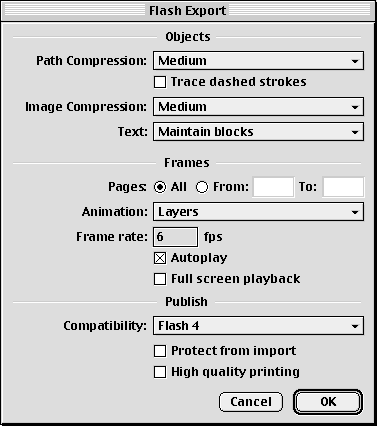
Choose File>Export to convert the file into the SWF format. The SWF options let you control the compression, frame rate, security, and other aspects of the Flash animation. When the Animation is set to Layers, each of the Layers in the document becomes a keyframe in the Flash movie. When the animation is set for Pages, you can use FreeHand’s multiple pages as keyframes. This option is useful if you want to use FreeHand to comp an entire Flash Web site, but that’s a different column. (Sadly, page-based animation is one of the features sorely missing from Illustrator’s SWF options.)

FreeHand gives you numerous options when exporting your animation to the SWF format.
Once you have created the SWF file, you can insert it into an HTML page or add it to other Flash movies.
Creating SWF animations in FreeHand and Illustrator is as simple as that, and the possibilities could keep you busy — and entertained — for a very long time. Better yet, either of these illustration packages gives you an easy way to create some animations that would push Flash well past its limits.
Read more by Sandee Cohen.


The Illustrator instructions missed steps. Taking the text on path and releasing to layers does nothing. I have never used that feature before so I wasn’t sure what it was supposed to do. The only way I could get more layers was to convert the path to curvers. But when you do that, you have each letter on it’s own layer and you do NOT get the same effect you get with Freehand when you export that to SWF. I manually moved the letter groupings to the same layers but the effect was dismal. I have been having a hecking of a time learning Flash and I thought this article would help me out! Guess I better dust off my Freehand V8.1!
I am still getting my web legs. I’ve been a print graphic designer for 25 years and appreciate any help I can get. I will soon be web-worhty with help like this.
Instructions have Illustrator users to create a Sequence animation by choosing the Release to Layers command from the Layers palette. We are told that there is no Drop or Trail feature in Illustrator, but we are not instructed as to how to otherwise make the animation work correctly.
I, for one, am very interested in getting this to work, and would welcome further assistance from Sandee Cohen. Many thanks!
Just to get the form submitted.
Neat trick, but for Illustrator users, You must convert type to outlines before Releasing to Layers will work. And then, you need to group words after ‘outlining’ or you’ll get a neat effect of every letter appearing.
I am still in school getting my BFA so I have little time to learn techniques outside of what I already know within the Adobe/Macromedia suites. This tutorial has saved me so much time that I would have spent doing complicated methods within Flash just to produce an inferior version of what is already capable with Adboe Illustrator. I’m also working on a freelance job right now so time is of the essence, and I want to thank the author of this wonderful article, it is a true must read.