

Digital cameras store their images as JPEG files. As anyone who’s ever prepared an image for the Web knows, JPEG offers an excellent balance of quality and compression. However, because JPEG is a “lossy” compression scheme, your images can be visibly degraded by the compression process. As such, many cameras also include the ability to save images in an uncompressed format such as TIFF or raw.
Raw files have two advantages over JPEG:
- They offer lossless compression, meaning your images will exhibit no artifacts as a result of being compressed.
- They allow you to perform operations that are normally performed inside the camera — white balance, exposure adjustment, sharpening — after you’ve taken the picture. If you want maximum flexibility for editing your images, raw files are second-to-none.
A few years ago, the ability to shoot raw images was only available on high-end, professional digital SLRs. Now, cameras from many vendors provide this facility and most include their own image browsing and transfer programs for handling raw files. From a workflow standpoint, these applications leave a lot to be desired. In addition to their sometime cumbersome interfaces, for photographers who work on images in Photoshop, these proprietary applications also add an extra step to your image-editing workflow.
To address this problem, Adobe has released a Camera Raw plug-in for Photoshop 7.0.1. Camera Raw lets you treat raw images from a number of cameras just as if they were any other type of file. You can browse them with Photoshop’s interface browser and use a single, well-designed dialog box to control your raw image processing. Because each camera has its own raw format specification, you’ll need to be sure that the Camera Raw plug-in supports your camera.
The Camera Raw plug-in is available for download from Adobe’s site for $99.
Images in the Raw
To understand how raw image capture is valuable, let’s look at how digital cameras usually process images. Your digital camera captures an image by exposing its image sensor — either a CCD or CMOS chip — to light, just as a film camera captures an image by exposing a piece of film to light. The image sensor is covered with a grid of millions of “photosites.” Each photosite corresponds to a single pixel in your final image.
To capture color, each photosite is covered with a single color filter. Some cameras use a combination of red, green, and blue filters while others use cyan, magenta, and yellow. Though each photosite can only capture a single color, an on-board computer uses complex interpolation schemes to calculate the correct color for each pixel by analyzing all of the surrounding pixels.
That same internal computer then adjusts the image according to the white-balance setting you have chosen, in addition to applying any other exposure, sharpening, or color-correction features that the camera may provide.
Once the image has been tweaked and adjusted by the camera, it is JPEG-compressed and then saved to the camera’s media card.
When shooting in Raw mode, however, the camera skips most of these steps. Instead of interpolating the color data and processing the image, it simply stores the raw data that comes directly off the CCD. Because the data doesn’t undergo JPEG compression, a raw file will be larger than a JPEG file. Most CCDs only capture 8, 12, or 16 bits per pixel. Because the camera has not interpolated up to a full 24 bits per pixel, the resulting raw image data is significantly smaller than other uncompressed formats such as TIFF. In addition, some form of lossless compression is usually applied to the raw data to make it smaller still. For example, a raw file from a 4-megapixel Canon G3 averages about 3.5 megabytes, certainly larger than a JPEG, but much smaller than a TIFF.
Do-It Yourself Image Processing
The Adobe Camera Raw plug-in lets you open Camera Raw images just as you would any other supported file type. Raw images can be opened using either the Open command or the Photoshop 7 File Browser. The plug-in does not provide a facility for transferring images from a camera, so you will have to move the images yourself using your transfer method of choice before trying to open them in Photoshop.
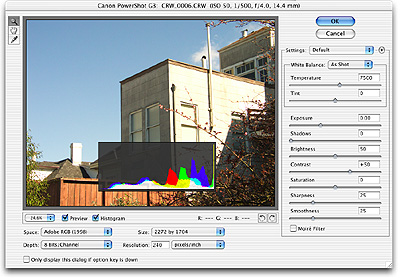
After selecting an image, Photoshop will present you with the Camera Raw dialog (see Figure 1).

Figure 1: The Adobe Camera Raw plug-in provides all of the controls you need to import your raw images into Photoshop.
In the window’s title bar, the image’s basic EXIF information is displayed — that is, its ISO, shutter speed, aperture, and focal length. The window itself is resizable and the preview image is zoomable, allowing you to get a big, detailed view of your adjustments.
In addition to lossless compression, the main benefit to shooting in raw is white balance control. Difficult white balance situations, such as a mixed lighting environment, are ideal for shooting in raw. The white balance pop-up menu lets you select from a number of white balance presets, just like you’d find on your camera. Daylight, cloudy, shade, tungsten, fluorescent, and flash presets are provided.
When you first open an image, the white balance settings are configured for the particular camera that shot the image. From the white balance pop-up menu, you can quickly change white balance settings and immediately see the results in the image preview. You can also use the White Balance and Tint sliders for total manual control of white balance. Measured in degrees Kelvin, you can simply slide the White Balance slider to select a warmer or cooler white balance.
Finally, you can also define white balance by simply clicking with the White Balance Eyedropper in a part of the image that is supposed to be middle gray.
Additional sliders let you further adjust your image. Measured in f-stops, the Exposure slider lets you easily add simple exposure compensation to your image.
The Shadows slider lets you change the black point in your image, while Contrast provides a gamma adjustment. If you hold down the Option/Alt key while using any of these sliders, your image preview will change to a monochrome display that shows clipping, allowing you to make precise white and black point adjustments. In addition, you can turn on a superimposed histogram that makes it easier to spot when you might be blowing out either extreme of your image (see Figure 2).

Figure 2: You can elect to display a histogram when making white and black point adjustments to the raw image.
A Saturation slider is provided for improving color intensity, while a Sharpness slider lets you perform a simple unsharp mask, or deactivate all sharpening to allow for later processing.
Finally, the Smoothness slider can be used to smooth out noise, while the Moiré checkbox does an amazing job of eliminating the moiré artifacts.
Resizing, Automating, and Saving
Though your camera may capture 8, 12, or 16 bits, it samples this data down to 8 bits before writing to JPEG format. The Camera Raw plug-in provides the option of generating a 16-bit image, which offers better color fidelity. A simple pop-up lets you choose between 8 and 16-bits per channel. Bear in mind that not all of Photoshop’s editing features are usable in 16-bit mode. However, if accurate color is your primary concern, this is a great feature, and you can always use Photoshop to convert your image to 8-bit later. Camera Raw also gives you a choice of four color spaces: Adobe RGB, ColorMatch RGB, ProPhoto RGB, and sRGB.
You can set a desired resolution — the default is 240 pixels per inch — or shrink or enlarge your image. Adobe claims that the new upsampling routine included in the camera raw plug-in is better than the algorithms included in Photoshop, and we did find the raw enlargements to be very clean with few of the artifacts we expect from an upsampling.
Image Quality and Automation
Because camera raw files are now “first-class citizens” in Photoshop, you can do anything with them that you would do with any other type of file. Most importantly, you can use Photoshop’s built-in automation capabilities to batch process groups of images.
Once you’ve defined settings for a particular image, you can choose to save those settings as the default for that camera. So, if you find your camera has particular tendencies you can quickly and easily configure the camera raw plug-in to always correct and adjust the same way. You can also create droplets and Actions for batch processing images.
Processing raw camera data is a somewhat subjective thing and many professional photographers feel that there are better and worse ways of interpolating the color data included in a raw file. We compared Adobe’s interpretation of several raw images shot with a Canon PowerShot G3 and a Canon EOS D60 to the same images converted using Canon’s raw conversion software and could see no difference in final color quality.
21st Century JPEG
Also included with the Camera Raw plug-in is a JPEG 2000 plug-in that adds support for this new JPEG standard. A wavelet-based compression scheme, JPEG 2000 offers the promise of improved compression quality as well as the addition of a lossless compression mode. The JPEG 2000 plug-in offers nothing more than the ability to open and save using this new CODEC.
Conclusion
Simply put, Adobe has included all of the workflow functionality that you could hope to want with raw images. In the past, working with raw images in Photoshop required taking a trip into a separate application for transfer, and many applications offered no batch processing facility. Though working with raw files still requires an extra bit of processing time, the extra power and the ease of use provided by Adobe’s Camera Raw plug-in makes shooting raw well worth the extra time and storage.
Read more by Ben Long.
This article was last modified on January 18, 2023
This article was first published on March 11, 2003
Commenting is easier and faster when you're logged in!

Recommended for you

Organizing Illustrator Files With Layers
We’ve all done it. We’ve all been so involved in the creative process that we do...

Free Lightroom 5 QuickStart Guide
For anyone looking to get a solid grasp on how to use Adobe Photoshop Lightroom,...

Tips for Shooting and Editing in Camera Raw
Why Shoot in Raw Format? Whether you realize it or not, if you are using a DSLR...