
When I became a pixel pusher years ago, one of the toughest concepts to wrap my brain around was that of image resolution: What the heck was it, how did I change it without trashing my image, how much did I need when, and so on.
I acted like I got it, but what I’d really done was memorize a couple of magic numbers: 300 for print and 72 for screen. Then I needed to change the resolution of an image. Suddenly, I was face to face with A Serious Resizing Situation and no clue what to do.
I know better now, but many professional designers don’t. They buy a high-quality photo from a stock agency, open it in Photoshop, and black out with rage when they see “resolution = 72” in the Image Size dialog. An irate call to customer service usually ensues, followed by an embarrassing explanation of Resolution 101 by someone half their age. The poor customer service rep hangs up, tells the story to the whole office, and the designer is dubbed a brainless prat. It’s not pretty.
I’d like to uncover the truth about resolution and protect you against such horror. I’ll explain exactly what resolution is, how to change it without altering image quality, how much you need when, and (gasp!) when it doesn’t matter at all. I’ll also talk about increasing resolution, otherwise known as The Dark Art of Upsampling.
Resolution and Pixels Defined
Resolution, when referring to an image, is the number of pixels displayed per unit of printed length. It’s a measurement used in printing and it’s stated in dots per inch (dpi). This makes perfect sense because printers print dots, and that’s what a printed image is composed of.
When referencing an image onscreen — on a computer monitor, TV, plasma, or projector — resolution is stated in pixels per inch (ppi). This too makes sense because digital images are displayed in teeny, tiny individual blocks of color called pixels.
How They Work Together
The resolution measurement dictates how closely the pixels are packed together. Increasing an image’s resolution means the pixels will be packed together more tightly, resulting in a smaller physical size, but generating a smoother, higher quality print. Lowering an image’s resolution means loosening the pixels, resulting in a larger physical image size, but generating a blocky, lower quality print.
Think of the resolution measurement as density. For example, the tighter a substance is packed, the denser it is and the less surface area it takes up (like brown sugar). The more loosely a substance is packed, the more surface area it consumes and it becomes less dense.
The confusing part is that when it comes to imagery, printers are the only devices that can do anything with the resolution measurement. Because our eyes can only process so much information, a 72 ppi image onscreen looks identical to a 600 ppi image onscreen. However, a printer isn’t hampered by the human eyeball and can take advantage of resolutions much higher than 72. (Actually, scanners can, too, but that’s a story for another time.)
How Much Do You Need?
The resolution necessary for a beautiful print depends on the printing device itself. For instance, consumer inkjets do a nice job at 225 to 250 dpi, while professional service bureaus require 300 dpi and higher for glossy magazines, coffee table books, and the like. For a color advertisement in a newspaper, you need between 150 to 200 dpi. Same thing for a black and white laser printer. However, to know for sure, you’ve got to run some tests. If someone else is printing your project, ask what resolution they want.
If you’re dealing with images that will never be printed (Web, email, and onscreen presentations) you don’t need to worry about resolution at all; it’s the pixel dimensions that matter.
Resizing Images from Digital Cameras
Let’s put theory into action on a photo from a high-end digital camera.
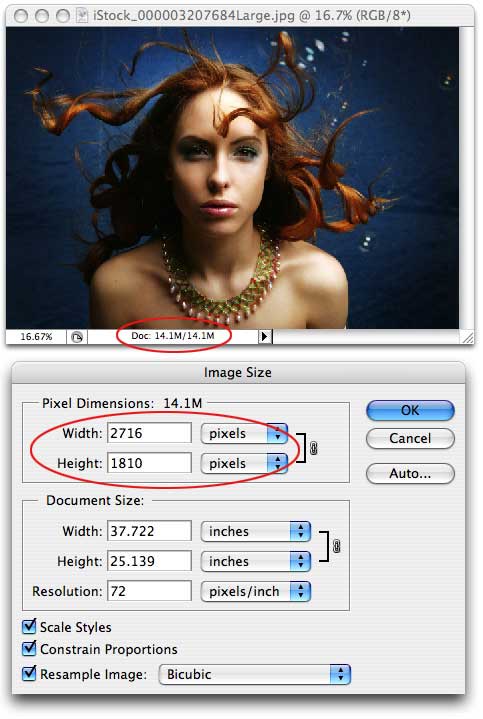
Step 1: I opened Figure 1 in Photoshop, then chose Image > Image Size (Command+Option+I/Alt+Option+I).

Figure 1. This is the place to learn about the pixel dimensions and current resolution measurement.
This gorgeous photo (courtesy of iStockphoto.com/Lisa Gagne) is measured at 72 ppi. Does that mean it’s a low-quality image? Negatory, good buddy.
First of all, look at the document file size: it’s 14.1 MB. That’s pretty darn big, which means we’re dealing with a pile o’ pixels. This information is revealed at the bottom of the Photoshop document window, which is circled in red.
Second, the pixel dimensions shown in the Image Size dialog (also circled in red) are 2716 x 1810. Yep, that’s a pile. Remember those numbers for a minute.
Third, note the honking big physical dimensions of the photo, shown in the center of the Image Size dialog. If you tried to print this sucker at its current resolution, you’d need a piece of photo paper more than 37 inches wide by 25 inches tall. Yikes!
Step 2: At the bottom of the Image Size dialog, uncheck the Resample Image option. This magical, all-powerful option locks the pixel data, thereby locking image quality. Watch what happens in Figure 2 when you enter 300 into the resolution box:

Figure 2. Now the numbers are way different.
Did you see the physical size of the image change? It decreased to roughly 9 x 6 inches — a bit more manageable, yes? However, take a peek at the pixel dimensions toward the top of the dialog. They didn’t change, did they? That, dear grasshoppers, is the power of the Resample Image option. I just successfully changed the resolution without altering image quality.
I can prove it in two ways:
- The number of pixels is exactly the same as it was in step 1: 2716 x 1810. But now the pixels will be packed more tightly together when the image reaches a printer.
- The file size is still 14.1 MB, which is further proof that the pixel data didn’t change.
This is hard to grasp because your eyes perceive absolutely no change in the image onscreen. The difference can only be seen in a print or revealed by the numbers in the Image Size dialog.
Now, if you wanted to resize this image for email or to post on a Web site, you’d want to leave the Resample Image box checked because you’d dang sure want to reduce the number of pixels in that image, or else it’d take an hour to download and that would be very, very bad.
The Evils of Upsampling
If you leave the Resample Image box checked and increase the resolution of an image, you’ll be adding information (pixel data) to the image that wasn’t originally there. It’s usually an extremely bad idea, but there may come a time when you have no choice.
For example, maybe you’ve grabbed an image from the Web that you have to print, or your image will be printed in an extremely large format (like a billboard). If you find yourself in such a pickle, you’ve got a couple of options. Happily, the first one is free.
Evil upsampling method #1: Open the Image Size dialog in Photoshop, take a deep breath, and leave the Resample Image box checked. (I realize I just told you not to do this, but bear with me.) Choose Bicubic Smoother from the pop-up menu to its right and change the document dimension pop-up menus to Percent. Enter 110% in the width box and press OK (Figure 3). Repeat this process as many times as necessary to enlarge the image. For some reason, adding data 10% at a time doesn’t cause a huge amount of quality loss. Do resist the urge to increase the size more than 10% at a time, unless you want that chunky look.
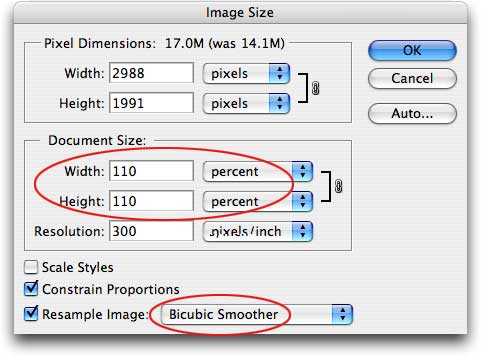
Figure 3. Resist the urge to enter a number higher than 110 in the circled boxes!
Evil upsampling method #2: Buy a plug-in, such as Genuine Fractals by onOne Software, Blow Up by Alien Skin, or PhotoZoom Pro 2 by BenVista. They pull off some serious voodoo and somehow manage to increase pixel data without totally destroying the image.
I Wouldn’t Lie to You
Resolution doesn’t mean squat until that image is headed for a printer. Because the same file can be measured at any resolution, it’s the pixel dimensions that matter most. With enough pixels, a file can be measured at 300 or 3000 ppi. The magic is in knowing how to change resolution without changing the number of pixels. As long as you uncheck the Resample Image option, you can tweak the resolution until Cylons invade and you won’t alter image quality. Honest!
This article was last modified on January 4, 2023
This article was first published on May 23, 2007
Commenting is easier and faster when you're logged in!

Recommended for you

CreativePro Tip of the Week: Customizing the Photoshop Interface
This CreativePro Tip of the Week on customizing the Photoshop interface was sent...

Goodbye, Bruce Fraser
After battling lung cancer for several months, Bruce Fraser passed away on Decem...

A Film Technique for Your Digital Photography
Before Picture Elements (“pixels” for short) were a gleam in some IB...