Throw Photoshop's Crop Tool into Reverse
Based on an article originally published in the DesignGeek e-zine.
I have a gripe about Photoshop’s Canvas Size dialog box (Image > Canvas Size), the feature you use to increase the editable area in an image. We’re up to version 53 now, I believe, and there’s still no Preview button. Not even in the Super Extended Extra Mega version of Photoshop CS3. Oh sure, it can count how many thousands of paramecium with three antennae are in a slide, but preview the amount of canvas I want to add to an image? Beyond its abilities.
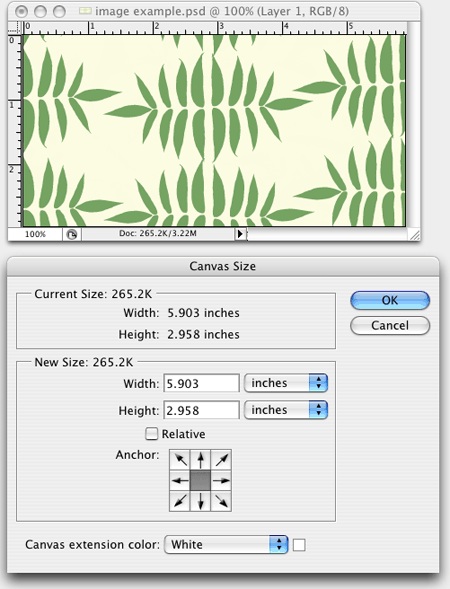
Without the Preview checkbox, I have to know the exact measure of how much canvas area I want to add before I open the dialog box, and manipulate the old-timey Anchor grid interface to tell Photoshop where to put the extra space (Figure 1). If I click OK and see it’s wrong, it’s Undo and try again.
Figure 1. If you want a preview and flexibility, the Canvas Size dialog box is not the best choice.

Sometimes I know exactly what I want. If I need another 10 pixels under a web graphic, or want to add a half-inch all the way around a scanned photo, the Canvas Size dialog box is the way to go.
The rest of the time, though, I need more flexibility. What’s the solution? The Crop tool.
Yup, I use the Crop tool to add canvas size. It sounds backwards to some users, I know, but the Crop tool is really a canvas manipulation tool. Normally, it makes the canvas smaller — that’s what cropping is. But it can also make the canvas bigger, by cropping in the opposite direction. Using the Crop tool to add canvas area allows me to get a preview of what I’m doing so I can adjust it on the fly, by eye or numerically, whichever I prefer.
The Crop Tool … in Reverse
Here’s how to do it. First, enlarge the window containing your image so you can see the twilight zone — the amorphous grey area surrounding the image’s existing canvas (editable area). You may need to zoom out (Command/Ctrl-hyphen) a few times first so the image gets smaller on screen, then make the window bigger, to see the surrounding grey area.
Next, figure out what color you want the added canvas to have. Do it now, because you won’t be able to after you start with the Crop tool. If your image has a Background layer, the added canvas will be filled with the current background color, so change that color now if necessary, or just press the D key to make it the default White. If your image doesn’t have a background layer, you don’t need to choose anything; the added canvas will be transparent (filled with the checkerboard pattern).
Select the Crop tool and make sure the fields in the Options bar are all blank (so cropping doesn’t also resample, for instance). If they’re not blank, click the Options bar’s Clear button.
Now drag the Crop tool so its marquee surrounds the image. Even if you start and end your drag in the middle of the grey area, it won’t stay there — by default, it’ll snap to the edges of the canvas. Not a problem.
As soon as you release the mouse button, you’ll see that the crop marquee has handles. Here’s where you put it in reverse. Instead of dragging a handle into the image to crop it, drag it outside of the image, into the grey area. That tells Photoshop you want to add canvas size. As soon as you press the Return/Enter key, Photoshop converts the grey area the crop marquee encompasses to additional canvas that’s filled with the specified background color or transparency.
A bonus of this technique is that you can drag each side handle to add canvas to just that side of image. By using the Crop tool you’re able to add a different amount of canvas to each side, which you can’t do with the Canvas Size dialog box.
Useful Tips for this Technique
The Info palette will tell you the width and height of the crop marquee (in other words, the canvas size), updating the readout as you drag the marquee handles, which is helpful if you know the total canvas size you’re after. But it won’t tell you how much you’re adding to each side — it shows only the total width and height.
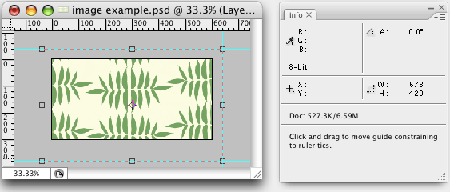
So if you need to add a precise amount of canvas to one or more sides, drag ruler guides out of the rulers (View > Show Rulers) and drop them into the grey area precisely where you want the canvas to reach. You can do this while the crop marquee is active. The Info panel will tell you the position of the ruler guide as you drag it if you can’t see the tick mark on the ruler itself (Figure 2). Then turn on Snap to Guides (View > Snap) and drag a crop marquee handle to the ruler guide.
Figure 2. Rulers and the Info palette give you even better control over the Crop tool. Click on the image for a larger version.

To add the same amount of canvas to all four sides, hold down the Option/Alt and Shift keys as you drag a corner handle into the grey. To add the same amount of canvas to the top/bottom or left/right of an image, hold down only the Option/Alt key (no Shift) as you drag any handle.
There is no Undo while you’re fiddling with the crop marquee. If you mess up, press the Esc key to cancel the operation, and start again with your initial drag of the Crop tool around the image.
As I said, in some cases, it’s just as fast (or faster) to use the Canvas Size dialog box. But if you’re pining for something more interactive and flexible, try the Crop tool in reverse.


I actually read this awhile back and wanted to remember the techniques because of the added flexibility (and hey, who doesn’t want to be able to increase the power over the use of their tools)
So I thank the author…AND thanks CP for making the site so easy for me to find this article again!
I’d noticed that the Crop tool adds space if you go outside the picture margins, but it never occurred to me that you could use it in this way. Thanks, Ana-Marie!
Nice tutorial, will be helpful to many. For anyone serious about photoshop check this out (USA only) https://bit.ly/psoffer
Rather than worry about your background color, make a solid color adjustment layer as you bottom most layer. Choose the color you want for your background. As you add canvas, the solid color adjustment layer fills the entire image. If you want to then experiment with alternate background colors, it is as easy as clicking on your solid color adjustment layer icon and choosing a new color.