
Track Down Obscure Glyphs in InDesign
There are many characters that don’t appear on standard keyboards. Here’s how to enter those hard-to-reach glyphs.

This article appears in Issue 41 of InDesign Magazine.
There are treasures lurking beneath the deceptively simple surface of your fonts—treasures in the form of cool glyphs that will spice up your layouts, or just help them look more professional. However, like any good treasure, you have to work to find these characters; you can’t type them as easily as a common number or punctuation you’d find with a quick glance at your keyboard. Uncommon glyphs (see “The Sweet Sound of Punctuation” from this same issue of InDesign Magazine) come in three categories: First, there are characters you can enter using a keyboard, but only after a lengthy search for the proper key combination; for example, the pilcrow (Option/Alt-7) and the twisted sign of infinity (Option/Alt-5). Second, there are characters that show up only in particular symbol or pi fonts (see “We Heart Dingbats” from issue 36 of InDesign Magazine). You can still type these on a keyboard, though it takes a lot of hunting-and-pecking to find the key that elicits the correct glyph. It’s often faster to open InDesign’s Glyphs panel (Type > Glyphs), scroll through the list, and double-click the one you want. Because these symbol fonts usually have only a couple hundred characters from which to choose, it’s not onerous to use the panel. The third type of glyph is beyond the realm of the keyboard, where no arthritic combination of modifier keys will evoke them; the infamous interpunct, for example; or the numero sign, or the sound recording copyright. These can only be found through nefarious means and inserted into your documents through trickery and subterfuge. But don’t worry, I’ll tell you how.
Step 1. Spy on Your Glyph
Every character in every font is assigned at least two numbers: a Unicode value and a Glyph ID (GID)
number. If you know the number, you can find the character. That’s important when searching for an odd duck in a flock of thousands of glyphs. If you know you want the Numero symbol, for example, do an Internet search for “numero symbol Unicode”. You’ll quickly find a couple thousand results—probably including Wikipedia (Figure 1)—that inform you this character is Unicode 2116.

Figure 1: Wikipedia is just one of thousands of references that help you find a special character’s Unicode value.
Step 2. Find a Dummy Character
Place a dummy character in your InDesign document where you want your special glyph to be. This placeholder can be any character, such as the letter “x”. Select the character, then right-click (or Control-click with a one-button mouse) and choose Load Selected Glyph in Find from the context menu (Figure 2). This opens the Find/Change dialog box, switches to the Glyph tab, and inserts all the pertinent info about that selected character for you. (This context menu shortcut is a godsend, as it’s such as hassle to figure out the information manually.)
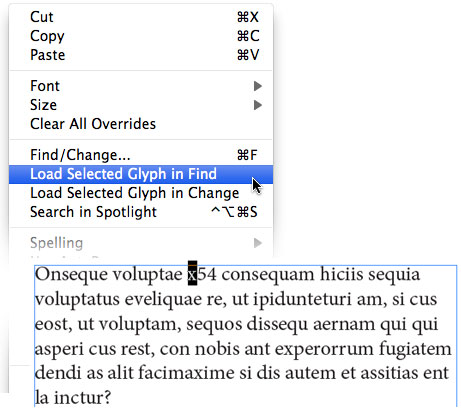
Figure 2: The Load Selected Glyph in Find feature appears only in the context menu.
Step 3. Specify the Code
Now to replace the dummy character with the special glyph. To do this, type the Unicode value into the Change Glyph ID field (Figure 3). Also, choose Selection from the Search field so that just that one “x” gets replaced. Of course, if you want to replace all those characters in your story or document with the special glyph, then set the Search pop-up menu accordingly.
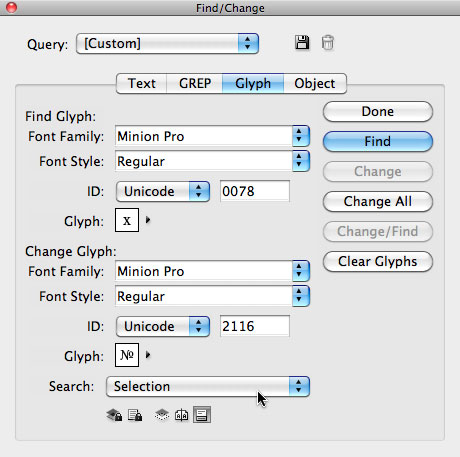
Figure 3: The Glyph tab of the Find/Change dialog box lets you dial in exactly which character you’re aiming for.
Step 4. Find a Font that Works
Not all fonts contain the character you need! For example, the Sound Recording Copyright character is in very few fonts. When you type in a Unicode number, InDesign shows the result to you in the Glyph area of the Find/Change dialog box. If it’s blank, then you’re out of luck. Fortunately, you can also specify a font here. Place your cursor in the Font Family field and press the up or down arrows on your keyboard until you find a font that does contain the character you’re looking for (Figure 4).
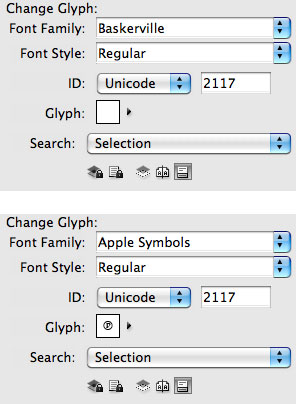
Figure 4: The first font doesn’t contain the character, so the Glyph field is blank (top). Switching to a font like Arial or Apple Symbols shows that you can find the character you want.
Step 5. Repeat versus Copy
When you have InDesign’s Find/Change dialog box filled out just right, click Change All. The app swaps the dummy character for the special character and you’re ready to move on. If the character appears as a pink rectangle or an “X” in a box, then something went wrong in the last step—the font you chose doesn’t include that character after all. If you need the same character again, you have several choices. You can run through the Find/Change rigmarole again, or you could simply copy and paste that character from one place to another. (To paste the same character into text set in another typeface, use Edit > Paste Without Formatting.) The Glyphs panel offers another way to reuse characters. Select the special character you inserted and open the Glyphs panel, where the character should now be highlighted. Double-click it in the panel to replace the glyph with an exact duplicate, and—here’s the cool part—to add it to the Recently Used area of the Glyphs panel. Once it’s there, it’s easy to find whenever you need it. You can even create a custom keyboard shortcut for Insert Most Recent Glyph.
Call Up the Character Viewer (if You Can)
The Mac OS has a terrific feature, the Keyboard and Character Viewer, that lets you see all fonts that contain a particular character. To enable the feature, go to System Preferences > Language & Text, and choose Keyboard and Character Viewer from the menu bar. Then navigate through it until you can select the character you’re searching for. When you do that, the panel displays that character in every available font (Figure 5). If you can find the character in that panel, you can insert it in your InDesign document (or any other open file) by double-clicking the character. For more on the Character Viewer panel, see this tip.

Figure 5: The Mac OS Character Viewer panel, while clunky, is a good way to see how a particular character shows up in a variety of fonts. Double-click the character to insert it into InDesign (or any other running program).
Faster Methods
Now that you know the Find/Change technique and the secret ways of the Recent Glyphs, I need to let you in on a secret: Once you figure out the Unicode value (see Step 1), there are even faster ways to insert that glyph into a text frame. (However, the previous steps haven’t been for nothing, as you’ll need the Find/Change technique again by the end of this article!) In Windows, you can usually type a Unicode character by holding down the Alt key and then typing the Unicode value on the numeric keypad. If that doesn’t work, you may need to create a new registry key (a process that gives me the willies, but you can read about it here). On the Mac, you can get a similar functionality, but you have to enable it by opening System Preferences, choosing Language & Text, clicking the Input Sources tab, and turning on the Unicode Hex Input checkbox in the list of languages. After that, you can type your special character by choosing Unicode Hex Input from the language menu (up in the menu bar), then holding down the Option key and typing the four-digit code. Don’t forget to switch your language back to English or whatever you normally use, or your usual Option- keyboard shortcuts won’t work. If you have to type special characters a lot, try Peter Kahrel’s great compose.jsx script. I suggest assigning a keyboard shortcut to the script (using Edit > Keyboard Shortcuts). When you run the script, it displays a small dialog box (Figure 6). Enter the Unicode value and press OK and the script inserts the character for you. That’s just one feature of this cool script; learn more about it here.

Figure 6: The Compose.jsx script (which runs on both Mac and Windows) lets you quickly input any Unicode value you want.
Alternate Glyphs
Here’s one potential problem to be aware of: Within the same font, more than one character may have the same Unicode value. A common example is the bullet character. If you type a normal, boring, round bullet (Option/Alt-8) and then select it, the Glyphs panel highlights that character. The panel also displays a small black triangle next to the glyph, indicating that there are alternate glyphs (Figure 7). Some of these characters share the same Unicode value—that is, they’re just “bullets.”
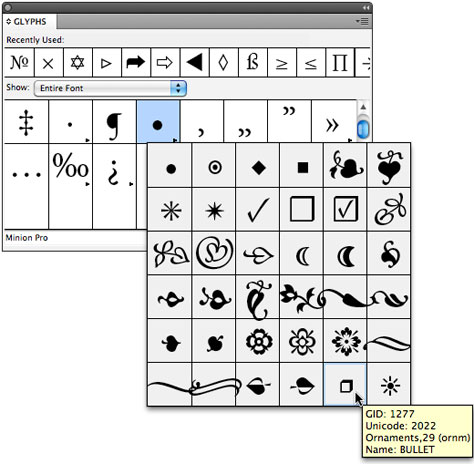
Figure 7: The same Unicode number may have a number of variations, but each variation has its own GID value. To find the specific GID number, hover your cursor over the character and look for the tool tip.
Commenting is easier and faster when you're logged in!

Recommended for you

TypeTalk: Find Figure Styles in OpenType Fonts
Q. You’ve written about figures in Open Type fonts, both oldstyle and lining var...

A Feast of Font Games
Recently I wrote about Type:Rider, an app for iOS and Android mobile devices tha...

Helvetica vs. Arial: Do You Know the Difference?
While they might seem similar at a glance, these fonts are most definitely diffe...