
There are thousands of wonderful typefaces, but sometimes nothing is just right. You don’t have to settle for someone else’s vision — instead, modify letters in Adobe Illustrator to create exactly what you want.
When you outline text, Illustrator converts each letter to an object with paths and points, which you can select and adjust. You can also change colors and combine letters with other shapes.
There’s just one caveat: after you convert letters to outlines, you can’t edit it in a word processor. So this technique is better for short bits of text, such as a headline or a logo.
Step 1
Open Adobe Illustrator and select the Text tool. Click somewhere on the artboard. Type the text you want to modify. Note: Clicking and dragging lets you set the text box area, but clicking and not dragging lets you use click and drag after typing to make your letters larger.

Step 2
Change the font type to one that fits the message. I selected Palatino and resized it.

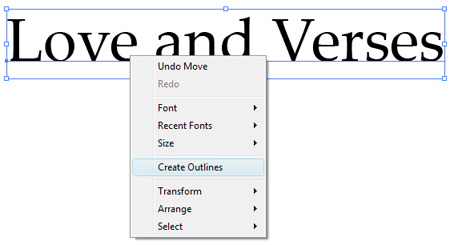
Step 3
Using the Selection tool (the black arrow), click on your text and control-click (PC: Rright-click) on the text and mouse down to Create Outlines.
Step 4
The text now consists of points and paths.

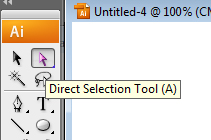
Step 5
Click outside the letters, then select the Direct Selection tool (the white arrow).
Step 6
Click and drag individual letters to rearrange them. To avoid selecting a path point instead, be sure to click on the fill area, not the edge.
Step 7
When you use the Selection tool, you affect the entire text. To select a few letters, click and drag a selection around the area with the Direct Selection tool.

Step 8
To resize a group of letters, select them with the Direct Selection tool, then click and drag with the Selection tool.

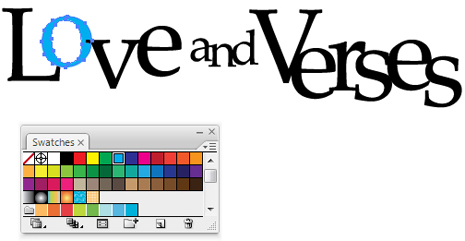
Step 9
With the Direct Selection tool, click on the letters and go to Window > Swatches and click a color to change the letter to.
Step 10
Use the Color Guide (Window > Color Guide) to get colors that are harmonious for the other letters. I used Right Complement.

Step 11
Now you’ve taken your run-of-the-mill type in a new direction. But let’s go even further.

Step 12
Zoom into the design by pressing Command and the plus key (PC: Control and the plus key).

Step 13
Use the Direct Selection tool and click on the edge of a letter. Click-and-drag one of the points and drag it to change the shape of the letter. I moved two of the points on the lower left side of the “L” in Love.

Step 14
Using the Pen tool, click and then click and drag in another area to draw a curved shape.

Step 15
At the tip of the curve, hover over the point and click to reset the angle. Then click and click and drag to complete the shape.

Step 16
Click and hold the Warp tool on the toolbar to bring out the Twirl tool option.

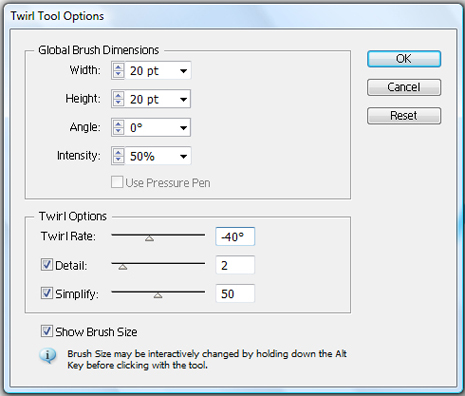
Step 17
Double-click the Twirl tool on the toolbar to bring up options. For the twirl to move clockwise, set the Twirl Rate to a negative number; I used -40. Set the size to the settings here if you’re following along with a similar text example. Click OK.
Step 18
Position the Twirl tool cursor over the shape to twirl, and make sure it’s selected with the selection tool, where you can see the path points.

Step 19
Click for a second or two and the shape will twirl to get something like this.

Step 20
Let’s create three more decorative designs on various letters. You can repeat steps 14 to 19, or just Option-click (PC: Alt-click) the shape you just twirled to duplicate it. Then rotate it by clicking-and-dragging near the corner or using the Rotate tool.
As you see, this example below doesn’t match up perfectly with the bottom of the “s” in “verses.”

Step 21
To fix this, click and hold the Pen tool on the toolbar and then click the Delete Anchor Point tool.
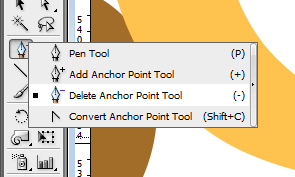
Step 22
Click on path points on the top of the s lower curve to remove them. The points will connect on either side of the path.
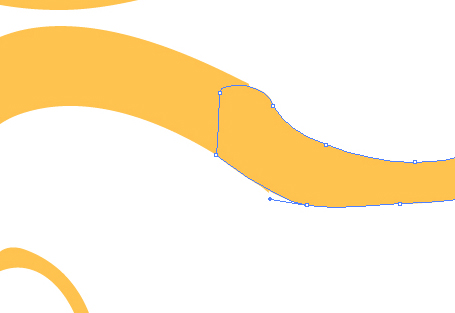
Step 23
Duplicate the shapes and add them to the “e” and the “V” to create a more balanced design.

This article was last modified on January 5, 2023
This article was first published on September 29, 2008
Commenting is easier and faster when you're logged in!

Recommended for you

The Path to Beautiful Tables, Part III: Working With Numbers
Don’t miss part 1 and part 2 of this series on how to create beautiful tab...

Fonts Bundled with Adobe CS4
In his blog Typblography, Adobe’s Product Manager for Fonts & Global Typogra...
TypeTalk: Mark Jamra, TypeCulture
Mark Jamra, noted type designer and educator, had a vision of combining his pass...