

Using a JavaScript to make a Web page time-based


One of the best things you can do to keep people from returning to your Web site is nothing. That’s right, though most people don’t deal well with change, they love to see Web sites that are constantly updated. Fortunately, this doesn’t mean you have to move your comfy leopard-skin futon into your studio (though it would be good for those mid-afternoon naps you normally take at your desk). All you have to do is plan ahead a little and include a simple JavaScript in the page. And before you start breaking out in a sweat, thinking that you’re going to become one of those geeky programmer types, fear not. The JavaScript we’ll show you is very easy to use and extremely easy to modify- even without a pocket protector! To begin, we’ll provide an overview of the script, a primer on JavaScript itself, and then we’ll finish up by playing with the script. Sound like a plan?
You got the time?
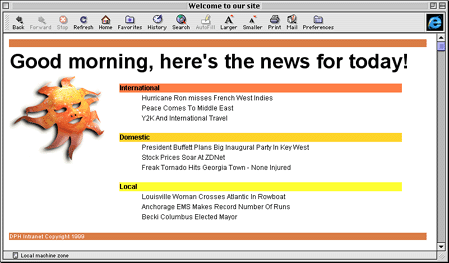
The viewer’s browser runs the JavaScript that we’ll show you in this article as it loads the page. As the browser parses the script, it determines the time in the viewer’s time zone and writes an appropriate portion of HTML to the page. For example, if it’s before noon when the viewer loads the page, the JavaScript could display a sun graphic along with a little "wake-up" message, as shown in Figure A. The beauty of the script is that you can use it in several locations on the page and display messages for different times of the day. You can even modify the script to test for the day of the week and the time. So, with a few changes in the script, you can even display a "TGIF" message within the page.
Figure A: It’s easy to create an interactive Web page with a little JavaScript magic.
A little JavaScript primer
Before we get too deep into the script itself, let’s take a moment and explain a bit about JavaScript itself. We think that once you learn a little more about its features and the vast possibilities that JavaScript holds, you’ll be inclined to include more scripts in your Web pages.
No beans here
To begin with, JavaScript has nothing to do with Java, the object-oriented programming language you’ve heard so much about over the last few years. Java lets you design compiled applications. JavaScript, on the other hand, is an object-oriented scripting language that allows you to add interactivity between the browser and the viewer’s actions. It brings dead pages alive, if you will. You can’t build self- running applications with JavaScript, only scripts that will run in a browser.
Geek alert
A JavaScript contains objects, variables, events, and operators to interact with the browser. That may sound like a lot of programming mumbo-jumbo, and to some degree it is. But think of it more as statements you want to tell the user’s browser, just like you would with HTML. So for instance, if you want to tell the browser to make the page backgrounds blue, simply use the phrase document.bgColor="blue" within a JavaScript. Or, as you’ll see later on in our time-based JavaScript, you can write a particular line of text by using the phrase document.write(Good morning, here’s the news for today!)
Since obviously these commands wouldn’t be recognized as a valid HTML statement, you have to tell the browser that a JavaScript command is coming through the HTML parsing. Further, you need to hide the script from browsers that don’t read JavaScript. To do so, simply enclose a JavaScript between HTML tags that alerts the browser to the script. This is done with the tag <script language= "Javascript"><!– at the beginning of the script and //–></script> at the end.
Seems easy enough doesn’t it? Now, let’s take a look at our basic time-based script to see how it works. Then, we’ll show you how to modify it to make your Web page even more dynamic.
Inserting the script
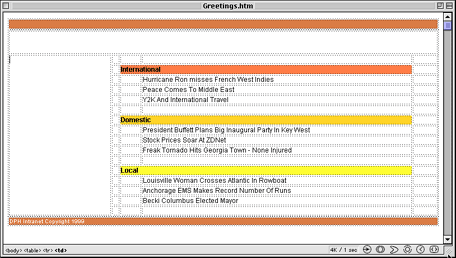
Normally, you insert scripts directly after the head tag in your HTML document since it will be one of the first things to load. However, because we’re using this script to write portions of text and include a time-based image, you can insert it anywhere on the page. For our examples, we’ll use the table layout shown in Figure B. We’ll insert the message into the top portion of the table and the appropriate graphic into the left table cell.
Figure B: We’ll put time-based JavaScripts into two different sections of the table.
Examples online
If you want to follow along but don’t want to have to re-create the examples using your own graphics and HTML files, visit our Web site at www.zdjournals.com/iwd/examples. Here, you’ll find the actual files we used to create the examples, ready for you to complete using our easy, step-by-step instructions.
To begin our example, insert the script shown in Listing A into the top row of the table (ignore the line numbers- they’re only included to help explain the script later). If you’re using a Web-authoring tool like Dreamweaver, this is easy to do. Simply click on the cell in which you’d like the time-based text to appear, and choose the Script option from the Insert menu. Then enter the script in the dialog box that appears and click the OK button to close it. When you do, Dreamweaver displays a JavaScript icon (ICON) in the cell. This just indicates that the HTML page contains a JavaScript.
Listing A:
Enter this script into the dialog box.
<SCRIPT LANGUAGE = "JavaScript">
<!–
theDate = new Date()
theHour = theDate.getHours()
if (theHour > 6 && theHour <= 12) {
document.bgColor = "white"
document.fgColor = "black"
document.write ("<P>Good morning, here’s the news for today!")
}
else if (theHour > 12 && theHour <= 17) {
document.bgColor = "white"
document.fgColor = "black"
document.write ("<P>Good afternoon, here’s the afternoon happenings.")
}
else if (theHour > 17 && theHour <= 20) {
document.bgColor = "gray"
document.fgColor = "black"
document.write ("<P>Good evening, did you have a good day?")
}
else {
document.bgColor = "black"
document.fgColor = "white"
document.write ("<P>Good night and have a restful slumber.</CENTER>")
}
// –>
</SCRIPT>
Next, click in the cell in which you’d like to insert the time-based graphic and again choose Script from the Insert menu. This time, enter the script shown in Listing B, and then click OK to close the dialog box. Don’t worry if the scripts seem a bit odd- we’ll review each line momentarily. However, before we do, let’s test them. To do so, choose your browser from the File menu’s Preview In Browser option.
Listing B:
This script displays a time-based graphic for your page.
<SCRIPT LANGUAGE = "JavaScript">
<!–
now = new Date()
hour = now.getHours()
if (hour > 6 && hour < 20) {
document.write ("<IMG HEIGHT = 170 WIDTH = 158 SRC = ‘sun.gif’>")
}
else {
document.write ("<IMG HEIGHT = 170 WIDTH = 158 SRC = ‘moon.gif’>")
}
// –>
</SCRIPT>
When you do, the browser should display the page, along with the appropriate message and graphic, as shown in Figure A. If you have nothing else to do with your time, you can wait around over the next several hours and test the other time-based elements. In case you have other things to do and don’t want to have to set your alarm clock just to test a Web page, you can always change the time on your computer and reload the page. As it’s listed, the time-based text will change at 6:00 A.M., 10:00 A.M., 5:00 P.M., and 8:00 P.M., while the time-based graphics will change at 6:00 A.M. and 8:00 P.M..
A step-by-step review of the scripts
Since at this point, we aren’t aware of everyone’s familiarity with JavaScript, we’re going to use the script in Listing A to provide a simple overview. Even if you get the gist of the script it may be good to follow along to hone your skills with JavaScript syntax and such.
For our script, what we first want to do is load the current hour into a variable. Unfortunately, there’s no direct way to do this. Instead you have to get the date and then extract the hours from that. To do so, we first store the date of the viewer’s computer into the variable theDate, as shown in line 3. At this point the variable theDate contains the seconds, minutes, hours, days, date, month, and year values for the date. So to get the hour value from the variable, you declare a new variable named theHour in line 4 and then use the command theDate.getHours(); to set the variable to that value. The resulting value is military time. Trust us, this is as difficult as this stuff gets.
From this point on, the script’s really nothing more than an If…else statement. Line 5 begins this by determining whether the value of theHour variable is greater than 6 and less than or equal to 12. The condition can be any JavaScript expression that evaluates to true or false. Also, since we’re using more than one series of If statements, we also enclose the statements in brackets. In cases where line 5 is true, the script continues to the next couple of lines, where we use the document property to set the background color for the page to white and the text to black. We then use the write method to insert the appropriate text in line 8. The script then stops, since the If statement has been satisfied. If the test in line 5 is false, the script moves on to the next test, in this case line 10, and so on.
More info
For more information on creating and working with JavaScripts, visit Netscape’s DevEdge Online Documentation site at https://developer.netscape.com/docs/manuals/js/client/jsguide/index.htm. Here you’ll find a complete book, on the subject, available in HTML or downloadable PDF.

Copyright © 2000, Element K Content LLC. All rights reserved. Reproduction in whole or in part in any form or medium without express written permission of Element K Content LLC is prohibited. Element K is a service mark of Element K LLC