
View Source: Building Better Forms with Dreamweaver CS3

A Web form is one of the few ways to receive direct feedback from visitors to your site. Whether it’s to sign up for an e-mail newsletter, search a database of information, or order products online, a Web form collects valuable information that can help both you and your site’s visitors. But only if the information submitted is correct: If a visitor forgets to type in her e-mail address when signing up for an e-mail newsletter, or a visitor accidentally submits a form before filling it out, you can end up with no information at all.
Making sure a Web form collects required information in the appropriate format is known as form validation. In a nutshell, validation lets you prevent a form from being submitted if information is missing, or information is improperly formatted. In addition, you can present an error message to let users know what they did wrong and how to fix it. See the example at /wp-content/uploads/sites/default/files/story_images/20070926/form.html.
Although form validation is an important part of building a Web form, it’s also usually a complicated process that involves either JavaScript programming on the Web page or server-side programming on the Web server. Fortunately, Dreamweaver CS3 introduces a new way of adding sophisticated form validation easily: Spry Form Validation.
Previous versions of Dreamweaver had a “Validate Form” Behavior. This simple tool did prevent users from submitting a form when information was missing or in an incorrect format, but the options were limited and the resulting error message — an ugly gray JavaScript pop-up alert window — looked amateurish. Dreamweaver CS3’s more advanced form validation options are compliments of the Spry Framework for Ajax — a set of JavaScript, CSS and HTML files, and snippets that lets you add interactive elements to a Web site. In this tutorial, I’ll take you step-by-step through the process of adding validation to a Web form; but first, a short overview of Spry form validation.
In Dreamweaver CS3, you can check form input for the following types of form fields:
- Text fields. The most common type of form field, the text field is a simple one-line box used to collect information like names, e-mail addresses, zip codes, search terms, and so on. If a particular piece of information is required — like a last name — you can prevent a form from being submitted if the user doesn’t type anything into that field. In addition, you can make sure that the information a user types into a text field is in the correct format; for example, a correctly formatted e-mail address. Dreamweaver CS3 offers 14 validation options, including e-mail address, zip code, phone number, URL, and time.
- Text area. A text area field is usually used to collect long text entries, such as comments, reviews, or blog entries. Not only will Dreamweaver let you make sure that a text area is filled out, it can also enforce a minimum and/or maximum number of letters. For example, you might want to limit feedback on a “Comments” field to 400 letters, both so it’s easier for you to go through all your Web site feedback and to keep your site’s database from being overloaded with too much data.
- Check boxes. Providing a simple yes/no option, a check box form field is perfect for multiple choice questions: “select your 3 favorite desserts,” for example. Using Spry validation, you can enforce a minimum number (“pick at least 2 options”) and/or maximum number (“pick no more than 3”) of selections.
- Pull-down menus. A pull-down menu is a compact way to present a lot of options in a single line; for example, a list of states, counties, or districts. Dreamweaver CS3 lets you make sure the user has actually made a selection from the menu before submitting the form.The Process
Dreamweaver CS3 lets you create Spry form validation fields as you build a form, or lets you add validation to an already created form. There are five steps in the process:- Insert the validation widget. (Dreamweaver uses the term “widget” to refer to Spry-related page enhancements such as the drop-down menu discussed in an earlier column, or a Spry validation form field.) Dreamweaver’s Spry Form tools are available from the Forms menu (Figure 1) or the Spry menu of the Insert Bar. You can insert a text field and add validation to it when creating a new form. Or, you can select a form field (text, text area, check box, or pull-down menu) on an already created form and click the appropriate Spry form button on the insert bar — in this case, Dreamweaver won’t add another form field, but will add the necessary code to make validation possible.

Figure 1. The Forms tab of the Insert Bar lets you create Web forms. The last four buttons let you insert or add validation to four form field types: text fields, text area, check boxes, and pull-down menus. Click on the image for a larger view. - Assign a validation requirement. Using the Property Inspector, you can assign the type of validation you’d like — for example, enforcing a specific format for the input, such as a properly formatted date.
- Select when validation occurs. When the user tries to submit the filled-out form, the JavaScript programming responsible for the Spry validation checks each Spry form field and makes sure that the user’s input matches the validation settings you’ve assigned. If one of the form fields doesn’t match a validation requirement — for example, the user left a required field blank, or typed “none of your business” in an e-mail address box — the form won’t submit. Instead, an error message appears next to the offending field. However, you can also force the Web page to validate a field sooner: either when the field “blurs” or the field changes. “Blur” means when the user has either tabbed out of the field or clicked elsewhere on the Web page. For example, say you require the user’s phone number on a form. Instead of waiting until they’ve finished filling out the form and pressed the “Submit” button to notify them of the problem, you can give more immediate feedback as soon as they tab or click out of the field. In this way, you can catch a mistake right away and let the user know to fix it. This option is good for text and text area fields.Alternatively, you can validate a field when it changes. This is useful for check boxes and pull-down menus. When a user clicks a check box, it changes (to either checked or unchecked), and when a user makes a different selection on a pull-down menu, it changes. That moment when users check a box or select an option from a menu is the perfect time to make sure they’re following your rules (“please choose at least one,” for example.)
- Set additional options. Each Spry widget has other options. For example, in a Spry text field, you can provide a helpful hint (for instance, “Type an e-mail address in the format: bo*@*********er.com“).
- Modify the error messages. When the user doesn’t fill out the form correctly, an error message appears. For example, if a required form field is left blank and the form is submitted, an “A value is required” error appears next to the form field. You can change the generic message provided by Dreamweaver to text that’s more descriptive. In addition, you can change the appearance of the error message by changing the CSS styles used to format the messages.
How-to: Adding Validation to a Form
Adding a Spry Menu Bar to a Web page is a snap. If you want to follow along with these instructions you can download the compressed files here:
spry_validation_site.zip
This tutorial will take you step-by-step through the process of adding and modifying a Spry Menu Bar.- Choose Site > New Site. Click the Advanced tab in the Site Definition window and type Spry Validation for the site’s name. Click the folder icon to the right of the “Local Root Folder” field and select the folder you downloaded (spry_validation_site). Click OK to finish defining the new site.
- In the Files panel, double-click the file form.html, or choose File > Open and open the file form.html in the spry_validation_site folder.
- Make sure you’re in design view (View > Design). Click the text field to the right of the label “Name:” to select it.
- Click the Forms tab of the Insert Bar and click the Spry Validation Text Field button (see Figure 1 above). A blue tab appears above the text field. This represents a Spry validation widget. In reality, Dreamweaver has added two HTML <span> tags to the page: One marks the field to be validated, and the other contains the error message to use if the field isn’t valid when the user submits the form.The property inspector now displays all of the validation controls for the form field (Figure 2). The box on the far left edge with the word “sprytextfield1” is the ID used to identify this widget. You can change this name to something more meaningful, such as “spryUserName,” to more clearly indicated which field the widget applies to, but you don’t have to. The Dreamweaver supplied “sprytextfield1” name isn’t visible when the page is viewed in a Web browser.

Figure 2. Dreamweaver uses a blue tab with the word “Spry” inside it to indicate Spry widgets. Clicking the tab selects the widget and lets you change its properties in the Property Inspector. Click on the image for a larger view. - Choose File > Save. Dreamweaver lets you know that it has saved two files to your site in a folder named SpryAssets. One file contains the JavaScript code that makes the validation magic happen, and the other contains Cascading Style Sheet styles used to format the look of error messages. (When you use Spry on your own Web site, make sure you upload this SpryAssets folder to your Web server; otherwise, none of the nifty programming you’ve added will appear to your site’s visitors.)
- In the Property Inspector, check “Blur” next to the label “Validate on.” This instructs the page to check whether the contents of the field are valid immediately after the user tabs out of the field or clicks elsewhere on the form. In this way, the user gets instant feedback of any errors he’s made.
- From the Preview States menu on the Property Inspector select “Required.” Notice that the message “A value is required” appears on the page next to the form field (Figure 3). The Preview States menu lets you see how the form will appear to users under different conditions — in this case, what will appear on the page if they don’t supply a name.
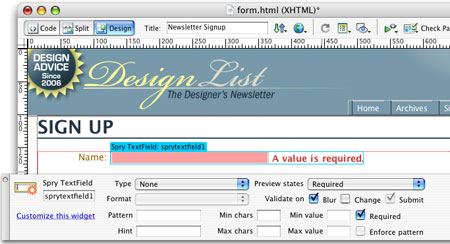
Figure 3. The Preview states menu on the Property Inspector lets you view and edit Spry error messages. Click on the image for a larger view. - Select the text “A value is required” and type “Please enter your name.” If you don’t like the way the error message looks (what’s that red borderline about?), don’t worry — you’ll learn how to change the appearance of errors soon.
- Select the text field next to the label “E-mail” and repeat steps 4 through 6 above to add validation to this field. When you add Spry validation to a field, you mark that field as required. In other words, a user can’t submit the form if the field is empty. But you can also make sure the user enters the correct type of information, such as a phone number or e-mail address.
- From the Type menu in the Property Inspector, select “Email Address.” You’ve just added a validation type to this field that checks what the user entered and makes sure it’s in the format of an e-mail address. So not only will an error message appear if the user leaves the field blank, but if he types something like “None of your business,” another error message appears. In fact, you now see the message “Invalid format” on the Web page — this is the “Invalid Format” state as indicated in the Preview States menu on the Property Inspector.
- Change “Invalid Format” to “Please enter your e-mail address.”
- From the Preview States menu on the Property Inspector, select “Required.” Notice that the message “A value is required” appears on the page next to the form field. A Spry-enabled form field can have multiple error messages. The Preview States menu lets you see how the form will appear to users under different conditions — in this case, what will appear on the page if they don’t supply a name.
To take the form for a spin, press the F12 key (Ctrl-F12 on a Mac) to preview the page in a Web browser. Try to submit the form without filling out any of the fields, then try to submit the form after typing a non-email address in the E-mail field.
Validating Check Boxes
Unlike text fields, check boxes have far fewer validation options: You can make sure a user selects at least one option for a series of check boxes and even limit the number of selections the user is allowed (for example: pick your 2 favorite desserts).- Select the check box to the left of the label “Design List.”
- Click the “Spry Validation Check Box” button on the Insert Bar. Save the file. Dreamweaver lets you know that it’s adding two other files to the site: a JavaScript file and a CSS file to control the formatting of the check box validation.
- In the Property Inspector, select “Required” in the Preview States menu and change the text “Please make a selection” to “Select at least one newsletter.” Notice that the error message appears to the right of the check box. The validation applies only to the first check box, not to all three. Unfortunately, you have to go into Code View if you want to apply the validation to all three check boxes.
- Click the blue Spry tab to select the newly inserted validation widget, then click the Split view button at the top of the document window so you can see both the code and the design (see top image in Figure 4). The Spry check box validation is created by a <span> tag; any check boxes within that span will be part of that validation procedure. You can change the <span> to a <div> and the validation still works.To include the other two check boxes in this validation widget, move the closing </span> tag to a spot in the HTML after the last check box. While you’re at it, you’ll move the error message that appears inside its own <span> tag so that it appears after all three check boxes.
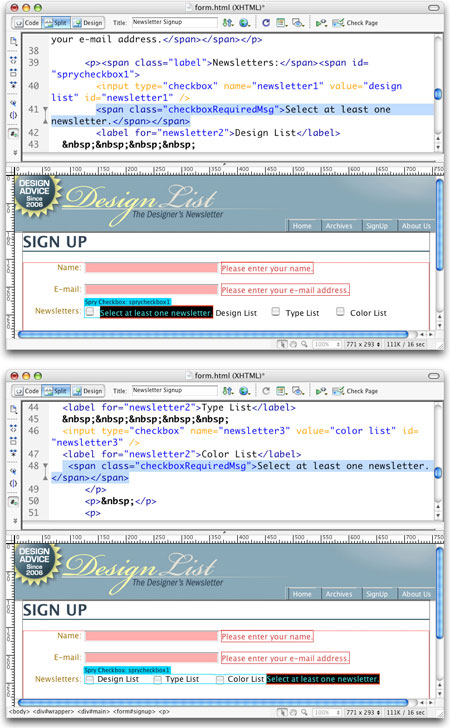
Figure 4. Sometimes it’s necessary to dive into the HTML code to make sure Spry validation works just the way you want it to. Click on the image for a larger view. - Select and cut the code “<span class=”check boxRequiredMsg”>Select at least one newsletter.</span></span>.” Paste the code directly after the closing </label> tag for the “Color List” check box (see bottom image in Figure 4). Now all three check boxes are included in the validation, so a user will need to check one box before she can submit the form.
Formatting the Error Messages
The design Dreamweaver provides for error messages leaves a little to be desired. Fortunately, CSS files that Dreamweaver adds to your site control the look of all Spry error messages. Some of the supplied CSS files contain lots of styles, so it can be difficult to find the correct style by opening the Style sheet. But Dreamweaver’s very useful CSS Styles Panel is a time-saving tool for quickly identifying styles that apply to any selection on the page.
Here’s how to change the error message appearance:- Make sure the CSS Styles panel is open (Window > CSS Styles) and click the “Current” button near the top of the panel. The Current view shows all styles that apply to the currently selected item on the page. It’s one of the most useful (and frequently overlooked) CSS-design features in Dreamweaver.
- Click inside the error message text “Please enter your name.” You’ll see the styles listed in the styles panel change to display the styles that apply to that text. In the middle pane — the Rules pane (Figure 5) — all of the styles affecting the error message are listed. The last in the list — .textfieldRequiredState — controls the look of the validation errors for text fields. The style properties are listed in the bottom pane (the Properties pane).
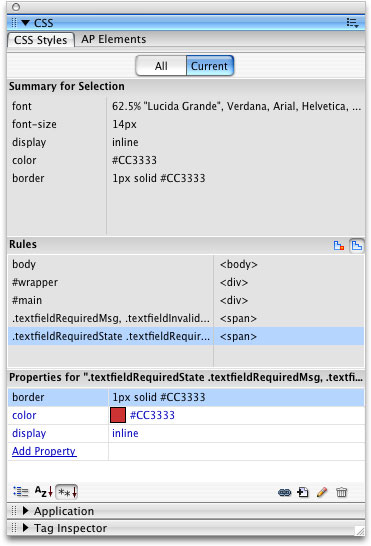
Figure 5. The Current view in the CSS Styles Panel is one of Dreamweaver’s hidden gems. It lets you view all of the styles and style properties that apply to a given selection on the Web page. It’s a great way to quickly identify which styles apply to an element on a Web page. - In the Properties pane of the CSS Styles panel, select the property values for the Border property and delete them. This removes the border around the error message.
- To make further formatting changes, you might be more comfortable using Dreamweaver’s standard Rule Definition window. In the Rules pane, double-click the style .textfieldRequiredState to open the Rule Definition window.
- Choose Bold from the Weight menu. Feel free to change other properties, such as the text color or size. When you’re done, click the OK button to save your changes. Notice that the look of the error message for the check boxes is unchanged. That’s because a separate style sheet controls those error messages.
- Click inside the error message “Select at least one newsletter” and repeat steps 3 through 5 above to change the look of check box error message so that it matches the other errors on the page.
- Save the file and preview it in a Web browser. Try to submit the form without filling anything out.
The Spry Form Validation tools are a fantastic addition to Dreamweaver. By letting even non-programmers add logic to their forms, Dreamweaver CS3 provides easy access to advanced user interface solutions that look professional and help Web sites function better.
- Insert the validation widget. (Dreamweaver uses the term “widget” to refer to Spry-related page enhancements such as the drop-down menu discussed in an earlier column, or a Spry validation form field.) Dreamweaver’s Spry Form tools are available from the Forms menu (Figure 1) or the Spry menu of the Insert Bar. You can insert a text field and add validation to it when creating a new form. Or, you can select a form field (text, text area, check box, or pull-down menu) on an already created form and click the appropriate Spry form button on the insert bar — in this case, Dreamweaver won’t add another form field, but will add the necessary code to make validation possible.


This article was last modified on January 8, 2023
This article was first published on September 26, 2007
Commenting is easier and faster when you're logged in!

Recommended for you

QuarkXPress 7 to Run Natively on Intel and Power PC-based Macs
Quark Inc. today announced that QuarkXPress 7, the next version of its desktop p...

New Contest! Mystery of the Empty Layers Panel
Solve this InDesign mystery for a chance at winning a great prize.

Combining Custom Distortions with Image Warp in Photoshop
Photoshop’s Image Warp tool is great for bending layers into any shape. Of...