
View Source: Create Advanced Online Galleries
Whether you’re a professional photographer or responsible for putting your family photos online, you’ve probably created at least one Web photo gallery. While Photoshop and other photo-editing programs let you export a gallery of images, you may want greater control over the design of the gallery Web page. Plus, these programs often generate a bunch of Web pages (one page full of thumbnail images, and one page for each full-sized photo), forcing photo gallery visitors to continually jump from page to page to see your images.
But thanks to the hard work of programmer Lokesh Dhakar, there’s Lightbox2, a simple, elegant, and free way to create a single Web page that can display both a thumbnail view of your photos as well as a larger version of each image. Lightbox2 is a set of free JavaScript, image, and CSS files that you add to your Web site and link to your gallery page. And although Lightbox2 depends on some complicated JavaScript programming, you don’t need to understand anything about programming to make it work.
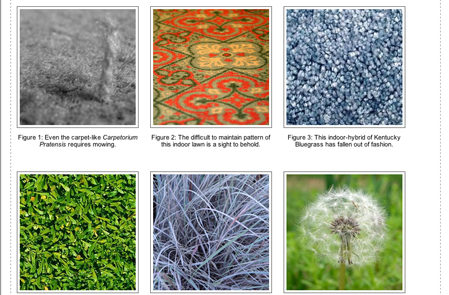
To see the example gallery I built using Lightbox2, go to /wp-content/uploads/sites/default/files/story_images/VSGallery/gallery_finished.html. Figure 1 shows screen captures of the live site.

Figure 1. The top screen capture shows the gallery thumbnails. The larger version of the grass photo in the bottom screen capture appears when you click on the Creepy Bentgrass thumbnail.
Overview
Getting started with Lightbox2 is simple: just build a Web page that includes thumbnail images; download the Lightbox2 files and link its JavaScript and CSS files to your Web page; link each thumbnail to the larger photo and add a single HTML attribute to the link. That’s it. The JavaScript programming supplied by Lightbox2 takes care of the rest.
Setting Up
In this tutorial, you’ll put Lightbox2 into action using a demo gallery file. To follow along with my instructions, click on “Carpet Diem” to download a compressed file with everything you’ll need, including the Lightbox2 files. This tutorial will take you step by step through the process using Dreamweaver. If you’re not a fan of Dreamweaver, I’ve also included steps for those who like their HTML code raw.
Dreamweaver Instructions
1. Choose Site > New Site. Click the Advanced tab in the Site Definition window and type Lightbox2 for the site’s name. Click the folder icon to the right of the “Local Root Folder” field and select the folder you downloaded, lightbox_site. Click OK to finish defining the new site.
2. In the Files panel, double-click the file gallery.html (or choose File > Open and open the file gallery.html in the lightbox_site folder.) The first order of business is to link the Lightbox2 JavaScript files to the gallery.html page. Dreamweaver provides a couple of ways to do this: You can go directly into code view and type the appropriate HTML, or you can use the foolproof method, which takes a few more steps but ensures that the JavaScript files are correctly linked. I’ll use the longer method here.
3. Make sure you’re in Design View (View > Design) and then choose View > Head Content. Dreamweaver displays the head content area directly above the document toolbar (Figure 2). JavaScript files are usually linked to the <head> region of a Web page — the same place the title of a Web page and external style sheets are attached.
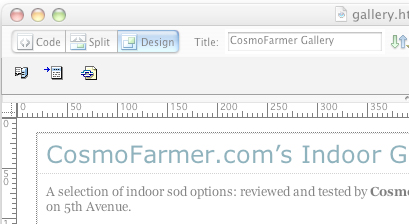
Figure 2. The Head Content area of Dreamweaver’s Document window displays HTML tags like the <title> tag and the <script> tag for JavaScript programs that appear within the <head> of a Web page.
4. Click in the empty portion of the head content (anywhere to the right of the three icons).
5. Choose Insert > HTML > Script Objects > Script. The Script window appears. All you need to do here is select the first JavaScript file.
6. Click the folder icon to the right of the Source box. In the Select File window, navigate to the js folder inside the lightbox_site folder and select the prototype.js file. Click the OK button in the Script window. You may see a Dreamweaver dialog saying that you won’t be able to see the element — just check the “Don’t show me this message again” box and click OK. Dreamweaver attaches the JavaScript file to the page. (This method of attaching a JavaScript file to a page takes a lot longer than simply typing in the correct code, but if you’re not completely comfortable with how file paths work on the Web, this is the sure-fire way to correctly link to the JavaScript file. If you prefer the quicker hand entered method, see the hand-coding instructions in the next section.)
7. Repeat steps 4 through 6 two more times and attach the scriptaculous.js file followed by the Lightbox2.js file. (Don’t worry about the effects.js file.) Attach the three JavaScript files in the order specified here, or your gallery won’t work. Finally, link to an external style sheet that contains the basic formatting instructions for the Lightbox2 effect.
8. Choose Text > CSS Styles > Attach Style Sheet. The Attach External Style Sheet window appears.
9. Click the Browse button and navigate to the css folder inside the lightbox_site folder. Double-click the Lightbox2.css file to select it. Finally, click OK in the Attach External Style Sheet window.
That’s all the set-up that’s required. Now you’re ready to skip down to the “Adding the Lightbox2 Functionality” section and bring your gallery page to life.
Hand-Coding Instructions
You can also achieve the same results using a basic text editor as you can with Dreamweaver. Just follow these steps:
1. In your favorite text editor, open the gallery.html file in the lightbox_site folder.
2. Directly below the <link> tag that attaches the styles.css external style sheet type the following:
<script type=”text/javascript” src=”js/prototype.js”></script>
<script type=”text/javascript” src=”js/scriptaculous.js”></script>
<script type=”text/javascript” src=”js/Lightbox2.js”></script>
When using Lightbox2 on your own site, be sure to adjust the src attribute so it correctly points from your gallery Web page to the location of the JavaScript file. For example, if you put your gallery page inside a folder named gallery, which is located inside your site’s root folder, you’d change the src property to ../js/prototype.js for the first line, and modify the other lines in the same way.
3. Below the three <script> tags, type:
<link href=”css/Lightbox2.css” rel=”stylesheet” type=”text/css” />
This links to the CSS file for Lightbox2.
Adding the Lightbox2 Functionality
Now that the basic files are in place, there are just a few steps to creating a dynamic image gallery.
Dreamweaver Instructions
1. Click the first image (the grey carpet photo). In the Property Inspector, click the folder button to the right of the Link box.
2. In the Select File window, navigate to the folder named large_images and double-click the file carpet.jpg. This creates a link to the larger version of the thumbnail. If you preview the page in a Web browser and click the first image, you’ll see the larger image. Not too exciting, but the magic comes in the next step.
3. In the tag selector at the bottom of the Document window, click the <a> tag to select the link you just added (circled in Figure 3). The tag selector is the most accurate way to select an HTML tag. You just need to add a single attribute to this tag to activate the Lightbox2 function.
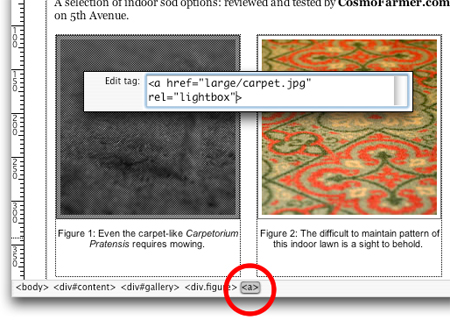
Figure 3. The tag selector at the bottom of the Document window lets you quickly and accurately select an HTML tag. In this example, the <a> tag is selected.
4. Press Cmd-T (Ctrl-T on Windows). This handy keyboard combination lets you quickly edit the raw HTML of a tag without having to switch to code view. The Edit Tag window displays the currently selected tag.
5. Type rel=”lightbox” in the Edit Tag window (see Figure 3 above) and press return. That’s it. Save the file and preview it in a Web browser. When you click the gray carpet photo you’ll see the larger image load directly on top of the gallery page like magic. (If you don’t see any magic, you may have added the rel attribute to the image itself — the <img> tag — and not the link — the <a> tag).
6. It’s also easy to add a short caption to appear along with the larger image. Return to Dreamweaver. Use the tag selector to select the first image’s <a> tag. Press Cmd-T (Ctrl-T on Windows) and add the following to the <a> tag: title=”Needs mowing”. Save and preview the page once again.
Hand-Coding Instructions
1. Locate the code for the first thumbnail (<img src=”small/carpet.jpg” alt=”Carpet Grass” width=”200″ height=”200″ />) and wrap it in an <a> tag so that it links to the file carpet.jpg in the large_images folder.
2. To the <a> tag you just added add the following attributes: rel=”lightbox” and title=”Needs mowing”. The finished code should look like this:
<a href=”large_images/carpet.jpg” rel=”lightbox” title=”Needs mowing”>
<img src=”small_images/carpet.jpg” alt=”Carpet Grass” width=”200″ height=”200″ /></a>
3. Save the file, preview the page in a Web browser, and click the gray carpet photo to see Lightbox2 in action.
Explanation
You might be wondering, “What’s going on with this rel and title stuff?” The rel attribute indicates the relationship between the page the link is on and the item being linked to. The title attribute is for adding a title for what you are linking to. But in this case, those two attributes provide a simple way to trigger the JavaScript programming that makes up Lightbox2. Adding rel=”lightbox” to a link indicates that the particular link should be controlled by Lightbox2. Likewise, the Lightbox2’s programming looks for a title attribute for the link and uses the text in that attribute as the caption for the larger image.
Creating a Slideshow
You can also create a slideshow effect, so that once someone clicks on a thumbnail image to see the larger image, he or she can navigate to the next larger image in the series by mousing over the image and clicking a Next button.
Dreamweaver Instructions
1. In Dreamweaver, click the photo of the gray carpet, then use the tag selector to select the <a> tag.
2. Press Cmd-T (Ctrl-T on Windows) to open the Edit Tag window, and change rel=”lightbox” to rel=”lightbox[cosmo]”. The [cosmo] part is a way of identifying that this particular link will be part of a series of images. You’ll add a link for another image next.
3. Select the second photo (the red-orange carpet) and repeat steps 2 through 6 above: Link to the file pattern.jpg in the larger_images folder; add rel=”lightbox[cosmo]” to the new link; and add title=”Beautiful!” to the link, as well. At this point, there are now two links that have the value of “lightbox[cosmo]”. Lightbox2 will treat these two links as part of the same gallery. (To create another set of related gallery photos on the same page, just make sure they share the same name within the brackets: for example, lightbox[series1].)
4. Save and preview the page in a Web browser. Now, when you click the first image, mouse over the top right corner of the pop-up photo to see a Next button. Click that button to see the next picture in the series.
5. Follow the above steps to add pop-up photos to the other images on the page.
Hand-Coding Instructions
1. Locate the link you added earlier in the tutorial — <a href=”large_images/carpet.jpg” rel=”lightbox” title=”Needs mowing”> — and change the rel attribute so that it now reads rel=”lightbox[cosmo]”.
2. Follow the steps from the previous part of this tutorial to add a link to the second image. The finished code should look like this:
<a href=”large_images/pattern.jpg” rel=”lightbox[cosmo]” title=”Beautiful!”>
<img src=”small_images/pattern.jpg” alt=”Pattern Grass” width=”200″ height=”200″ /></a>
3. Add links for the other images in the gallery, if you’d like.
Customizing the Lightbox2 Look
Lightbox2 is so sophisticated-looking, but so simple to add to a Web site, that you can see it on hundreds of site. Fortunately for you, few people take the time to customize the look of Lightbox2, so with just a couple of changes, you can make your photo gallery stand out from the masses.
The most recognizable aspects of Lightbox2 are the graphics used for the various buttons that appear as part of the pop-up image. There are four images you can (and should) replace with graphics of your own creation:
- Loading.gif is an animated GIF that appears after a Web visitor clicks a thumbnail image, but before the larger image is downloaded from the Web site. It looks like the startup icon for Apple’s OS X operating system — and it’s everywhere you turn. If you’re not an animated GIF wizard, go to www.ajaxload.info. This handy Web application lets you customize your own “please wait while we download your information” icon. You can choose from different styles and even specify your own background and foreground colors.
- Closelabel.gif appears in the lower-right corner of the pop-up image (Figure 4). Clicking the button makes the pop-up window close, returning the visitor to the thumbnails. The dimension of the graphic is 66 pixels wide by 22 pixels tall. In order to ensure that the graphic you create fits, keep your final image to the same dimensions.

Figure 4. The images that come with Lightbox2 — such as the Close and Next buttons pictured here — are a dead giveaway that you’re using the same thing hundreds of others are using. - The Previous and Next buttons are two other gif images: prevlabel.gif and nextlabel.gif. As with the Close button, these images are 66×22 pixels.
If you decide to use different names for your graphic files, or move them to a new location on your Web site, you’ll need to update the Lightbox2.js file and the Lightbox2.css file because they both specify path and filenames for those images.
The Lightbox2.css style sheet controls the formatting properties for the pop-up image effect. To change fonts and colors, you need only to edit some of the styles in the style sheet. Here’s a short cheat-sheet listing the name of a style in the style sheet and what part of the page it controls:
- #overlay: You can change the background color that’s used to create the fade-out effect when a pop-up image appears. Just change the #000 (black) in background-color: #000; to another color.
- #outerImageContainer: pop-up images have a white border around them by default. Change the background-color property of this style to get a more colorful border.
- #imageDataContainer: If you want to change the background color of the area with the caption, change the background-color for this style. This style also dictates the basic look of text inside the caption area. That includes not only the caption you supply as part of the “title” attribute, but also the text that appears as part of a slideshow (“Image 2 of 4”, for example).
- #imageData #caption. If you want to alter only the look of the caption text, edit this style to add your preferred caption font, color, and font size.
Lightbox2 is easy to use and provides an elegant solution to a common problem. If you need to present a portfolio of illustrations, photos, or layouts, or just want to put photos from your kid’s last birthday party, you’ll find Lightbox2 helpful.
This article was last modified on January 4, 2023
This article was first published on October 29, 2007
Commenting is easier and faster when you're logged in!

Recommended for you

Photoshop CS6 updated
Adobe has released an update to Photoshop CS6 (version 13.0.1) that fixes a tota...

Creating Barcodes
Barcodes are one of those things that many designers don’t give any though...

CreativePro Conversations: Better Digital Asset Management With Canto
Come see Mike Lacey from Canto show off how easy digital asset management can be...