View Source: How to Use Photoshop Files with Dreamweaver CS4

As a Web designer, odds are pretty good that you spend a fair amount of time preparing graphics for your Web pages. Whether you need to create a logo, a banner, or a set of navigation buttons, the task of making web-ready image files takes time. Fortunately, when you move to Photoshop and Dreamweaver CS4, your job is a lot easier, thanks to a built-in workflow between Photoshop and Dreamweaver.
Dreamweaver CS4 supports two methods for adding Photoshop files to a Web page. The first method — copying an image, layer, or selected slice in Photoshop and pasting into a Dreamweaver page — debuted in Dreamweaver CS3. When you paste the item, Dreamweaver lets you choose optimization settings (such as whether the file should be saved as a GIF, JPEG or PNG file), provide a name for the web-ready image file, and save that file into your site.
The second method, new to Dreamweaver CS4, adds support of Photoshop Smart Objects, which gives you a quick and easy way to update Web images to match changes made to a Photoshop file. When you insert a PSD file, Dreamweaver not only helps you create a Web-ready version of the Photoshop image, but also notices when the original Photoshop file is changed and lets you re-import an updated version of the image to your site. In this way, you can make sure that the Web version of an image is up-to-date with its Photoshop parent.
In this article, I’ll demonstrate both methods of getting Web-ready graphics from Photoshop. To follow along with the tutorials, download the sample files:
Download Tutorial Materials
After you unzip the files you’ll have a folder named photoshop_site, which contains the files for this tutorial.
Copying and Pasting From Photoshop
You may be used to Photoshop’s Save for Web and Devices command, which lets you export a Photoshop file in a Web-ready format. You can skip that step entirely: simply copy from Photoshop and paste into Dreamweaver. (Note this part of the tutorial works in both Dreamweaver CS3 and CS4. You’ll also need Photoshop, either CS3 or CS4).
1. Launch Dreamweaver, choose Site > New Site. Click the Advanced tab in the Site Definition window, type Photoshop for the site’s name; then click the folder icon to the right of the Local Root Folder field and select the folder you downloaded: photoshop_site. Click OK to finish defining the new site.
2. In the Files panel, double-click the file 01_paste_photoshop.html (or choose File > Open and open the file 01_paste_photoshop.html in the photoshop_site folder.)
3. Launch Photoshop and open the file chia_banner.psd. This is a banner graphic for the fictional (in case you couldn’t tell) Web site of Chia-Vet.com. You’ll copy and paste the banner into Dreameaver.
4. Choose Edit > Copy Merged. Copy Merged is a must when you’re working with a multi-layer Photoshop file and want to make sure you copy all layers.
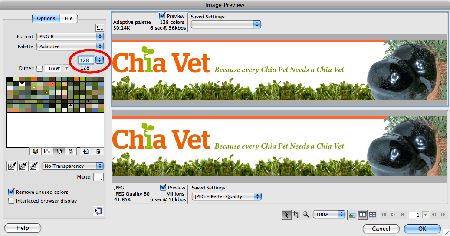
5. Go to Dreamweaver and click in the empty space below the green headline. Choose Edit > Paste. The Image Preview window appears (Figure 1). Use the options in this window to choose the file format — PNG, GIF, or JPEG — and select optimization settings appropriate to your selected file type.
In general, it’s best to stick with either PNG 8 or JPEG. PNG 8 is a replacement for the older and very common GIF file format. It has the same compression method, creates images that are identical in quality to GIFs, but produces slightly smaller images. Since GIF and PNG 8 are limited to a maximum of 256 colors, you should choose JPEG for photos and images with lots of different colors. However, when you have areas of solid color — such as the logo type in this image — JPEG can create some unattractive visual artifacts.
Figure 1. When adding an image from Photoshop into Dreamweaver, you must choose how to optimize the image: Pick a file type such as GIF, PNG 8, or JPEG, and determine how much you want to compress the file. Click on the image for a larger version.

6. From the Format menu (in the top left of the Image Preview window) choose PNG 8, and from the colors menu (circled in Figure 1) choose 128. Both GIF and PNG 8 reduce the size of graphic files by eliminating colors from the image. In this case, you’ve selected a color palette of 128 colors. Since this particular image is largely white, orange, and green, decreasing the number of colors doesn’t drastically harm the image quality. However, let’s see how another file format looks.
7. In the lower right of the window, click the icon that looks like two side-by-side windows (just to the right of the icon that looks like a landscape). This splits the preview area in two, so you can compare different optimization settings (this view is pictured in figure 1).
8. Click the bottom preview image, and choose JPEG from the format menu. Each of the previews lists the total file size produced. The top PNG image is 39.14k, while the bottom JPEG image is 41.85k. Since the PNG version is a bit smaller and the text in the JPEG version looks a bit mottled, let’s go with the PNG version.
9. Click the top preview image. This selects the PNG settings. Click the OK button in the lower right of the window. Dreamweaver pops up a Save Web Image dialog. You can leave the suggested file name — chia_banner.png — and click the Save button. Type “ChiaVet.com” in the Image Description window, then click OK. Dreamweaver adds the image to the Web page.
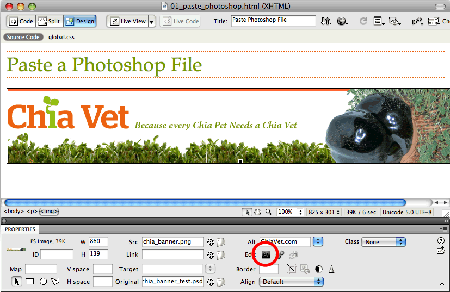
If you select the image in the Dreamweaver (by clicking on it, for example), you’ll see a field named “Original” in the Property Inspector (Figure 2). This field contains the name of the original PSD file. Click the Edit in Photoshop button (circled in Figure 2) to launch Photoshop and open the original PSD file.
At this point you can edit the image, but there’s no straightforward way to get the edited version back to Dreamweaver in a Web-ready format. You must go through the copy and paste ritual again.
However, the process isn’t quite as bad as it sounds — if you select the old version of the image on the page in Dreamweaver and then paste the edited Photoshop image, Dreamweaver skips the Image Preview steps (steps 6 through 9 above). Dreamweaver remembers the options you selected the first time and reapplies those settings to the image you’re pasting. It then replaces the older graphic on the page. (However, if you simply click somewhere on the Web page and paste the image, Dreamweaver will treat this like a new image and take you to the Image Preview window where you must choose optimization settings all over again.)
Figure 2. Once you’ve pasted an image from Photoshop into a Web page in Dreamweaver, you can select the image, then click the Edit in Photoshop button (circled) to open the original PSD file in Photoshop. This only works, however, for Photoshop CS3 and CS4. Click on the image for a larger version.

Inserting a PSD File into Dreamweaver CS4
The copy-and-paste method discussed above works in both Dreamweaver CS3 and Dreamweaver CS4. However, that method requires you to copy and paste each time you want the Web version of a Photoshop file — a tedious process.
Dreamweaver CS4 introduces a better option: Now you can insert a Photoshop image directly into a Dreamweaver page, create a Web-ready version of the file, and create what’s called a Smart Object. A Smart Object retains links to the original Photoshop document. Edit the Photoshop document and Dreamweaver tells you that the original has changed — and gives you the option to re-import the image.
Here’s how it works:
1. In Dreamweaver, open the file 02_insert_psd.html (for example, choose File > Open and open the file 02_insert_psd.html in the photoshop_site folder).
2. Click in the empty spot below the green headline and choose Insert > Image. Select the chia_banner.psd file (make sure to select the Photoshop document and not the PNG file you created in the last exercise.) Dreamweaver opens the same Image Preview window you saw in the last exercise (see Figure 1). Follow the steps from above to select a graphic file type (PNG for example) and save the file as chia_banner.2png.
After Dreameaver inserts the image in the page, you’ll notice an icon in the upper left corner of the banner — a set of green circular arrows an top of a square which is on top of a document-like thingy (who came up with this one?) That icon indicates a Smart Object. The two green arrows mean that this image is in synch with the original Photoshop file — in other words, no changes have been made to the PSD file since it was inserted into this Web page. As you’ll see in a moment, if an arrow turns red, then the Web image no longer matches the Photoshop document. You’ll then have the option of updating the Web version of that image on the Dreamweaver page.
3. Go to Photoshop and make sure the chia_banner.psd file is open. (These steps only work in Photoshop CS3 or CS4). Select the Text tool and edit the tagline so that “Needs” is all lowercase. Feel free to make any other changes to the image — apply a filter, for example — and when you’re done, choose File > Save.
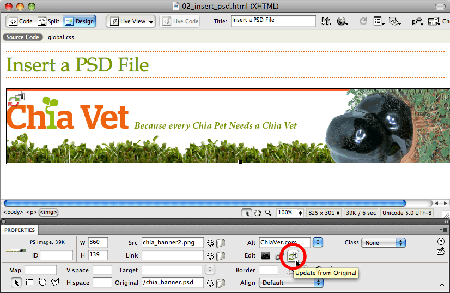
3. Return to Dreamweaver. Notice that the bottom arrow on the image has turned red (see the top-right corner of the banner image in Figure 3). This indicates that the Photoshop file has changed. Select the image and click the Update from Original button in the Property inspector (circled in Figure 3). Dreamweaver updates the image. Actually, it re-optimizes the original Photoshop file using the settings you chose in step 2.
Figure 3. A red arrow in the Smart Object icon (upper right corner of the banner in this figure) indicates that the Web image doesn’t match the Photoshop document. This can happen when you edit the Photoshop file without updating the Web version. In that case, the bottom arrow turns red. In rare cases, the top arrow will turn red indicating that the version on the Web page has changed. Click on the image for a larger version.

4. Things are a tad weirder if you resize the image in Photoshop. To see for yourself, return to Photoshop. Select the Crop tool and crop off a bit of the bottom and right edges of the image. Save the file.
5. Return to Dreamweaver and notice that, once again, the red arrow appears. But don’t click the Update from Original button just yet. When you resize an image in Photoshop you need to do one step before updating the original. (Well, you don’t have to, but it’s the fastest method for updating the Web-version of the image)
Choose Modify > Image > Reset Size to Original. This sets the dimensions of this image in the HTML to match the resized Photoshop image, but it doesn’t actually update the image itself, so the banner now looks distorted on the page. In addition, the red arrow indicating that the Photoshop file has changed still appears.
6. You now need to update the graphic from the Photoshop file. Click the Update from Original button once again in the Property inspector. Dreamweaver re-imports the most recent version of the Photoshop file, replacing the distorted graphic with the new, cropped image.
At times, you may see a yellow warning symbol (!) in the Smart Object icon. This indicates that the dimensions specified in the HTML for the image don’t match the dimensions of the image file itself. This can happen when you resize an image in Photoshop and then, in Dreamweaver, select the image and click the Update From Original button in the Property inspector. The image is re-imported but not resized to match the new dimensions of the Photoshop file. (This is really just a bug, or at least a weird behavior, on Dreamweaver’s part.)
To get rid of the yellow warning symbol, choose Modify > Image > Reset Size to Original and then click the “Update From Original” button again.
You will also see the yellow warning symbol if you’ve resized an image in Dreamweaver by grabbing one of the three resize handles that appear when you select an image. This move doesn’t actually resize the graphic file; it changes the HTML width and height properties for the image. In other words, Dreamweaver displays the unchanged file at a different size based on what’s specified in the HTML. If you resize the image on the Dreamweaver page so that it’s smaller than its image file (you’ll see the yellow warning symbol), you can click the Update from Original button to make Dreamweaver not only re-import the Photoshop file but also resize it.
This is a nifty trick when you want to keep a large, high-quality version of an image in Photoshop but want the Web-version of the image to be smaller. However, if you resize the image in a Dreamweaver document so that its dimensions are larger than the original Photoshop file, you’ll always see the yellow warning symbol, even if you click the Update From Original button. That’s because you’ve made the copy larger than the original and forced Dreamweaver to blow up the pixels. This almost always results in a low-quality image.
This new Dreamweaver CS4 method is meant for inserting an entire PSD file (or at least a cropped portion of the file). If you’ve created an entire Web page mockup and want to export individual sections from the PSD file, the insert PSD method isn’t a good answer. In that case, you could create separate PSD files for each section of the mockup that you wish to be an Web image: for example, the logo, a tiled-background, a navigation button, and so on. Or, you could use the old cut and paste method: Select the desired area of the Photoshop mockup, then copy and paste it into Dreamweaver. Photoshop’s Slice Tool provides an even better solution: select the Slice tool from the toolbar (it’s grouped with the crop tool) and draw a rectangle over the area of the file you want to turn into a single graphic; in a full-page mockup, this could be only the banner, or a single navigation button. You can then use the Select Slice tool (also located with the crop tool in the toolbar) to select the slice. At this point you can copy the slice, switch to Dreamweaver, and paste and optimize the image.
Both methods of bringing imagery from Photoshop and adding it to a Web page in Dreamweaver are faster than Photoshop’s old “Save for Web and Devices” command. The new Smart Object support in Dreamweaver CS4 is a wonderful tool for making sure your Web images stay up-to-date with your Photoshop files.
This article was last modified on January 5, 2023
This article was first published on November 19, 2008
Commenting is easier and faster when you're logged in!
Recommended for you

Know Your Photoshop File Sizes
How can one Photoshop image grow and shrink dramatically during production, even...

Integrating 3D Text into Images with Photoshop
This is a technique you’ll have seen in countless films and TV shows, from...

How to Mask Hair Using Today’s Techniques in Photoshop
Using Photoshop features like Generative Fill and Select and Mask makes the job...


