
View Source: JavaScript for Designers

From simple pop-up info bubbles (like Netflix), to drag and drop shopping carts (like Panic’s), to completely interactive desktop-like Web applications (think Google Apps), JavaScript is changing how we design our sites. This browser-based programming language can completely rearrange the look of a page, or add a few simple formatting and usability enhancements, such as the JavaScript-enhanced HTML table you’ll build in this tutorial. For an interactive preview of the finished site, click on the link below:
What you’ll build
Unfortunately, tackling a programming language can be a painful experience for visually inspired designers. Even Web designers with technical expertise in the intricacies of HTML and Cascading Style Sheets can get lost when faced with the complex ins-and-outs of JavaScript programming.
However, you don’t need a 1,500-page JavaScript Basics book to get started with JavaScript programming. Nor do you need to learn all there is to know about JavaScript to spruce up the look, feel, and usability of your sites.
A JavaScript library can jumpstart your programming.
This collection of pre-written JavaScript code solves many of the common day-to-day tasks you’ll face. (If you walked through this column’s Advanced Gallery article, you’ve already used a JavaScript library called Prototype.) JavaScript libraries eliminate many cross-browser programming challenges, and most reduce complicated procedures (say, animating an element across the screen) to a simple command.
In this article, I’ll focus on one of the most popular and designer-friendly JavaScript libraries, jQuery.
About jQuery
jQuery is a free JavaScript library that’s used on many big sites for companies such as NBC, Intuit, Warner Bros. Records, Dell, and even sections of Google.com. Its relatively small file size, fast performance, and ease of use have quickly made it one of the most popular JavaScript libraries. In addition, a large community of programmers have created a huge selection of additional scripts, called plug-ins, which offer many advanced effects and commands. (You can find a plug-in list at the jQuery site.)
Best of all (from a Web designer’s perspective), jQuery takes advantage of your knowledge of Cascading Style Sheets to make it easier to enhance a Web page. If you’ve created style sheets before, you’re ready to get started.
Using jQuery
Your first step is to get a copy of jQuery. You can find the latest version at the jQuery Web site. Make sure to download the Minified version — it’s the best combination of performance and file size. I’ve included a copy of version 1.2.3 of jQuery with this article’s tutorial files. Click below to download them:
javascript_site.zip
The jQuery code is in a separate file containing only JavaScript (just as an external stylesheet contains only CSS rules). To use jQuery on a Web page, you must first attach it to the page using a HTML <script> tag by taking these steps:
- In Dreamweaver or some other Web page editor, open the tutorial file table.html inside the “javascript_site” folder. (You’ll be working on the code in this tutorial, so if you’re using Dreamweaver, switch to Code View.) The page contains a basic HTML table; you’ll be using JavaScript to help style the table and add interactivity to it.
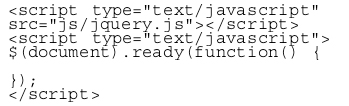
- In the <head> of the page, locate the style sheet <link> tag and add a blank line between it and the closing </head> tag. Type
<script type=”text/javascript” src=”js/jquery.js”></script> so that the code in the page now looks like this:
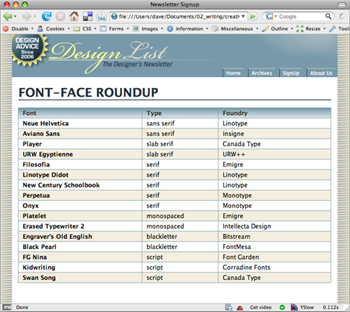
Figure 1. HTML tables are great for presenting spread-sheet like data. Click on the image for a larger version.

<script> is an HTML tag which informs the Web browser that everything between the opening <script> and closing </script> tag is JavaScript code. When attaching an external JavaScript file, you specify the path to the file for the src property. The src property works the same as the href property for attaching style sheets, or linking to other files, and just tells a Web browser where it can find the file.
Note that you must include the </script> tag when linking to a JavaScript file, and you mustn’t put any code between those tags. To insert your own programming, you add another set of <script> tags. - After the <script> tag you just added, type <script type=”text/javascript”>. Press return twice and type </script>. At this point, you should have a new set of <script> tags and an empty line between them: That’s where the JavaScript programming will go.
- On that empty line type $(document).ready(function() {. Hit return twice, then type }); The code you’ve added to this point should look like this:

There’s your first real programming and it probably looks a little weird… maybe a lot weird. You don’t need to know exactly how this code works, but keep in mind that you should include these lines with all programs you write using jQuery — the rest of the program should go between the $(document).ready(function() { and the });
In a nutshell, these few lines of code make sure the HTML for the page has been loaded by the Web browser. Since much of JavaScript programming involves manipulating the contents of a page, you’ll get a big JavaScript error if you try to access the HTML with JavaScript before the HTML has fully loaded.
jQuery Basics
A lot of JavaScript programming is about dynamically changing the content or display of a Web page. This involves selecting and manipulating parts of the page. In fact, you can break down many of the things you’ll use JavaScript for to these two steps:
- Select a part of the page. You might, for example, select a link that you wish to add a pop-up menu to, or a <div> tag that you wish to show or hide. You might also do something as simple as selecting the <body> of the page itself, so that you can add new content inside it.
- Manipulate the selection. Once you select a part of the page, you’ll do something with it, such as make it disappear, fade it into view, move it across the screen, make it glow, or even shake. Or you might add additional content to the selection or program the selection so that it can respond to visitor interaction, such as a mouse click.
jQuery lets you complete step 1 — selecting a part of the page — using CSS selectors. As you probably know, CSS selectors let you specify which element a CSS style applies to. You can use a basic element selector to choose every instance of a particular tag; for example, p selects every <p> tag or paragraph. A class selector lets you target any tag that has a particular class attribute; .copyright, for example, will apply to any tag with that class, such as <p class=”copyright”>Copyright, 2007</p>. Another very useful selector is an ID selector: #banner, for example. IDs are like classes, but can only be applied to one element per page. They provide a great way to identify one particular tag on the page.
You use CSS selectors with what’s called the jQuery object, which is just this: $( ). When you put the CSS selector inside quotes within the parentheses, jQuery selects any matching page elements. For example, $(‘p’) selects all paragraphs on the page, while $(‘#banner’) will select a tag with an ID of banner. You can use any valid CSS selector, class selectors, descendent selectors, attribute selectors, and most CSS3 selectors (even if the browser itself doesn’t understand those selectors). There’s a complete list of selectors that jQuery understands at https://docs.jquery.com/Selectors.
Note: To learn more about CSS selectors in general, visit https://css.maxdesign.com.au/selectutorial/.
Striping Table Rows
In this part of the tutorial, you’ll use JavaScript to add alternating colored rows to a HTML table. “Striping” a table like this can make the data in each row easier to read. Usually, you accomplish this effect by creating a CSS class style with a background color property and adding the class to every other row in a table. Without JavaScript, this is a tiresome and repetitive task, but with JavaScript it’s a breeze.
The first step is to select the elements you want to manipulate. The basic code to select every table row (the <tr> tag) is $(‘tr’). However, you want to select every other row. Fortunately, jQuery gives you a way.
- On the blank line inside the JavaScript you added earlier, type $(‘tr:even’). This selects every even table row. The next step is to do something to this selection. In this case, you want to add a class to each <tr> tag in the selection using a jQuery shortcut.
- Add .addClass(‘striped’); on the same line as the last step. Your code should now look like this:

Note: In JavaScript, a semicolon indicates the end of a statement. It’s kind of like a period at the end of a sentence. - Save the page and view it in a Web browser (Figure 2). That’s all there is to it. The style sheet that’s attached to this page has a class style named striped which sets a beige background color for the style. The JavaScript is adding the class to every other table row, while the CSS is applying the striped color. You could easily edit the striped style in the style sheet to change the background or any other CSS property such as the font weight or color.Figure 2. Instead of manually adding classes to every other <tr> tag in a table’s HTML code, use JavaScript for fast, error-free table striping. Click on the image for a larger version.

Note: If, when you preview a Web page with JavaScript, nothing happens, you’ve probably made a typo. To locate the problem, preview the page in the Firefox Web browser, then choose Tools > Error Console. A window listing any errors will appear. Because this window lists every error encountered while the browser has been open, you may see a lot of error messages. If so, click the Clear button to erase them, then reload the troublesome Web page. The error on the reloaded page should now be listed, including a description of the error and which line it occurs on. (An even better tool for tracking down errors is Firebug, a Firefox extension.
Adding Interactivity
Formatting table rows is a nifty trick, but the heart of JavaScript programming is responding to user interaction — making a menu appear when mousing over a link, responding to the click of a radio button, or verifying the contents of a form field when the user tabs out of it.
Web browsers are programmed to keep track of these user interactions, which are technically called events. When a visitor clicks her mouse button on the Web page, a click event is triggered. To make your Web pages interactive, you write JavaScript programs that respond to these events. jQuery provides a simple method for responding to events. In the next stage of this tutorial, we’ll experiment with events by programming each table row to highlight in response to the mouse passing over it.
- In your JavaScript program, add an empty line below $(‘tr:even’).addClass(‘striped’); and type the following:

There’s a lot going on here, so let’s break it down: $(‘tr’) uses the jQuery object to select every table row (the <tr> tag). Next, the mouseover event is assigned to these tags, meaning that you want something to happen whenever the mouse moves over a table row. The rest of the code represents the actions that will happen when the mouse moves over a row — this is called a function. I’ll talk about functions in a future column, but for now, just accept that this function adds a class named highlight to a table row. (As with the striped table example, the actual visual formatting is taken care of by CSS and, in this case, a style named highlight.) - Save the page and view it in a Web browser. Move your mouse over a table row and its background color changes… unfortunately, it never changes back! That’s because the mouseover function only adds the class to the table row — it never removes it. To deal with that problem, you need to add an additional event for when the mouse moves off of the table row.
- After the code you just typed, hit return and type the following:

The code you’ve add so far in this tutorial should now look like this:

- Save the page and check it out in a browser. The rows should turn blue when you mouse over them, then return to their original background color when you mouse off (Figure 3.)Figure 3. Simple interactivity, like highlighting a table row when the mouse is over it, is easy with JavaScript. Click on the image for a larger version.


To find out more about using jQuery to respond to events, check out https://docs.jquery.com/Events.
Make a Table Sortable
HTML data tables are great for displaying information in a spreadsheet-like format. However, unlike spreadsheets in programs like Microsoft Excel and Apple’s Numbers, HTML tables don’t let you sort the information inside the table. If you want to see all the items in the first column sorted in alphabetical order, for example, you’re out of luck… unless you use JavaScript.
One of the great benefits of jQuery is the large community of programmers who create plug-ins that solve many common (and not-so-common) design and user interface problems, including sortable tables.
The tablesorter jQuery plug-in, written by Christian Bach, turns an otherwise complex task into a single line of JavaScript. To use a plug-in, you need to download the plug-in file (usually just a single JavaScript file) and attach it to your page, just as you linked the jQuery file to the page earlier in this tutorial. I included a copy of the tablesorter plug-in in the javascript_site folder. You can also download the tablesorter plug-in from https://tablesorter.com/ and find other jQuery plug-ins at https://plug-ins.jquery.com/.
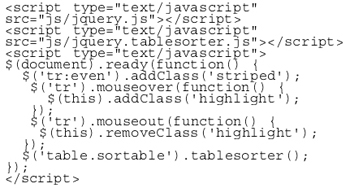
- In the table.html file, add a blank line directly below the <script> tag that links the jQuery file to this page and type <script type=”text/javascript” src=”js/jquery.tablesorter.js”></script>. When you include a jQuery plug-in file to a page, it must go after the <script> tag that links the jQuery file to the page. That’s because plug-ins are dependent on the programming in the jQuery file and you’ll usually end up with an error if the files aren’t attached in the proper order. Next, you’ll make the table sortable.
- Add a blank line between the two sets of }); at the bottom of the script you added and type $(‘table.sortable’).tablesorter();The table has a class of sortable applied to it, so the selector $(‘table.sortable’) will select this table, but leave any other tables on the page alone. All of the code you’ve added so far should now look like this:
- Save the page and view it in a Web browser. Click on any of the column heads at the top of the table to sort that column in ascending order (A-Z or 0-100); click a header a second time and the column sorts in descending order (Z-A or 100-0). At this point, you’ve probably noticed something wrong with how the page is working: When you sort a column, the striped rows are also resorted, so you no longer have alternating rows of color. You’ll fix that next.
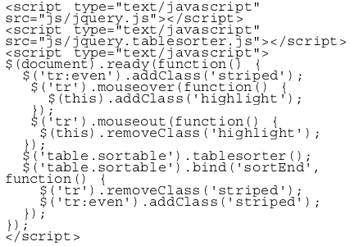
- Add another empty line after the tablesorter code you just added and type the following four lines of code:

In a nutshell, this code runs a function that removes the striped class from all table rows, then adds it back to just every other row. The function only runs when the sorting process completes (that’s the ‘sortEnd’) part.
The fully completed code should look like this:
Save the file and preview it in a browser (Figure 4). View the stripes, mouse over the rows to see them change color, click the header to sort the table, and admire what can be done with a powerful JavaScript library and just a few lines of code.
Figure 4. The file completed_table.html (included in the javascript_site folder) contains the finished version of the tutorial. Click on the image for a larger version of this screenshot.

Notes on Using the Tablesorter Plug-in
There are a couple things to keep in mind when using the jQuery tablesorter plug-in. First, for the plug-in to work you must have <thead> and <tbody> tags in your table. The first encloses the table row containing the column headers (use the <th> tag for headers), and the second encloses the rows that contain the data (tags) for the table. You can find more on these tags at https://www.htmldog.com/reference/htmltags/thead/ and https://www.htmldog.com/reference/htmltags/tbody/.
Secondly, you’ll notice in the tutorial that when you click one of the column headers to sort the table contents, the header’s appearance changes — an arrow appears indicating the sort order. You control that effect with two CSS styles, th.headerSortDown (the look of the table column header when that column is sorted A-Z) and th.headerSortUp (column header when sorted (Z-A). You can edit these styles to change the look of these column headers.
The tablesorter plug-in has even more cool sorting power. For the details, read the documentation at https://www.tablesorter.com/docs/.
Moving Forward
This article has been a whirlwind introduction to using JavaScript libraries to enhance your Web pages. Although the code you typed may look stranger than friendly ol’ HTML, you didn’t have to add much to get a lot of visual and interactive punch.
In future articles, I’ll revisit the jQuery library and show you other ways to improve the look and feel of your Web pages. If you’d like to do some reading between now and then, try the information and tutorials at https://docs.jquery.com/Main_Page, https://jquery.open2space.com/, and https://jqueryfordesigners.com/.
This article was last modified on January 8, 2023
This article was first published on February 25, 2008
Commenting is easier and faster when you're logged in!

Recommended for you

FontAgent Pro for Windows Unveiled
Attendees of NEXPO, one of the world’s largest technology exhibitions for...

Using Envelope Distort in Illustrator
Learn how to mold vector artwork to fit any shape in Adobe Illustrator

Making E-Mail Blasts from InDesign Documents
Gary wrote: Up until now, I've just been doing basic graphic design work, but to...