
View Source: The Easy Way to Add Dynamic Elements to Web Sites
Until recently, you probably only used the word “spry” to describe an aging yet still nimble person. But Dreamweaver CS3 introduced the world to a new meaning of the word: an exciting set of tools based on Adobe’s Spry Framework for Ajax. Spry is a set of JavaScript files that let you easily add dynamic elements, such as drop-down navigation menus, tabbed panels, and interactive data tables, to a Web page. The Spry framework isn’t actually a part of Dreamweaver — it’s a separate Adobe project. However, Dreamweaver CS3 includes a friendly user interface for adding many Spry-driven page elements (called “widgets”).
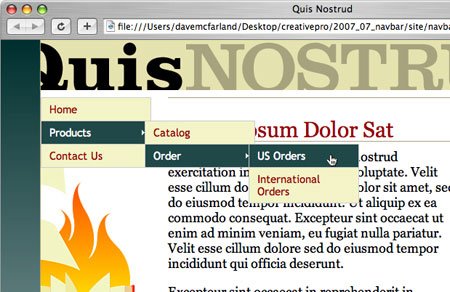
One of Dreamweaver CS3’s most useful widgets is the Spry Menu Bar (Figure 1). The Spry Menu Bar provides a way to include lots of links in a compact space. Each menu button can include an additional pop-up menu, and each button on one of those pop-up menus can have yet another pop-up menu. So in addition to the main navigation buttons, the Spry menu bar supports two levels of pop-up submenus.

Figure 1. Dreamweaver CS3’s new Spry Menu Bar lets you create interactive navigation bars with up to two levels of pop-up sub menus.
With Spry menu bars, you don’t ever have to worry about the complex JavaScript required to make pop-up menus pop. But while Dreamweaver makes it easy to insert a Spry Menu Bar, you still need to be familiar with the new interface for modifying the menu bar, and understand the long list of CSS styles that make the menu bar look good, so you can change its appearance to match your site’s design.
Adding a Spry Menu Bar to a Web page is a three-step process. First, you tell Dreamweaver to insert the menu bar, which adds a JavaScript file and a CSS file to your site and adds HTML to create a “starter menu” of links. Second, you edit the menu Dreamweaver inserted by changing the text of the menu buttons, and adding new menu options and links to other pages on your site. Finally, you modify the CSS that Dreamweaver supplies to match the look of your site.
This tutorial will take you step-by-step through adding and modifying a Spry Menu Bar.
Insert a Spry Menu Bar
Adding a Spry Menu Bar to a Web page is a snap. To follow along with these instructions, download the folder below, then double-click on the folder to uncompress its files:
- spry_menu_site.zip
- Open Dreamweaver and choose Site> New Site. Click the Advanced tab in the Site Definition window and type in “Spry Menu” for the site’s name. Click the folder icon to the right of the Local Root Folder field and select spry_menu_site, which is the folder you downloaded and uncompressed. Click OK to finish defining the new site.
- In the Files panel, double-click the file navbar.html (or choose File> Open and open the file navbar.hml in the spry_menu_site folder).
- Click in the page’s left-hand column (just above the graphic of the flaming book).This is the general process to follow whenever you wish to add a navigation bar — just click on the page where you want the nav bar to go.
- Choose Insert> Spry> Spry Menu Bar. The Spry Menu Bar window appears. Here you choose the orientation of the navigation bar: horizontal (a row of buttons as you might see near the top of a Web page) or vertical (a column of buttons commonly used as a left-hand nav bar.) For this tutorial, choose Vertical, then click OK.Dreamweaver inserts a column of four buttons labeled “Item 1”, “Item 2”, and so on. A blue tab labeled “Spry Menu Bar: MenuBar1” appears at the top of the buttons. This tab identifies the menu bar, and you click it to edit the list of links of the navigation bar.
- Choose File> Save.Dreamweaver pops open a dialog box that lets you know it has saved several files to the site. When you add a Spry widget, Dreamweaver stores a JavaScript file, a CSS file, and several graphic files in a folder named “SpryAssets” in the site’s root folder. These files make the Spry magic possible, so don’t delete them, and be sure to move them to the Web server when you’re ready to publish your Spry-enabled Web pages.
Edit the Menu Bar
To make the generic menu bar Dreamweaver inserts match the structure of your site, you need to edit, add, and delete buttons.- Click the blue tab to select the menu bar. The Property Inspector displays the properties of the menu bar (Figure 2).
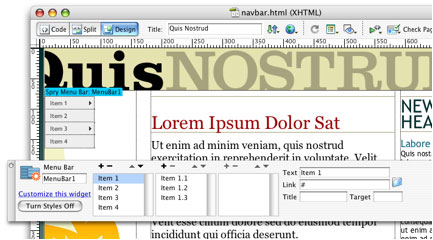
Figure 2. Dreamweaver inserts a generic menu bar with four buttons (Item 1, Item 2, and so on).
There are three columns, each of which list the names that appear on the menu’s buttons. The left column represents the buttons for the main navigation bar (Item 1, Item 2, etc.). The middle column represents the buttons of a pop-up menu for a button selected in the left column; for example, the generic Item 1 button has a pop-up menu with more buttons (Item 1.1, Item 1.2, and Item 1.3). The last column represents a sub-sub menu — in other words, a pop-up menu that appears when you mouse over a button on the first pop-up menu.
There’s no rule that you must have two levels of pop-up menus — whether you add a sub-sub menu depends on the complexity of your site’s structure. Many designers avoid a second level of pop-up menus. - In the Property Inspector, click Item 1. In the text field at the right side of the inspector, change Item 1 to Home.
- Click the folder icon to the right of the Link box and select the file index.html from the site. This makes the button a functioning link that points to the home page of the site.Dreamweaver’s generic menu bar includes a pop-up menu on the first button. In this case — a link to the home page — you don’t need a pop-up menu, so you’re about to get rid of it.
- In the Property Inspector, click Item 1.1 in the second column of buttons. Click the minus (-) button at the top of the column to delete Item 1.1. Repeat this step to delete Item 1.2 and Item 1.3.
- Select Item 2 in the left column and, in the Text field at the right of the Property Inspector, change its name to Products. Add a link to the file products.html.Next, you’ll add a pop-up menu to this nav button.
- Make sure you still have Products selected in the left-hand column. Click the plus (+) button in the middle column to add a new pop-up menu and button. Change its name to Catalog and link it to catalog.html.
- Repeat the last step to add another button named Order, which links to order.html.You can add yet another pop-up menu to create a sub-sub-menu. You’ll do that in the next step with the Order button you just created.
- Make sure Order is selected in the middle column of the Property Inspector. Click the plus (+) button in the third column and type “US Orders” in the Text field and link the new button to us.html. Add another button named International Orders and link it to international.html.Next, you’ll add one last button to the top level of the main nav bar.
- On the left column in the Property Inspector, select Item 3; rename the button Contact Us and link it to contact.html.Finally, clean up the rest of the navigation bar by removing the pop-up menu attached to the Contact Us button (see Step 4) and removing Item 4 from the main menu.
Style the Menu Bar
Now that you’ve inserted and modified the Spry menu bar, you have a fully functional navigation system. Unfortunately, the generic look of the Spry Menu bar probably doesn’t match the style of your site. To change the menu buttons’ appearance, you must edit the Dreamweaver-supplied CSS styles. The look of the menu buttons is defined by a set of CSS styles located in SpryMenuBarVertical.css (for vertical menus) and SpryMenuBarHorizontal.css (for the side-by-side look of horizontal buttons).
There are a few styles you’ll probably want to change most of the time: the width of the menu buttons, borders around menus, and the text and background color for menu buttons. In addition, each menu button changes appearance when you move your mouse over it, so you’ll probably want to change the text and background color for buttons when they’re moused over.
Figure 3 below shows formatting for menus and menu buttons and the CSS style name that controls that formatting.

Figure 3.
Now you’ll change the look of the navigation bar you created earlier.- Open the CSS Styles panel (Window> CSS Styles). To see all of the menu bar styles, click the plus (+) button (triangle on the Mac) next to the style sheet name SpryMenuBarVertical.css (Figure 4).

Figure 4. Use the CSS Styles panel to view and edit the CSS styles that format a Spry Menu Bar. - In the CSS Styles Panel, double-click the style ul.MenuBarVertical. This opens the CSS Rule Definition window. Change the font size to 150%, then click the Box category and change the width to 150 pixels. Click OK to finish editing the style.
- You’ve just enlarged the font size and made the menu fit the entire width of the left-hand column. If you preview the page, however, you’ll see that although the border that surrounds the main menu expands to 150 pixels, the actual menu buttons aren’t as wide. That’s because a separate style controls the width of the menu buttons. In the CSS Styles Panel, double-click the style ul.MenuBarVertical li. Click the Box category and change its width to 150 pixels. Click OK to finish editing the style.
- The width of pop-up menus and the buttons on pop-up menus are defined by two other styles. Follow the previous step and set the width of the ul.MenuBarVertical ul and ul.MenuBarVertical ul li to 150 pixels.
- Next, you’ll change the background color and text color for the buttons. In the Styles panel, double-click the style ul.MenuBarVertical a. In the Type category, change the color to #990000. Click the Background category and change the background color to #F3F4C7. Click the OK button to finish editing the style.
- If you preview the page now, you’ll notice that the buttons change to an alarming shade of blue when you mouse over them. You’ll change that color next. In the Styles panel, double-click the ul.MenuBarVertical a.MenuBarItemHover. Click the Background category and change the background color to #1F4848.This change won’t affect page display in Internet Explorer 6, however. Edit the style ul.MenuBarVertical a:hover and change that style’s background color to #1F4848.
Now the menu looks good, but it would look better with lines separating each button. - In the CSS Styles Panel, double-click the style ul.MenuBarVertical a. Click the Border category. Uncheck the 3 Same for All boxes, and add a solid 1-pixel bottom border with a color of #CCC (Figure 5). Click OK to finish the style.

Figure 5. You can add a border to any styled element using the Border category of Dreamweaver’s CSS Rule Definition window. To change individual border lines, uncheck the three Same for All boxes.
You may notice that the bottom of the menu has a double border. The bottom border you’ve just added applies to each menu button, but the overall menu has an outline around it, as well. That means the 1-pixel bottom border for the last button in the menu sits on top of the bottom border of the menu. A quick fix for this is to edit both the main menu (ul.MenuBarVertical) and the pop-up menu (ul.MenuBarVertical ul) styles. Remove the bottom border from those styles. - Preview the page in a Web browser. It should look like Figure 1 in this article. There’s a finished version of the page in the folder you downloaded and decompressed. Look for the sub-folder FINISHED_NAVBAR.
You can further change the look of the navigation bar by editing the CSS styles in the SpryMenuBarVertical.css file. To quickly discover which properties are applied to each style, select the style name in the CSS styles panel and view the CSS properties associated with that style in the Properties pane (see the bottom pane in Figure 4 above).
You may also want to change the look of the arrows that appear on any button with a pop-up menu. The graphic signals users that a pop-up menu will appear if you mouse over the button. Dreamweaver inserts four graphics into the SpryAssets folder along with the JavaScript and CSS file used to control and format the navigation bar. The files are SpryMenuBarRight.gif (a right-pointing arrow), SpryMenuBarRightHover.gif (a right-pointing arrow that appears when you mouse over a button with a pop-up menu), SpryMenuBarDown.gif (a down-pointing arrow used with horizontal nav bars), and SpryMenuBarDownHover.gif (the rollover version of the down-pointing arrow.) You can create new graphics with the same names — keep the images small, around 7×7 pixels — and replace the images Dreamweaver puts in the SpryAssets folder.
Once you know the ins and outs of the tools interface and you’ve learned how the supplied CSS styles format the menu, you’ll see that the Spry Menu Bar is easy to insert and modify — certainly much easier than coding it all by hand!
This article was last modified on January 8, 2023
This article was first published on July 11, 2007
Commenting is easier and faster when you're logged in!

Recommended for you

iPhotographer Magazine Free Issue
iPhotographer magazine covers world of mobile photography with inspirational ima...

Don’t forget to show your edge(s)
Many InDesign users have a dislike of frame edges due to their somewhat distract...

Napoleon and the Courier Font
In 1985, if you were asked to name the most-used typeface in the world, the answ...