
ViewSource: Build Interactive HTML Tables with Dreamweaver CS4

While HTML tables have been used in many different ways during the short life of HTML, they’re best suited for their original purpose — displaying data. A table’s spreadsheet-like presentation is a concise way to display products, employee information, flight schedules, and any other data that can be neatly divided into rows and columns. In fact, tables are common in many programs; for example, most e-mail applications list e-mail in rows with columns for the subject, date received, the address of the sender, and so on.
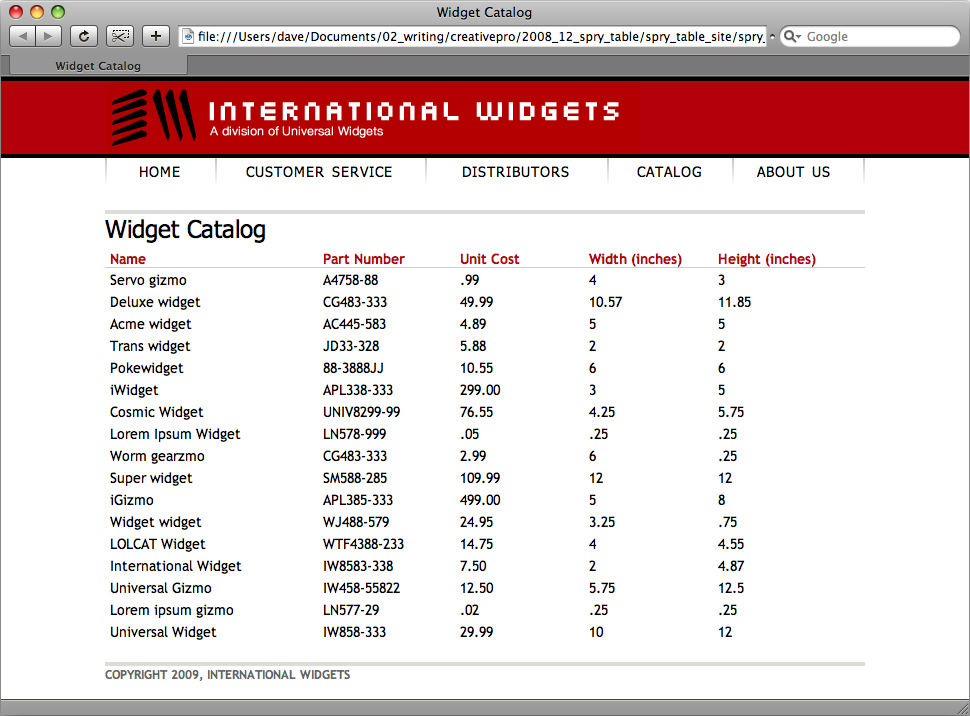
Unfortunately, HTML tables lack the user-friendliness of spread sheet or e-mail programs, where it’s easy to sort data by date, price, name, etc. On many e-commerce Web sites, if you try to re-order a list of products from least to most expensive, you usually need to load a new Web page with the information sorted correctly. Fortunately, with a little help from JavaScript, Dreamweaver CS4 lets you super-power your HTML tables so site visitors can quickly sort data without having to leave the current Web page (Figure 1).
Figure 1. An HTML table is the best way to display rows and columns of information such as an employee listing or catalog of products. Click on the image for a larger version.
Introducing Spry Data Sets
In this article, you’ll learn how to create interactive data tables using Dreamweaver CS4’s Spry data sets. Spry data sets are one example of the many Dreamweaver tools based on Adobe’s Spry Framework. Basically, Spry is a collection of JavaScript files that adds the programming necessary to turn plain HTML into an interactive experience. In previous articles, I covered the Spry Menu bar, which lets you create drop-down navigation menus, and Spry form-validation tools, which prevent users from submitting forms with incorrect or missing information.
Although Spry data set tools were in Dreamweaver CS3, they worked only with data contained in XML files. In other words, in Dreamweaver CS3, you can create the kinds of interactive tables you’ll learn about here, but you have to keep your data in a separate file formatted in XML (not exactly something we Web designers do every day).
In Dreamweaver CS4, however, Adobe added support for plain HTML tables — no need for XML. In addition, you don’t need to put the HTML table in a separate file (as you do with XML data), so you can easily supercharge HTML tables on pages you’ve already created.
Spry data sets are very flexible and let you display XML or HTML table data in a variety of different ways. (Visit Chia Vet for one way to present data interactively that doesn’t seem like a table.) For this article, I’ll concentrate on improving regular HTML tables.
With Dreamweaver CS4, you can use the Spry data set to add the following to your ho-hum tables:
- Make rows sortable by clicking on column headers. For example, you could sort the rows in a table of product listings by price, by clicking the “Price” column. Rows can be sorted both in ascending order (A-Z, 1-100) or descending order (Z-A, 100-1).
- Automatically format alternating rows. The Spry programming can apply different class names to odd and even rows in a table, letting you create CSS styles that format rows with alternating background colors for increased readability. This doesn’t really have anything to do with making the table sortable, but it’s a great feature if you usually apply alternating row colors to tables by hand.
An Overview of Spry Data Sets
To create more useful HTML tables, you need to follow a few steps:
- Create a plain-vanilla HTML table composed of rows and columns. The first row should contain table headers (the <th> tag) that indicate the content in each column; for example, “Product Name,” “Product Price,” and so on.
- Add an ID to the table. The ID is a small bit of HTML used to identify the table for the Spry data set programming. It’s a simple process using the Property Inspector, as you’ll see shortly.
- Create a couple of CSS styles. The programming provided by the Spry data set adds a separate class name to both odd and even table rows. You can create two different classes to apply different looks to alternating rows of data.
- Insert a Spry data set. Another enhancement to Dreamweaver CS4 data sets is a simple data set wizard that takes you step-by-step through the process of adding the proper programming to your page.
Using a Spry Data Set
To follow along with this tutorial, download the files below:
spry_table_site.zip
After you unzip that, you’ll have a folder named spry_table_site, containing the files for this tutorial. Time to get to work!
- Launch Dreamweaver and choose Site > New Site. Click the Advanced tab in the Site Definition window, and type Spry data set for the site’s name. Click the folder icon to the right of the “Local Root Folder” field and select the folder you downloaded: spry_table_site. Click OK to finish defining the new site.
- In the Files panel, double-click the file spry_table.html (or choose File > Open and open the file spry_table.html in the spry_table_site folder). This page already has a basic table’s worth of product information. I created it using the Insert > Table tool. If you’re not sure how to create tables in Dreamweaver, visit https://tinyurl.com/ywnsr7.
- Select the table by moving your mouse to the bottom of the table until a red border appears, then click. Alternatively, you can click anywhere inside the table, then click “table” in the tag selector in the lower left of the Web page’s document window. Or, you can click anywhere inside the table and then choose Edit > Select All twice.
- In the Property Inspector, type “products” in the box that appears at the left side below the word “Table” (Figure 2). Doing this adds an ID property with the name “products” to the table, which is necessary for the Spry data set to work.
Figure 2. The Property Inspector provides a simple way to add an ID attribute to almost any HTML tag. In this case, typing “products” in the text field below the world “Table” adds the ID name “products” to the table tag.

- Next you’ll create a couple of styles that will come in handy when you use Dreamweaver’s Spry data set wizard. These styles will format alternating rows in the table. Click the + button at the bottom of the CSS Styles panel. (If the panel isn’t open, choose Window > CSS Styles.) The New CSS Styles window appears (Figure 3).
Figure 3. The New CSS Rule window changed a lot in Dreamweaver CS4. One addition is the text box in the middle of the window, which explains what HTML elements the style will apply to. Click on the image for a larger version.

- From the top menu, choose Class. Type “.odd” in the middle text field, then select global.css from the bottom menu. Click the OK button. The Rule Definition window opens.
- Click the Background category and type “#FFFFE6” for the background color. This will become the background color for all odd rows. You can set any CSS properties you want for this, such as adding a background image, or changing the text color. Click OK to complete the style.
- Repeat steps 5 through 7 to create another class style named “.even”. Set that style’s background color to #F2F2F2. Now you’re ready to add the Spry data set.
- On the Web page, click to the right of the Widget Catalog headline and press the Enter (or Return) key. This creates a new, empty paragraph where you’ll insert the Spry table. You may be thinking that there’s already a table on the page, so why add another? This is one of the weird things about Spry tables: the Spry programming is actually going to create a new table using the data supplied from the existing table. You’ll see how this works in a moment.
- Choose Insert > Spry > Spry Data Set to open the Spry Data Set window (Figure 4). The settings at the top of the window (Select Data Type, Data set name, and Detect) are set for working with HTML tables by default, so you don’t need to make any changes here.
- Click the Browse button to open a Select File Source window. Now you need to tell Dreamweaver which file contains the HTML table you want to use. (That’s because the Spry Data Set tool was originally created to import data from another file — an XML file. It still works that way, so even when you create an interactive table with data from the page you’re working on, you still must use this dialog box to select the Web page.) Double-click the spry_table.html file to select it. The middle section of the window displays the current Web page (pictured in Figure 4.)
Figure 4. The Spry data set wizard (new in Dreamweaver CS4) makes the process of creating an interactive data table simple. Click on the image for a larger version.

- Next you need to tell Dreamweaver which table to use. Click the arrow to the left of the table pictured in the preview (circled in Figure 4). This selects the table from which the Spry data set is created. A preview of the data appears in the bottom of the window.
- Click the Next button to move to the next screen, called Set Data Options (Figure 5 below). On this screen you can set various options related to sorting the table data. Most importantly, you can tell Dreamweaver which type of data is in each column, so that it knows how to sort the data. For example, if a column contains product prices, the data is numeric, but if the column contains product names, it contains text (called a “string”). In this case, there are three columns containing numeric information: Unit Cost, Width, and Height.
- Click the Unit_Cost column and choose “number” from the type menu (as pictured in Figure 5). Repeat this step for the Width and Height columns.
- Choose “Name” from the Sort Column menu in the lower left of the window (circled in Figure 5). This menu determines whether a table is sorted when the page first loads, and if so, which column is used to sort the rows. In this case, the table will be sorted by product name in alphabetical order (A to Z).
Figure 5. To make a column sortable, let Dreamweaver know what type of information — text (string), numbers, dates, or raw HTML — is stored in the column. In this case, since the Unit Cost column contains prices, choose “number” from the Type menu at the top of the window. Click on the image for a larger version.

- Click the Next button, which takes you to the “Choose Insert Options” window. Here you can pick from four data layout designs. (As I mentioned earlier, the Spry data set tool can present data in different ways; a regular HTML table like you’re creating here is just one option.) Check the first option — Insert table — and then click the Set Up button under that option.
- The Insert Table options window opens (Figure 6). Here you pick which columns are sortable and assign classes to table elements. For this table, visitors might want to sort products by name, price, and size, but probably won’t need to sort by the product number. Click Part_Number and uncheck the box Sort column when header is clicked.
Figure 6. The Hover class and Select class options let you assign class styles to a table row when a visitor mouses over the row, or when the visitor clicks the row. Click on the image for a larger version.

- From the Odd row class menu, select “odd”; from the Even row class menu, select “even”. These names relate to the two class styles you created earlier and will be assigned to alternating rows in the table.
- Click OK to close the Insert Table options window, then click the Done button to insert the new Spry table. You’ll notice that Dreamweaver inserts a second table above the original table.
- The new table is only two rows, and it doesn’t display any of the data from the original table. The first row is regular HTML — a bunch of table headers (<th> tags) containing text that identifies the content in each column; for example, “Name”. The second row is a special row containing Spry data. The items in the table cells in this row have a blue background and are enclosed in curly brackets like this. You can’t edit the text in these cells — they’re simply placeholders for data that will come from the original HTML table. You can however, select the text and apply a Class name using the Property Inspector if you want to add some CSS style magic to the cells. This may seem unusual, but it’s how it works.
However, when a visitor views this page in a Web browser, she’ll see only one table — the Spry table — which is generated when the page loads using the data from the original table. (Welcome to the crazy world of JavaScript.) If you don’t believe me, preview the page in a Web browser right now and you’ll see.
The table design itself needs a little help — it doesn’t fit the available width and there’s extra space around the individual cells. Let’s take care of that now.
- Select the table using any of the techniques mentioned in Step 3. In the Property Inspector, set the width to 100% and the CellPad, CellSpace, and Border properties to 0. In addition, you should remove the underscore characters Dreamweaver inserted in the table header cells in the Spry data table. For example, change Unit_Cost to Unit Cost and Width_(inches) to Width (inches). Those header cells are regular HTML so you can change them in any way you’d like, including adding CSS class styles to change their appearance or simply editing the text Dreamweaver inserted.
TIP: Although Dreamweaver doesn’t highlight a sortable column when you click its associated table header at the top of the column, you can add a little CSS to clearly indicate that you can click on a column header.
First, create a class style named something like “.sortable”. Set its Cursor property to “pointer” via Dreamweaver’s CSS Rule Definition window under the Extensions category. Just type “pointer” in the Cursor text box.
Once you’ve created this style, apply the class name to the <th> (table header) tag for each sortable column. For example, in the tutorial for this article, you would add the class “sortable” to the <th> tags for the Name, Unit Cost, Width, and Height columns. The pointer setting for the Cursor property will change the cursor to look like a hand — the same icon you get when hovering over links. In this way, you’re telling visitors “You can click this!”
Next, create another style, what Dreamweaver CS4 calls a “compound style,” named “.sortable:hover.” This style will appear when the visitor mouses over the sortable column header, and it can act like a rollover highlight. You can change the text color, background color, or whatever you’d like. (Note that since Internet Explorer 6 and earlier doesn’t support hover effects on non-link elements, you won’t see any effect from the .sortable:hover style. However, that style does work in IE 7, Firefox, Safari, and Opera.)
Dreamweaver CS4’s New Live View
At this point, you have a fully functional, interactive, sortable Spry data table. You can preview and test this table (and other JavaScript effects) directly within Dreamweaver CS4 using a new feature called Live View. To activate Live View, click the Live View button in the toolbar at the top of the document window (circled in Figure 7 below) or choose View > Live View.
When Dreamweaver switches to Live View, the original table disappears, and the Spry table complete with all of the data appears (Figure 7). Click Unit Cost at the top of the product cost column to experience how you can sort the data in the table. Click once to sort from least to most expensive, and click again to sort from most expensive to least expensive.
Figure 7. A sortable Spry data table, complete with styling of alternate table rows. This is a preview directly within Dreamweaver CS4’s Live View feature. Click the Live View button a second time to return to editing mode. Click on the image for a larger version.

Unfortunately, Dreamweaver doesn’t provide any way to show which column is being sorted on. However, Dreamweaver CS4’s new support for HTML tables with Spry data sets does give you a simple way to supercharge your own HTML tables and make them interactive and more attractive.
This article was last modified on January 8, 2023
This article was first published on January 7, 2009
Commenting is easier and faster when you're logged in!

Recommended for you
Morisawa Font Library Now Available Outside Japan
Morisawa, one of the most prestigious type foundries in Japan, first made its fo...

Designing A Logo for Every Size & Usage
Designing a typographic logo, or word mark, isn’t as simple as coming up with on...

Image Source Partners with Fair Trade Photo Collection
Image Source, the world’s leading independent producer of royalty free sto...