
Vintage Photoshop How-To: Part 1
In this tutorial, you will learn how to create the look of an aged, hand-tinted photograph (Figure 1) by using Photoshop’s masks, fill and adjustment layers, blending modes, and layer styles.  Figure 1. This animated GIF shows the photo before and after you manipulate it in Photoshop. This composition is the first in a series I plan to create for a bound collection of postcards using the images of a talented photographer I know from Japan who happens to be my wife. She has kindly agreed to let you download the photo used in this composition so you can work through tutorial. Please remember the image is copyrighted and cannot be sold or reproduced without her permission. Download Tutorial Files, approximately 9MB. Getting Started I am big on working nondestructively. That means working in a way that keeps your options open and allows you to make changes quickly and easily, without damaging your original image. To work nondestructively you need to use masks. The first thing you will do in this tutorial is use a layer mask to create the aged, distressed-looking outer border of the photograph. The main thing to remember when masking is that white reveals and black conceals. Photoshop comes with a large array of brush presets. You can access the brushes by selecting the Brush tool and opening the Brushes Presets picker on the left side of the options bar next to the word Brush, or by opening the Brushes palette by pressing F5, or clicking on the Brushes palette icon near the right end of the options bar. To create the distressed look of the border, you will be using brushes I refer to as texture/grunge brushes. Photoshop assigns these artistic names such as Chalk, Rolled Rag, Sponge, and so on. Some of these are available in Photoshop’s default set of brushes. For a wider range of brushes, click on the small triangle in the upper right of the Brushes Preset picker and choose Faux Finish Brushes from the drop-down menu. When the dialog appears, choose Append and click OK. You can also create your own grunge brushes, and numerous Web sites offer free brushes that you can load into Photoshop to greatly increase your brushes arsenal. Step 1 Open the image you downloaded that’s called Bike.tif. Double-click on the background layer and rename it “bike”. Step 2 Add a layer mask by clicking on the Add Layer Mask button at the bottom of the Layers palette. Make your foreground color black. Step 3 From the Brushes Presets choose the brush named Chalk. It may help if you choose Large List (Figure 2) from the drop down menu. This will provide you with the names of the brushes as well as the icons for the various brushes.
  Figure 2. Choose Large List from the Brushes Presets drop down menu. Step 4 Make the brush about 100px in diameter. You can use either the Standard or the Airbrush mode for this project. Out of habit I tend to use Airbrush most of the time. If you use Standard mode, reduce the brush opacity in the options bar to about 30%. If you use the Airbrush mode, reduce the flow to 30%. It’s easy if you stick to one or the other. Step 5 Be sure the foreground color is black (remember, black conceals). Use a series of strokes and scrubbing motions to mask the edge of the photo (Figure 3). Do not try to create the effect using only one brush or one size of a particular brush. Vary the brushes and sizes quite a bit to get an irregular, organic-looking edge. Some of the other brushes I used were Rolled Rag, Sponge, and Stencil Spray Wet. You may want to duplicate the layer several times (Command-J on Mac, Control-J on PC) and repeat the process several times until you get something you are happy with.
  Figure 3. Use different types and sizes of brushes for a more organic border. Creating a good distressed border takes some practice and experimentation. Don’t get discouraged if yours doesn’t look like mine right off the bat. Step 6 Add a solid color fill layer by clicking on the Create New Fill or Adjustment Layer button at the bottom of the layers palette. Choose Solid Color at the top of the menu (Figure 4).
  Figure 4. Add a solid color fill layer. Step 7 When the Color Picker appears, choose a light to middle value warm grey and click OK. Move the fill layer below “bike” in the layers palette stack (Figure 5).
  Figure 5. Change the fill color and make it the bottom layer. Step 8 Save your document as Postcard.psd. Set the Mood and Focus Attention Step 9 Add a levels adjustment layer (Layer > New Adjustment Layer > Levels). Lighten the entire image by moving the right and middle sliders to the left until the Input Levels at the top of the dialog read approximately 0, 1.44, and 196 (Figure 6).
  Figure 6. The Levels dialog box. Step 10 Go to Edit > Fill and choose Foreground Color if your foreground color is currently black, otherwise choose Black from the drop down menu. This will completely hide the effect you just created. Step 11 Change your foreground color to white (white reveals) and use one of the texture/grunge brushes (Chalk, for example) to selectively reveal the effect. Concentrate mainly on the center of the image. Leave the edges dark. Now your image should look something like the left pane of Figure 7, and the mask should look like the pane on the right.
  Figure 7. You photo and mask should resemble this.Click on the image to see a larger version. Note: You can view just the mask by pressing Option (Alt on the PC) and clicking on the thumbnail of the mask in the layers palette. Add a Hand-Tinted Look Step 12 Use the Create New Adjustment Layer icon to make a new solid color fill layer above the levels adjustment layer. Choose a turquoise color from the Color Picker (I used 86, 215, 243). Change the layer’s blending mode at the top of the Layers palette to Color and reduce the Opacity to 14%. Step 13 This next bit sounds a little confusing at first, but it’s a very useful technique that you need to learn. Highlight the layer mask on the new colored fill layer, then Command-click (Control-click on the PC) on the thumbnail of the level’s adjustment layer mask. That will create a selection based on the level’s mask. Step 14 Fill the selection on the fill layer’s mask with black (Figure 8). This will hide the t
urquoise in the center portion of the image and leave it around the edges. Soften the edges of the mask using one of the texture brushes with a diameter of about 80px on a Flow or Opacity setting of about 30%. If the turquoise appears in the center of the image rather than the around the outside, press Command-I (Control-I on PC) to invert the mask.  Figure 8. The edges have a turquoise tinge to them now. Click on the image to see a larger version. Step 15 Next, give everything a warm, aged tone by adding a new adjustment layer. This time choose Photo Filter from the Adjustment Layer menu and select Warm Filter 85 from the filter’s drop down menu. Change the Layer opacity to 60% (Figure 9).
  Figure 9. Add a new adjustment layer and choose Photo Filter. Click on the image to see a larger version. Add the Look of Water Damage An important note about masking: When you make a selection and then add a mask, the area inside the selection will be white (REVEALED) and the area outside the selection will be black (HIDDEN). In the next steps you will use this feature with an adjustment layer to add texture to the image, creating the appearance of water damage. These steps will be easier if you undock the Layers and Channels palettes so that you can see both at the same time. Step 16 Open Abstract.tiff (Figure 10) and Select All (Command-A on Mac, Control-A on PC). Copy the selection (Command-C on Mac, Control-C on PC) then go back to Postcard.psd.
  Figure 10. The image called Abstract.tiff. Step 17 Open the Channels palette. Click on the small triangle in the upper right corner of the palette and from the drop-down menu choose New Channel (Figure 11). Name the channel “abstract”. In the dialog under Color Indicates, choose Selected Area and click OK. You have just created an alpha channel.
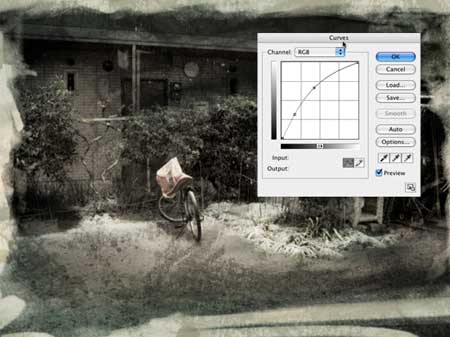
  Figure 11. Now you’ll work in the Channels palette. Step 18 When you click OK, the image window will be completely white. That’s because what you are seeing is the new channel, not the images in your Layers palette. Paste the image you copied from Abstract.tiff into the new channel (Command-V on Mac, Control-V on PC). Step 19 Use Free Transform (Command-T, Control-T on PC) to reduce the size and rotate the image to your liking. Click the box next to the RGB channel to turn on the eyeball. This will cause your alpha channel to appear red in the image window with the rest of the image visible below or behind it, allowing you to see how the alpha channel relates to the rest of the composition as you size it. I scaled the abstract texture to 57%. When you are happy with the way the texture relates to the photo of the bike, click the Check Mark in the Options bar. Step 20 Highlight the RGB composite channel. This should automatically hide the new alpha channel. If not, click the eyeball next to the alpha channel. Load the channel as a selection by Command-clicking (Control-clicking on PC) on the thumbnail of the new alpha channel in the Channels palette. Step 21 Go back to the Layers palette and add a curves adjustment layer. Name the layer “abstract texture”. Now here’s an important point: Adjustment layers automatically come with layer masks and, as I said at the beginning of this section, when you have an active selection and add a mask, only the area inside the selection will be revealed. That means when the Curves adjustment layer is created it will have a mask based on the alpha channel selection you just made. As you modify the adjustment layer, only the area inside the selection will affect the image below. Click on the curve in the Curves interface to add a point and move the point toward the upper left corner. To increase the effect, add a second point and move it up and to the left (Figure 12). A texture will appear on the image.
  Figure 12. Further change the image using a curves adjustment layer. Click on the image to see a larger version. Step 22 For an even more dramatic effect, duplicate the Curves layer. Change the blending mode of the copy layer to Color Burn and reduce the layer opacity to 50% That’s the end of Part 1. In Part 2 of this tutorial, you will create the title and the kanji (Chinese character) to the left of it using Photoshop’s Type tool, Layer styles, and the Distort filter. Then you will add a few finishing touches with the Shape and Painting tools.
This article was last modified on January 4, 2023
This article was first published on February 5, 2007
Commenting is easier and faster when you're logged in!

Recommended for you

Basic Tips for Color Management
In early December, a community of conference-goers explored best practices and n...

Adobe Releases Free Photoshop Extension for Blending Colors
Adobe has released a new free extension for Photoshop CS6 that provides two new...

dot-font: Fun with the Push Pin Legacy
dot-font was a collection of short articles written by editor and typographer Jo...