
Web How-To: Creating Pop-Up Menus in Dreamweaver and GoLive

This story is taken from “Inside Web Design” (Element K Journals).
Creativepro.com readers can subscribe to Element K Journals at a discount. Click here to learn more.
One of the newer interface styles to come into vogue is the DHTML pop-up menu, shown in figure 1. These menus allow the designer to reduce page clutter by concisely putting navigation in one area. Even though pop-up menus are wonderfully useful, many designers are hesitant to use them because of the technology needed to build them. Pop-up menus require the use of DHTML, which includes JavaScript, layers and CSS. If you aren’t comfortable working with those, then creating a pop-up menu can seem like a daunting task. However, we’ll show you that it isn’t really so bad, especially with the help of Macromedia Dreamweaver and Adobe GoLive. We’ll show you how each program handles pop-ups, but before that we need to cover some of the theory behind making the pop-up menus so that you’ll understand why we’re doing things the way we are.
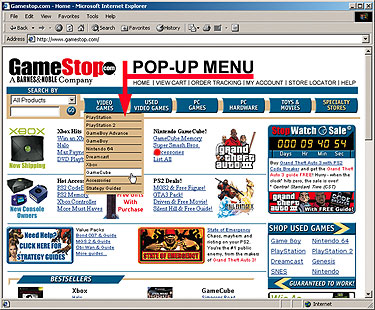
Figure 1: Pop-up menus are a real asset on content-heavy pages.
What’s on the Menu?
To illustrate our examples we’ll first tell you where pop-up menus won’t work. With that warning, we’ll then examine the theory behind creating pop-up menus using CSS and HTML as well as graphical elements. In this discussion, we’ll be incorporating JavaScript, graphics and CSS elements to build the menus. We’ll then show you how to create pop-up menus using both Dreamweaver and GoLive.
Before we get started, it’s important to realize that pop-up menus aren’t going to be universally ac-cessible on the Web. The techniques we’ll show you are compatible with IE 5+ and Netscape 6+ but not with Netscape 4.x or IE 4. If you know that your target audience is using older browsers, then you may want to consider incorporating other design alternatives into the site’s design such as redirecting or hiding things from older browsers.
Pop Theory
There are two different ways to go about creating pop-up menus. With one style, you rely more on CSS and use actual HTML text for the menu options. This style is easier to update and modify.
The second style utilizes all graphical menu elements. This style of menu is easier to put together and control, but more difficult to change. Your choice of which to make may depend somewhat on how much you expect to be editing the menu’s content. We’ll show you how to do both by covering the first style in Dreamweaver and the second in GoLive. Both applications make the creation of pop-ups much easier and more accessible to designers of all levels.
Pop-up Basics: Pop-up menus consist of a few different components, including JavaScript, CSS, graphics and layers, which are the most important parts of building pop-up menus. Layers allow you to stack graphics on top of each other within your Web page. They also allow you to animate objects on your page or, in the case of pop-up menus, turn groups of graphics on and off.
We’ll create separate layers to hold each of the menus that will pop up on our page. Those layers are initially invisible, and as we roll over or click the main button, the layers with the menu items appear so the user can make her choice.
Behaviors: The JavaScript that actually does that work in our pop-up menus is called a behavior, or action. These scripts are attached to an object on our page, such as an image or layer, and give them a behavior such as a rollover. Dreamweaver and GoLive each have their own way of working with scripts, as we’ll soon show you.
Creating the Graphics
For both pop-up styles you need to create basic menu type graphics. It’s always important to plan out your images before you start building. Your plan will be based on the menu method of choice. We’ll begin by reviewing your options when building a menu using text. Then we’ll outline the same general parameters when building a graphical menu. Finally we’ll highlight the need to use transparent GIFs to avoid problems when displaying these menus.
Text Menu: If you’re building a menu that will use text for the menu options, then things will be easier graphi-cally. You’ll only need to create one entire graphic for each menu. For this style of menu, we found that it worked better if we included the original button at the top of the menu graphic, as you can see in figure 2. This makes it easier to control the rollover function. The advantage to this style of menu is that it’s easy to edit and the text is easy to read.
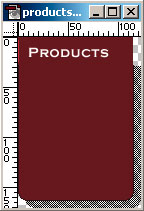
Figure 2: This single image will become the pop-up menu for our example in Dreamweaver.
Graphical Menu: If you’re building a graphical menu, you’ll have many more little pieces to deal with. You should also try to make as much of it as reusable as you can, such as the top bit, for padding and spacers, and the bottom of the menu. figure 3 shows how we broke apart the graphical menu that we’ll be using in GoLive. As you can see, we tried to keep the components simple and reusable.

Figure 3: We used 11 images to create the graphical pop-up menu in GoLive.
GIF Tricks: Finally, you need to remember that both menu styles are going to appear over part of your page content. If there are any curves or irregular shapes, you’ll need to use transparent GIFs for the graphics. Because of this, you won’t be able to anti-alias corners or angles. Also, keep in mind that you can’t use a standard Adobe Photoshop drop shadow. A neat trick for creating a similar effect in a GIF graphic is to fill the area where the drop shadow should be with alternating pixels of black and your background color. When you knock out the background color for transparency, you’ll have alternating black and transparent pixels that will look like a semi-transparent drop shadow on your page. You can see our shadow technique in both figure 2 and figure 3
This article was last modified on January 8, 2023
This article was first published on October 11, 2002
Commenting is easier and faster when you're logged in!

Recommended for you

Free Scripts Help Fix Word Formatting
Here are four useful, free scripts that will help you get formatted text into In...

Creating InDesign Scripts With Python
We publish a lot of content related to InDesign scripts here at InDesignSecrets...

OnRequest Images Releases World's Fastest and Most Advanced Photography Production Platform
OnRequest Images, the world’s leading provider of OnBrand custom imagery,...