
Web Tips: Shooting Video for the Web
Picture this: You’re at yet another meeting and everyone agrees that video clips embedded in the company Web site would really spice things up. Naturally, you’re the person who has been given the lucky task of producing those clips.
You head out of the office, camera in hand, planning to grab some of those great video images that you’ve seen gracing the pages of other Web sites — a hand on a phone, a traffic light turning green, the busy rush of commuter traffic.
You race back to the office, excitedly plug the camcorder into a monitor and… uh, well. Let’s say it looks more like the home video your uncle shot at your niece’s fifth birthday party — and it’s not nearly as interesting.
Getting the professional-looking images that will please your boss, your client, and yourself isn’t impossible, it just takes a little information and forethought. Follow these simple shooting guidelines to ease the transition from your camcorder to the Web.
Think Small
First, the most basic rule: Delivery is everything. Since you are eventually going to deliver to the Web, you’ll need to take the strengths and limitations of the Web into consideration when you shoot.
Video on the Web is small — rarely bigger than a quarter of the size of a standard video image (320 x 240 pixels) — and often as small as a 10 x 10 pixel button.
It’s also small in another way — it’s highly compressed in order to keep file sizes to a minimum. Unfortunately small, highly compressed video tends to not look very good (see Figure 1).
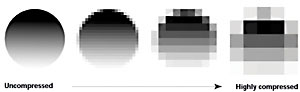
Figure 1: As compression increases, images become harder to read.
But there are some simple things to consider when you’re shooting that’ll help make the most of your Web video. Avoid the following:
- Stripes and other detailed patterns
- Wide shots, trees and other complicated subject matter (see Figure 2);
- Lots of camera movement;
- Lots of subject movement;
- High-contrast lighting;
- “Hot spots” (small areas of bright white highlights).

Figure 2: The wide shot on the left does not read well as a small image, it also has too much detail and the motion of the rollerbladers will not compress well. The image on the right is fairly simple, static, and easy to grasp even at this small size.
(For more about Web-video compression, see “Web How-To: Introduction to Streaming Media.”)
Design Your Shots
Everything else on your Website is designed, so why not invest some time in a little shot design?Start by making some thumbnail sketches of the images you want to get for your project. If it’s more of a narrative, you should also write out a script — format a word processing document with a column that’s half the width of the page on the right to leave room for your storyboard drawings on the left.
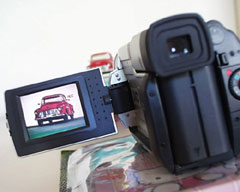
Figure 3: Your camcorder’s LCD screen can provide a good guide for framing 320×240 Web-video compositions.
As you develop ideas for shot compositions, ask yourself:
- Are you going to crop the image?You might want to create square, rather than rectangular, buttons, or make a close-up out of a wide shot. Frame your shots accordingly (see Figure 3).
- Will you be adding text over the image? If so, your shot compositions need to account for the space that will be taken up by text. Be aware that the text on a small Web movie will take up a greater percentage of the screen in order to be legible than the standard text you see on TV.
- Is there something in the image that must be seen? A product shot that must clearly display the logo, a sign that must be legible, whatever it is your shot composition needs to account for it.
- How will you separate the subject from the background? The more your subject stands out from the background, the more readable it will be later (see Figure 4).
- Where exactly does the camera need to be positioned to get the angle you want? Will you need a ladder or some scaffolding to get up high enough? What other tools will you need on the set?
- Are other people required to hold things or move things while you’re shooting? You might not be able to do it all yourself.
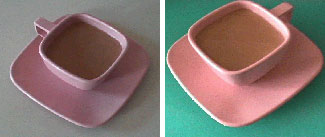
Figure 4: The pink coffee cup stands out more clearly against a cyan backdrop.
Once you have a strong visual image of your project, make a shot list — that is, a checklist of each shot you are going to get. During the shoot, you can cross off items as you go and double-check the list at the end to make sure you didn’t forget anything.
Use the Right Tools
For most Web video projects, a mini DV camcorder is the ideal choice (see Figure 5) — it offers great image quality for a very small price tag and, thanks to FireWire (a.k.a., iLink or IEEE1394) technology, getting the video from the camcorder into your computer for editing is relatively painless. Digital-8 makes another good choice since it shares the FireWire advantage, although it’s somewhat lower in quality than DV. An older consumer grade camcorder, such as VHS or Hi8, will work as well but the image quality will be visibly lower and you’ll need special hardware in order to get the video into your computer.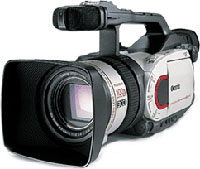
Figure 5: A DV camera, like this Canon GL1, is the ideal choice for most Web video shoots.
Take Control
Filmmaking is really all about control — controlling the camera, controlling the environment, controlling light, and controlling the subject. If you’ve ever seen the set of a big movie shoot (or even just the crew list at the end of a film), you have an idea just how many people it takes to get the kind of control that results in a beautifully shot feature film or commercial.But even if you have to go it alone there are still some ways to stay in control:
- Use a tripod. You can buy a decent video tripod for $50-$100, or you can rent one for a day from your local professional photographer’s store. DV camcorders tend to be very light weight, so you don’t need an expensive, heavy tripod but you do need something sturdier than the average still-camera tripod.
- If you don’t have a tripod, try placing your camera on a counter or table top. If your camera has it, use the image stabilization feature. If you have none of the above, turn yourself into a human tripod: Stand with your legs apart and slightly bent for balance, keep the lens zoomed all the way out — the tighter the zoom, the more visible any wobbliness becomes — and avoid moving your hands on the camera, since tiny, lightweight consumer camcorders jiggle at the slightest touch.
- Take care of your tapes. Keep them in the protective plastic boxes they came in. Avoid using the first minute or so of the tape — this is the part of the tape that’s exposed to the elements and most prone to damage. Avoid unnecessarily playing your tapes — tiny mini DV tapes are prone to damage caused by dust, try to use them as little as possible before you get them into your computer.
- Set the white balance properly. Some people consider white balancing an art form in and of itself, but for the rest of the world, just make sure it’s set to the sun icon for sunlight and the lightbulb icon for other light sources.
- Focus the camera manually. If you can, set the focus yourself. It’s not that hard and you won’t have to worry about the camera adjusting the focus in the middle of a shot because someone walked in front of it.
- Don’t use the zoom during a shot. Zooming is just another form of movement that won’t compress well. The same goes for pans and tilts. If you must use these camera moves, make them fast. The viewer is less likely to see the artifacts of poor compression in a fast zoom or pan than in a slow one.
- Don’t use the digital zoom — ever. Some consumer camcorders offer a special digital zoom that extends the capability of the camera by blowing up the image, resulting in lower resolution. If you need a closer shot of your subject than the mechanical zoom allows, move the camera closer.
- Always shoot in SP mode. If your camera offers a choice between SP and LP, or EP, always choose SP — other recording modes will result in lower image quality.
- Bring light bulbs of various wattages. If you’re shooting indoors, you can replace the bulbs in existing light fixures to improve the lighting. Clamp lights from the hardware store are also handy.
- Avoid harsh shadows on faces. If you’re shooting outside, the direct overhead sun can make ugly, harsh shadows in the eye sockets and around the nose. Move your subject into the shade or shoot near the end of the day when the sun is lower in the sky and not as bright. Also be aware of the shadow your own body casts when standing over an object (see Figure 6).
- Don’t forget about sound. If you’re shooting an interview, where clear dialogue is important, use an external microphone. If your camcorder doesn’t have a microphone jack, you can record sound separately, on a MiniDisc recorder, for example, or you can make sure to record in an environment where there is no background noise and the subject is no more than a few feet from the camera. Don’t forget to turn off air-conditioners, refrigerators, and fans — these things aren’t that noticeable in the real world but make a lot of noise in a recording.
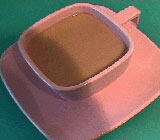
Figure 6: Sometimes your shadow is your own worst enemy.
Don’t Forget to Break Some Rules
Shooting video for the Web is all about rules and limitations, but don’t be afraid to experiment. For example, common wisdom dictates that the effects that come built-into your consumer-grade camcorder are cheesy. But you might find that you like some of your camera’s special effects – for example, I know I like the 4x slo-mo feature on my JVC camcorder, which creates images that look kind of blurry.After all, if you know what you want and time is of the essence, why not just shoot it the way you want to begin with? Caveat: This isn’t good advice for someone embarking on their first indie feature film — for that, I suggest you check out my book “The Digital Filmmaking Handbook (Second Edition),” co-authored with Ben Long — but for a simple Web clip, you can afford to take some short cuts and play around a little.
Read more Sonja Schenk.
This article was last modified on January 8, 2023
This article was first published on April 1, 2003
Commenting is easier and faster when you're logged in!

Recommended for you

QuarkXPress 5: Moving Ahead or Falling Behind?
QuarkXPress has been a darling of professional desktop publishers since its firs...


Taking control when control is needed
The InCopy workflow brings a lot of great benefits to the table including the ab...