
How-To: 10 Techniques for Copying Pages Between InDesign Documents
There are many reasons why you might want to combine pages or objects from one or more InDesign documents into other InDesign documents.

This article appears in Issue 45 of InDesign Magazine.
There are many reasons why you might want to combine pages or objects from one or more InDesign documents into other InDesign documents.
Perhaps you need to join unchanged pages from an old financial report with the new one; or use a previous design’s page geometry and elements as the template for a new project; or combine individual chapter NDDs into a single “book” that can be output as one long PDF; or… Whatever the case, InDesign has several paths to that end.
Method 1. Copy & Paste
Scenario: You want to copy objects or the entire content of a single page from one document to another.
Caveats: Too labor-intensive for copying more than a single page. Breaks text threading if one or more stories flow outside the selected frames. Styles may change if you have the same style names but different definitions between the two documents.
How-To:
- Open the source document, which I’ll call Document A.
- Ensure that all the objects you want to copy are individually unlocked and not on locked layers. If you want any master page items to come along when you copy, first override those items on the page.
- Use the keyboard shortcut CTRL+A/ CMD+A for Select All or drag the black arrow Selection tool such that a selec¬tion rectangle touches all the objects you want to select and thus copy (Figure 1).
- Press CTRL+C/CMD+C to copy those ob¬jects to the clipboard.
- Switch to Document B and navigate to (or create) the page onto which you want to paste the copied objects.
- Press ALT+SHIFT+CTRL+V/ OPT+SHIFT+CMD+V to invoke the Paste in Place command, which will paste the copied objects into the same place on the destination page as they occupied on the source page (assuming the page sizes are the same and that both documents are either facing pages or single sided).
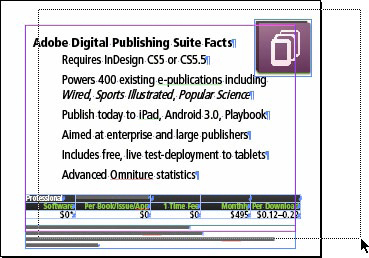
Figure 1: Select a full page of objects by dragging the Selection tool (a.k.a. the black arrow) across them.
Method 2. Drag & Drop
Scenario: You want to copy objects or the entire content of a single page from one document to another.
Caveats: Because this Method is very similar to the first Method, the caveats are the same.
How-To:
- Open both Document A and Document B in InDesign.
- CS4, CS5, and later: From the Arrange Documents menu button on the Application Bar, choose a window arrangement that puts both Document A and Document B onscreen together (e.g., 2-Up Vertical or any arrangement other than Consolidate All). CS3: Select Tile Vertically or Tile Horizontally from the Window > Arrange menu.
- Make sure that all the objects you want to copy are individually unlocked and not on locked layers. If you want any master page items to come along when you copy, first override those items on the page.
- Use the black arrow Selection tool select the object or objects you want to copy to Document B.
- Drag those objects from Document A and drop them in Document B (Figure 2).
- Reposition it/them in Document B if it’s necessary.
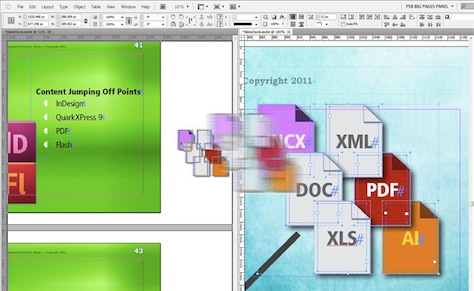
Figure 2: Dragging objects out of one document window (Document A on the right) into another document window (Document B on the left) copies those objects — even a full page of them.
Method 3. Book Them
Scenario: You have multiple documents that need to contain consecutive page numbering across all files and/or to output into a single print job, PDF, or ePUB.
Caveats: The page numbers of any individual document will be updated to reflect the document’s location within the consecutive ordering of the book — even when the document is opened independently of the book. Thus, if page numbers are indicated by Current, Next, or Previous Page Number markers, those page numbers will reflect the location of the page relative to the entire book page count.
How-To:
-
- In InDesign, choose File > New > Book.
- When prompted to save the new INDB book file, give it a name and save it in or near the same folder containing the INDDs you want to combine.
- After saving you’ll see a new book panel whose title matches the INDB you just saved. At the bottom of the book panel, click the plus sign Add Documents button.
- In the resulting Add Documents dialog box, navigate to one or more of the INDDs you want to include. (They don’t have to be in the same folder or even on the same computer, but you can add multiple files simultaneously only if they’re in the same folder.) Select one or more documents from a folder and click Open; InDesign instantly adds them to the book panel.
- Repeat the previous step as needed until all the necessary documents are in the book panel (Figure 3).
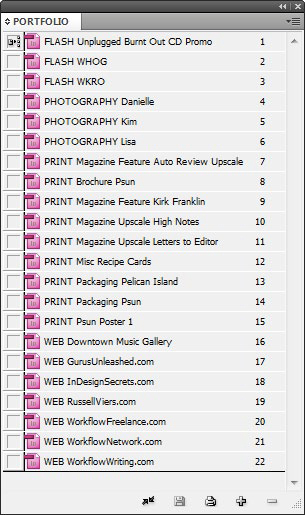
Figure 3: This book panel contains numerous documents. For more on using a book panel for efficient portfolio customization and output, see “Create On-the-Fly, Adaptive Portfolios with Multiple Page Sizes” in the October/ November 2009 issue of InDesign Magazine (#32).
- If your documents are out of order, drag each one up or down in the book panel itself. There may be a slight delay afterward as InDesign repaginates the joined document.
- If the page numbering isn’t how you want it, select a document and use the Document Page Numbering commands from the book panel’s flyout menu.
- Now output your book. There are commands on the panel’s flyout menu to send the entire book (or selected portions of it) to print, ePUB, and PDF (print or interactive). You can also package the book, which packages the files comprising the book and their respective assets.
Method 4. Move Pages Dialog
Scenario: You have one or more pages inside Document A that you want to add to Document B quickly and efficiently.
Caveats: If the page sizes and/or orientations differ between Document A and Document B, InDesign will alert you but will still perform the copy or move. The result varies with the version of InDesign. CS5 and later, which supports multiple page sizes and orientations natively, will faithfully copy the pages from Document A to Document B, preserving the page sizes and orientations of the copied or moved pages. InDesign CS4 and earlier will resize the source (Document A) pages to match the pages already in the destination (Document B). Objects on the pages will not be resized or re-arranged; instead, they will land on the destination pages at the same sizes and positions as in the source, even if that means they don’t fill the pages or extend off the destination pages and into the pasteboard. Open both Document A and Document B in InDesign.
How-To:
-
- Within Document A, choose the Move Pages command from either the Layout > Pages menu or from the Pages panel fly-out menu.
- In the resulting Move Pages dialog (Figure 4) enter the page number(s) of the page(s) to copy. (Although it’s not titled the Copy Pages dialog, that’s what it’s going to do.) You can enter a single page number in the Move Pages field, a range of pages separated by a hyphen (e.g., “1-6”), non-sequential pages separated by commas (e.g., “1,3,5”), or a combination of both (e.g., “1-6, 10-16”). You can even re-order the pages so they’ll wind up in the destination document in a different order than they appear in the source document. To do that, enter the page numbers in the new order; for example, “5,3,1,16,10.” Note that all these pages numbers must match the actual page numbers in the document; if your document starts on page 47, then the second page will be 48. To type absolute numbers, such as “the second page,” type a + symbol before it, such as “+2” (without the quotes).
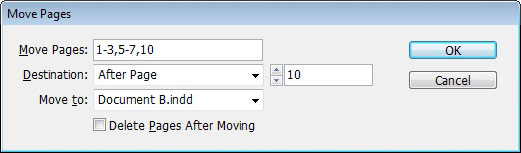
Figure 4: Use the Move Pages dialog to copy several pages from one document into another. Click on image for larger view.
- Skip down to the Move To field and choose Document B, the destination document.
- Back in the Destination field, choose where in Document B you want the pages to land: at the beginning before all other pages, at the end of Document B, or before or after a specific page number. If you choose Before Page or After Page, enter the respective page number in the unlabeled field to the right.
- Toggle between Move Pages and Copy Pages via the Delete Pages After Mov¬ing checkbox at the bottom of the Move Pages dialog. Activating Delete Pages After Moving will move the pages from Document A to Document B. Leaving the option in its default unchecked state copies the pages from Document A to Document B.
- When you click OK the page copy (or move) will occur.
Method 5. Drag & Drop Pages
Scenario: You have one or more pages inside Document A that you want to copy to Document B quickly and efficiently. Those pages must be copied in order but don’t necessarily have to be consecutive; for example, you want to copy Document A’s 1, 4, and 8 pages such that they become pages 1, 2, and 3 in Document B.
Caveat: If the page sizes and/or orientations differ between Document A and Document B, InDesign will alert you but will still perform the copy. For the results, see the caveats in Method 4.
How-To:
-
- Open both Document A and Document B in InDesign.
- CS4, CS5, and later: From the Arrange Documents menu button on the Ap¬plication Bar, choose any arrangement other than Consolidate All so that Document A and Document B are onscreen together. CS3: Select Tile Vertically or Tile Horizontally from the Window > Arrange menu.
- Ensure that Document A, the source, is the active document window. Open the Pages panel.
- In the Pages panel, select the pages you want to copy. They can be sequential or non-sequential, as you prefer.
- Click on one of the selected page thumbnails and drag it from the Pages panel over to Document B’s open window. Now drop (Figure 5). You’ll see all the selected page thumbnails appear in Document B.
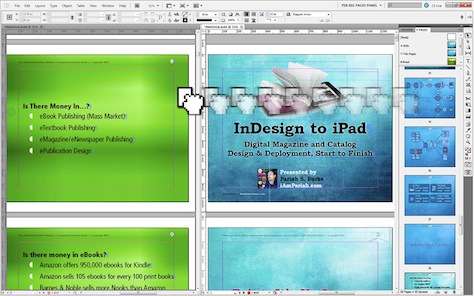
Figure 5: Dragging pages from the Pages panel in Document A (right) and dropping them in Document B (left) copies those pages to Document B.
- The Insert Pages dialog will appear. From the Insert menu, choose to copy the selected (and dragged and dropped) pages at the start or end of Document B, or before or after a specific page number. Again, if you want to put them before or after a specific page number, you’ll have to enter that page number in the field to the right.
- If you want to move the pages, adding them to Document B while simultaneously removing them from Document A, check the box beside Delete Pages After Inserting. Click OK and your selected pages will become part of Document B.
Method 6. Snippets
Scenario: You want to make some or all of the content of a single page readily accessible to be copied into other documents.
Caveats: Much too labor-intensive a Method for copying more than a single page. Will break text threading if one or more stories flow outside the selected frames.
How-To:
-
- Open the source document, Document A.
- Resize InDesign and/or the document window so that you can at the same time see your desktop or an Explorer or Finder window.
- Ensure that all the objects you want to copy are individually unlocked, not on locked layers, and are not master page items yet to be overridden.
- Use the keyboard shortcut CTRL+A/ CMD+A for Select All, or drag the black arrow Selection tool such that a selection rectangle touches all the objects you want to select (and thus copy).
- Drag the selected objects out of InDesign and drop them onto your desktop or an Explorer or Finder window. The objects — grouped or not — will become a single IDMS file, an InDesign snippet (Figure 6). Rather than dragging-and-dropping, you could use File > Export, which lets you save the snippet anywhere via a standard Export dialog box. Just remember to choose InDesign Snippet from the Save as Type or Format dropdown menu in the Export dialog.
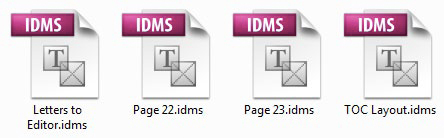
Figure 6: These snippet files contain InDesign objects — full pages of objects in this case are ready to be dragged into any open InDesign document.
- To add the snippet content to any other InDesign document (or to another place in the same document), simply drag the IDMS file from your desktop or folder and drop it onto an opened document in In-Design. You can also choose File > Place and select the snippet file from the Place dialog box. All of the objects will become a native part of the document, un-associated with the snippet.
- For even greater efficiency, rename the snippet file to reflect its content (e.g., “book front matter objects.idms” or “letters to editor page geometry.idms”). You can even share the snippet with others, although they’ll need access to any assets linked to from within the snippet.
Method 7. Library
Scenario: You want to make some or all of the content of a single page readily accessible to be copied into other documents, and you want to do so without creating a bunch of IDMS snippet files.
Caveats: Will break text threading if one or more stories flow outside the frames you’ve selected.
How-To:
-
- Choose New > Library.
- You’ll immediately be prompted to save the new INDL library file, so give it a name (preferably something other than the default “Library.indl”) and save it in or near the same folder containing the INDDs whose elements you want to combine.
- Now you have a new library panel with a title that matches the INDL that you just saved in the previous step.
- Make sure all the objects you want to copy are individually unlocked, not on locked layers, and are not master page items yet to be overridden.
- Using the black arrow Selection tool, select the object or objects you want to copy to Document B (and any other documents).
- Drag the selected object(s) into the library panel and drop. All of the objects, grouped or not, will become a single library entry named “Untitled” (Figure 7).
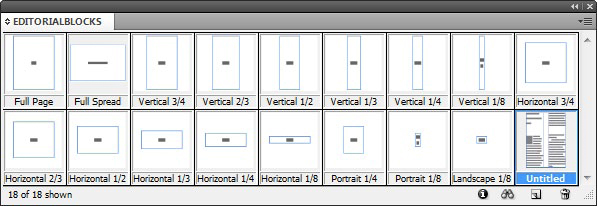
Figure 7: The new “Untitled” object added to a library that contains many pages and page components ready for dragging into other InDesign documents. Click on image for larger view.
Alternatively, you can choose from the library panel flyout menu the commands Add Items or Add Items as Separate Objects (if you want each item to be added as an individual library item).
- In the Library panel, double-click the “Untitled” library item to open the Item Information dialog box.
- Give the item a meaningful name in the Item Name field and, optionally, a longer description in the field at the bottom.
- In the middle of the Item Information dialog box, the Object Type dropdown menu lets you choose what type of object(s) you’ve added to the library. If it’s the entire content of a page, choose Page. Otherwise, select the appropriate object type.
- Switch to Document B. The library panel will remain in view.
- Drag the object you want to copy out of the library panel and drop it into the correct location in Document B, and then reposition as necessary.
Method 8. PDF It
Scenario: You have a finished multi-page InDesign document, and you want to place all or some of those pages into one or more other InDesign documents.
Caveats: This Method requires an intermediary format — PDF — and to make changes to the content of the placed pages you must make them in the original source INDD, export again to PDF, and update the linked PDF inside the destination document. This Method should be used only with source documents whose content is not expected to change. Not well-suited for mismatched page sizes between the source and destination documents.
How-To:
-
- Open Document A, the source. If the source pages you want are spread across multiple INDDs, first combine all of those documents into a book (see “Method 3: Book Them”).
- For single documents, choose File > Export. In the Export dialog, select Adobe PDF (Print) from the Save As Type dropdown menu; click Save.
- For book panel-managed documents, make sure that no files are selected in the book panel, and then choose Export Book to PDF from the panel’s flyout menu. Set the Save As Type drop-down menu to Adobe PDF (Print) and click Save.
- When the Export Adobe PDF dialog appears, set your options appropriately. Typically, you want to use the highest quality settings possible (the Press Quality preset or similar custom options). Click Export to create the PDF.
- In Document B, choose File > Place and navigate to the PDF you created from Document A. Before clicking the Open button, make sure that the checkbox beside Show Import Options is checked.
- If Show Import Options was selected during place, the Place PDF import options dialog will appear (Figure 8). In that dialog, on its General pane, you may import only the previewed page (which is the one shown on the left and may be changed with the navigation arrows beneath the preview itself); all pages in the PDF (which will place as individual graphic frames); or a range of pages.

Figure 8: The Place PDF options dialog enables you to place any or all pages in a PDF into an InDesign document. Click on image for larger view.
- In the section below pages, choose how the incoming PDF pages should be cropped. If the source InDesign document contained bleed and/or slug areas, and you sent those to the PDF in the Export Adobe PDF options, then those options are in the Crop To dropdown. Media is the equivalent of the source document’s paper size, which is typically the same as the Crop value unless the PDF contains actual crop marks. The Bounding Box options refer to the space taken up by actual objects on the page in the PDF and source INDD. If the page sizes of your source and destination documents match, choose Media in the Crop To field as that will make perfect alignment of placed art to actual page easy. If page sizes differ, you might want to choose a Bounding Box option.
- Activate the Transparent Background option if you want to see Document B’s master page items or background objects behind the content of the incoming PDF page.
- When you click OK, you’ll have a loaded cursor. Each page of a multi-page PDF will be placed as a separate graphic (all linked to the same PDF), so place those pages one after the other, on sequential InDesign document pages, just as if you were placing multiple independent graphics during a multi-place operation.
Method 9. Place indd Pages
Scenario: You have a multi-page InDesign document and you want to place all or some of those pages into one or more other InDesign documents without intermediary formats or export steps. The source document content may or may not be finalized.
Caveat: Primarily suited for matching page sizes (or at least scales) between the source and destination documents.
How-To:
-
- Open Document B, the destination. Do not open Document A, the source.
- In Document B, choose File > Place and navigate to Document A — yes, the INDD itself. Select that document. Before clicking the Open button, click the Show Import Options checkbox.
- The Place InDesign Document import options dialog will appear (Figure 9). On that dialog’s General pane, you may elect to import only the previewed page (the one on the left, which you can change with the navigation arrows beneath the preview); all pages in Document A (which will place as individual graphic frames); or a range of pages. Set the option that’s appropriate for your needs.

Figure 9: In the Place InDesign Document options dialog, you can insert any or all pages of another InDesign document. InDesign treats the placed pages like graphics that are linked to, and updated along with, the original INDD document. Click on image for larger view.
- Below the section Pages, the Options section contains only one option: the Crop To dropdown menu. It has three options: Page Bounding Box, which crops the incoming pages to the size of their pages in Document A; Bleed Bounding Box; and Slug Bounding Box, which crops the incoming pages to those respective structures if Document A contains bleed guides or a slug area.
- When you click OK, you’ll have a loaded cursor. Each page of a multi-page INDD will be placed as a separate graphic (all linked to the same original INDD), so place those pages one after the other, on sequential pages, just as if you were placing multiple independent graphics during a multi-place operation.
- To make changes to the placed pages, edit Document A, the original INDD, and then update linked files in Document B. Note that this Method enables two designers to work in Document A and Document B concurrently.
TIP: You can also go the other way, breaking up one InDesign document into multiple documents using Automatication’s LayoutZone add-on to convert selected elements of a page into a separate INDD and replace the selected elements with the place external INDD version of them. You can download LayoutZone free here.
Method 10. Interleave Files
Scenario: You have two InDesign documents of equal page count that need to be combined. The first document contains all the odd numbered pages while the second contains all the even numbered pages. These sorts of documents can result from placing multi-page PDFs that were non-duplex scans of two-sided printouts.
Caveat: This Method doesn’t work with CS3, and the author of the below script warns that continued functionality with future versions of InDesign is not guaranteed.
How-To:
- Close InDesign.
- Open a text editor application such as Windows Notepad or Mac OSX’s TextEdit.
- Download the file “InterleaveDocs” from here. Copy the downloaded code from the file and paste it into your text editor.
- Save the file as InterleaveDocs.jsx, a JavaScript file, into InDesign’s User Scripts folder. The location of that folder varies by operating system and version of InDesign.
• Mac OSX: Users/username/Library/ Preferences/Adobe InDesign/Version number/en_US/Scripts/Scripts Panel/
• Windows 7/Vista: Usersusername AppDataRoamingAdobeInDesign Version numberen_USScriptsScripts Panel
• Windows XP/2000: Documents and SettingsusernameApplication Data AdobeInDesignVersion numberen_US ScriptsScripts Panel
- Open the two InDesign documents, which I’ll call Document Odd and Document Even.
- Open the Scripts panel inside InDesign by choosing Window > Utilities > Scripts (CS5/CS5.5) or Window > Automation > Scripts (CS3 & CS4).
- On the Scripts panel, open the User folder where you should see InterleaveDocs. jsx listed (Figure 10). Double-click the script to execute it, whereupon a new document will be created that combines the pages from Document Odd and Document Even, interleaved — one after another, like well shuffled playing cards.
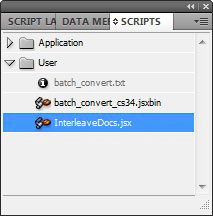
Figure 10: Once InterleaveDocs.jsx has been installed in the correct folder, it appears on the Scripts panel ready to run.
- Ensure that pages were combined in the correct order, and rearrange them if needed.
The above script was written by InDesign scripting genius Dave Saunders per a request in the Adobe forums. (The original post is here: https://forums.adobe.com/ message/1108150#1108150).
There you have it — numerous ways to copy pages — even whole InDesign documents — from one layout to another.
This article was last modified on May 8, 2024
This article was first published on April 11, 2012
Commenting is easier and faster when you're logged in!

Recommended for you

Corbis Enhances Creative Imagery with Host of New Image Partners
Corbis today announced that it is adding more than 10 new collections partners i...

Illustrator Downloadable: Summer Citrus Pattern Set
Add some zing and zest to your next design with these tasty patterns, symbols, a...

InDesign How-To: Switch Custom Workspaces Quickly
See how to set up a keyboard shortcut to jump between workspaces and quickly acc...